A blog devoted to the cards I make in my tiny upstairs space. When my sister stays there, she calls it an "artist's garret". I'm not an artist, but am an enthusiastic cardmaker - hence the title "Cardmaker's Garret".
___________________________________________________________________________________________

Tuesday 31 October 2017

Wooden Snowflake and a Horse

The new Christmas Card Throwdown challenge is to use canvas or wood.


I have a bit of a stash of wooden snowflakes so thought this was a good opportunity to use one.  I need a few horse-themed Christmas cards and thought a wooden snowflake kind of went well with the outdoors / country idea of a horse.


I splattered some liquid frisket on watercolour paper and stamped my horse and the evergreen trees.  I used a brown ink for the horse that is close in colour to the wooden snowflake.  After stamping him, I took a waterbrush and the same ink and filled in the rest of the horse's body

Then I tore a rough edge out of scrap paper to mask the snow line, and did a loose watercolour wash for the sky.  I added the simple sentiment at the bottom and the wooden snowflake at the top.  When I rubbed off the liquid frisket, the snow was revealed.

I used a brown cardbase - in real life, it tones in better with the brown of the horse and snowflake.

Thanks for stopping by today!


Supplies:
Stamps - Local King Rubber Stamp mustang, Tim Holtz trees, Penny Black sentiment
Ink - Memento Cottage Ivy, Archival Potting Soil
Paper - watercolour paper, brown cs
Size - A2
Accessories - liquid frisket, blue watercolour paint, wooden snowflake


Monday 30 October 2017

A Card for a Painter

The wonderful Karen Dunbrook (of the Snippets blog) is hosting this week's Technique Lovers' Challenge at Splitcoaststampers - "Splash Watercolour".   She's included the video tutorial (see here) by the equally wonderful Loll Thompson (of Stamping with Loll) on how to do the technique.

I first learned it from Loll using regular Distress inks but it is equally fabulous but slightly different with Distress Oxide inks as I used here.


I made the card with a particular friend in mind - when she retired she decided to learn to paint using oil paints. She took several classes and has become really good - so good that I've bought two of her paintings for my house. I wanted to capture her favourite colours so used the three colours of Oxide inks closest to them for my Splash Watercolour background.

As Karen says in the challenge, it creates a perfect background for stamping on. I put the stamps in my MISTI so that I could restamp a couple of times to get a good dark impression.

To finish it off, I die cut the panel and some black cardstock with the layering rectangle dies and mounted it on a piece of fun foam.

Karen's SCS challenge inspired Loll to run a mini challenge over at her blog (with a small prize for the winner).  Loll's challenge is open for one week only, whereas the SCS challenges have no deadlines.  If you make a card, be sure to link up in both places!


Supplies:
Stamps - Viva Las Vegas jar of brushes, Impression Obsession sentiment
Ink - Ranger Archival Jet Black, Distress Oxide (Cracked Pistachio, Fossilized Amber, and Broken China)
Paper - watercolour paper, white and black cs
Size - A2
Accessories - fun foam, Spellbinders layering rectangle dies


Sunday 29 October 2017

An Old Layering Stamp Set

The current Less is More challenge is stamp layering.


One of the very first stamp sets I ever bought was designed for layering (though not the way some of the newer ones are where you build up the image).  I still love this old set and it is great for CAS cards.


One of the things that got me hooked on stamping was heat embossing and when I saw the SU set "Solemn Stillness" and the way you could heat emboss the swirly stamp on top of the tree, I had to have that set. I probably got it 10 years ago!

I used it in a very straightforward way - stamped the base tree in green and heat embossed the swirly stamp on top of it in gold.

I love the sentiment that comes with the set so added it below.

It's bordered in gold with a few gold stars scattered about.


Supplies:
Stamps - SU Solemn Stillness
Ink - Memento Cottage Ivy and Tuxedo Black, ColorBox Gold
Paper - white and gold cs
Size - A2
Accessories - gold embossing powder, tiny star punch, Nesties matting basics dies


Saturday 28 October 2017

Jingle Belles Pup

The new Jingle Belles Christmas card challenge is "Not a Creature Was Stirring" - use an animal on your Christmas card.

I chose a sweet Penny Black pup, all dressed up for winter in a Christmas scarf.


I watercoloured the dog to keep it paler so that I could have nice contrast with the bright scarf that I coloured with markers. It's bordered with a scrap of dp.


Supplies:
Stamps - Penny Black
Ink - Memento Tuxedo Black
Paper - white cs, unknown dp
Size - 4.75" square
Accessories - watercolour paints, markers


Wednesday 25 October 2017

Merry Monday Gifts

This week's Merry Monday challenge is "Gifts".


I pulled out my stamp of a sweet parade of pups wearing their Santa hats and carrying gifts.


I stamped, coloured with coloured pencils, bordered with red, and a bit of Wink of Stella on the ruff and pompoms of the hats (sorry, the sparkle and shimmer it gives doesn't show in the photo).

The dog in the lead is coloured in black and grey like my old dog Will, and then the goofy young one bringing up the rear is coloured like my young pup Tessa.  It kind of suits them -   Will, the wise steady old fellow, leading all the others, and crazy playful Tessa getting distracted by something and then having to gallop along to catch up!

Here's a recent photo of the two of them:


Thanks for stopping by today!


Supplies:
Stamps - Penny Black dogs
Ink - Memento Tuxedo Black
Paper - red and white cs
Size - A2
Accessories - SU sentiment tags, coloured pencils, Wink of Stella


Tuesday 17 October 2017

Pink Poinsettia

Over at the Jingle Belles Christmas card challenge, it's time for "Pink Christmas".


I'd like to encourage you to participate!  The first ♥JINGLE BELLES♥ theme of each October is devoted to making pink holiday cards as part of Breast Cancer Awareness Month, and, for each card that gets linked up, Stephanie and Lauren (they run Jingle Belles) each donate two dollars to the Breast Cancer Research Foundation.

Here's my card:


I stamped and heat embossed in platinum, then watercoloured the poinsettia with a couple of shades of pink Zig markers.  I wanted to match the platinum embossing powder for a splatter so mixed a bit of Brushed Pewter and Antique Linen Distress paints and splattered.  I inset the panel into a platinum silver frame and filled the centre of the poinsettia with silver gemstones.

Thanks for stopping by to look, and please think about joining in over at Jingle Belles for Breast Cancer Awareness Month.


Supplies:
Stamps - Penny Black poinsettia, Rubber Soul sentiment
Ink - Versamark
Paper - white and platinum silver cs, mixed media
Size - 4.75" square
Accessories - platinum embossing powder, Zig markers, Brushed Pewter and Antique Linen Distress paints, silver gemstones


Monday 16 October 2017

The Last of the Fall Leaves

Time to remind you that you only have until October 24 to enter your card in the CAS Watercolour challenge:


And don't forget, it's our first birthday celebration:


And we have prizes in honour of it:

$25 Gift Certificate to Simon Says Stamp for Challenge Winner
&
$25 Gift Certificate to Simon Says Stamp for one random draw of all entries
 (must follow rules to be eligible for prizes)

Here's my reminder card:


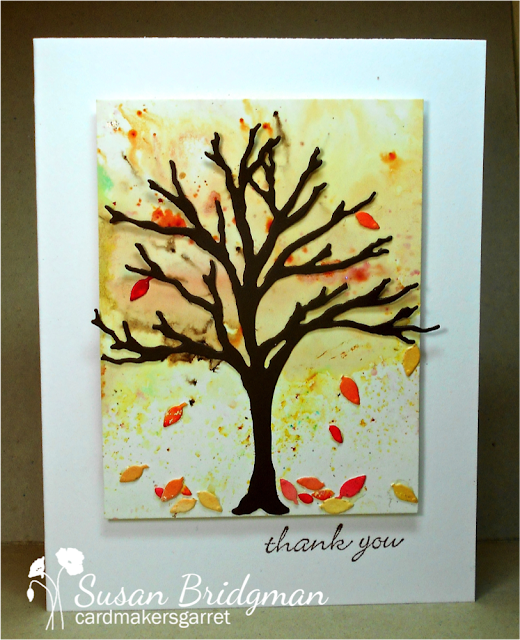
I started by sprinkling a piece of coated cs with yellow and orange brushos and spritzing with water.   I die cut a bare-branched tree out of brown cs and glued it to this background.

Then I used the same brushos and technique on a scrap of watercolour paper.  Out of it, I die cut some little sprigs of leaves and snipped the leaves from their branches.  I glued a few leaves to the tree and glued the rest falling to the ground.

I mounted the panel on fun foam and added a sentiment underneath.  I made the card for my friend who invited me for Thanksgiving dinner.

Please head over to CAS Watercolour to see the mid-month inspiration from our Design Team and the October Guest Designer, Marcia of Marcia's Stampin Pad.


Supplies:
Stamps - Memory Box sentiment
Ink - Memento Rich Cocoa
Paper - white and brown cs, coated cs
Size - A2
Accessories - yellow and orange Brushos, Impression Obsession Bare Tree die, Ali Express tiny leaf sprig die, fun foam


Sunday 15 October 2017

Stars for Peace

Mid-month reminder time for CAS Mix Up!


I did something quite different to my first Design Team CAS Mix Up card (see here).


Instead of just layering of whole bunch of stencils on top of each other with ink, I started with a "Peace in a Star" stencil that Loll Thompson made for me on her Silhouette.  It looks like a die cut on the card, but is actually a stencil made out of acetate.  I added little bits of removable glue runner to hold it on the cs, then using a Clarity brush, I went over it with Distress Oxide Antique Linen and Fossilized Amber.

I left it in place and laid the Simon Says Stamp "Falling Stars" (the small stars) stencil over top of it and went over it with a finger dauber and Delicata Golden Glitz ink.

I removed the "Falling Stars" stencil and replaced it with the TCW "Random Stars" (the three larger stars) stencil and chose three strategically place stars and put Dreamweaver Gold embossing paste through them.  I removed it and the "Peace in a Star" stencil and let everything dry.  Once dry, I stamped "on earth" below the star (masking off the word "peace" on the stamp).

Trimmed the panel and popped it up on fun foam.

I have stamping, stencil layering, and for my choice, embossing paste.

Please come and join us at CAS Mix Up - you have until October 24th.


Supplies:
Stamps - "on earth" - part of Tim Holtz "peace on earth" stamp
Ink - Delicata Golden Glitz, Distress Oxide Antique Linen and Fossilized Amber
Paper - whtie cs
Size - 5.25" square
Accessories - TCW Random Stars stencil, Simon Says Stamp Falling Stars stencil, homemade "Peace in a Star" stencil, Dreamweaver Gold embossing paste, fun foam


Friday 13 October 2017

Favourite Stamps

Addicted to CAS used a code word for their challenge:


I had a very hard time choosing my favourite, but in the end went with a stamp of an English Cocker Spaniel (the breed of my dogs, and since they are my favourite little furry beings, I thought a stamp of them should be my favourite stamp).


Here's the two of them:


I stamped them in inks representing their colours and fussy cut them.  Then grounded them by stamping the sentiment below and added a bit of faint stenciling behind them for interest.

I'm giving the card to friends who are going to look after them when I'm away.


Supplies:
Stamps -
Ink -
Paper -
Size -
Accessories -


Thursday 12 October 2017

Delphiniums are My Favourite Flower

This month's Flower Challenge is "Use Your Favorite Flower".  And it's their first birthday!  Happy Birthday to all of you who run it and on the Design Team!


Delphiniums are my favourite flower.  What I love about them are the tall spire shape of the flowers and all the lovely shades of blue, mauve, and purple that they come in.  I made a card using a combination of a delphinium die and stencil.


I stamped my sentiment on a piece of cs and then die cut it with the stitched rectangle and the Delphinium Circle dies.  If you don't know the Delphinium Circle die, it looks like this:


I created a background for the opening with two different blue sprays.  When I laid the die cut piece over it, it needed something more on the background so I took the Delphinium stencil and lightly sponged the flowers with Distress inks over the spray.   You can see how they fill in that centre gap in the die cut.

I then took the same colours of Distress inks and coloured the delphiniums of the die cut, making sure they came out more strongly coloured.  I went over just those ones with Wink of Stella.

The panel is popped up on a very thin layer of fun foam and the die cut delphiniums with thin foam tape.

Thanks for stopping by today.


Supplies:
Stamps - SU sentiment
Ink - Memento Tuxedo Black, Distress inks (Faded Jeans, Salty Ocean, Seedless Preserves, Dusty Concord, Shaded Lilac)
Paper - white cs
Size - A2
Accessories - Memory Box Delphinium Circle die and Delphinium stencil, Lil Inkers Stitched Rectangle die, Mr. Huey Powder Blue spray, Glimmer Mist Glacier spray, Wink of Stella, fun foam, foam tape


Wednesday 11 October 2017

Variation on Oak and Aspen

I had some extra oak and aspen leaves left from this card that I made as my Design Team card for CAS Watercolour.


So I made a slightly less CAS version of my earlier card.


The leaves were done at the same time as the earlier card - putting the stamps in my MISTI,  dabbing Distress stains onto the stamps, then spritzing with water before stamping onto watercolour paper.  I was really pleased with the way the colours blended.  For the aspen leaf, I used Wild Honey and Rusty Hinge, and for the oak leaf, Rusty Hinge and Tea Dye.   When dry, I fussy cut them.

I did a watercolour wash on a rectangle of watercolour paper, stamped the sentiment on it, glued the stems of the leaves down and rolled up some tape under the rest of the leaves to give them a bit of a free-floating look, and wrapped some twine around the top.   I popped the panel up on fun foam.

Please come and join us at CAS Watercolour.  It's our first birthday, and in celebration, we're giving out some prizes this month.


Supplies:
Stamps - SU French Foliage, unknown sentiment
Ink - SU Baked Brown Sugar
Paper - PTI Vintage Cream cs, watercolour paper
Size - A2
Accessories - Distress Stains (Rusty Hinge, Tea Dye, Wild Honey), watercolour paints, twine, fun foam


Monday 9 October 2017

Hot and Spicy Christmas Card

The new Less is More challenge is to use hot and spicy colours:


I wanted to try and get some nice red backgrounds made for Christmas cards so sprinkled some red and orange brushos on mixed media cs and spritzed with water and then created this card:


I stamped my bird  / holly / text stamp onto a nice bright section of it and heat embossed.  I diluted a bit of red brusho on my palette and painted the bird to intensify its colour.

I trimmed the piece, popped it up on fun foam, bordered with a stitched square, and added gold gemstones to the holly berries.

I've still got a nice piece of background to use for another card.


Supplies:
Stamps - Memory Box Scripted Holly Bird
Ink - Versafine Onyx Black
Paper - white and mixed media cs
Size - 4.25" square
Accessories - red and orange brushos, clear embossing powder, gold gemstones, Lil Inker stitched square die, fun foam


Sunday 8 October 2017

Vintage Winter Sports

The new Christmas Card Throwdown challenge is "Winter Sports".  And the SCS Inspiration Challenge is to find inspiration at the Victorian Trading Company website.  It's a great website. I went through their Christmas section and found this image of skaters and this one of kids sledding and thought about a great stamp I have of old-fashioned winter sports.


I stamped it on the smooth side of watercolour paper, watercoloured parts of it, bordered it with black cs, popped it up on fun foam, and added a bit of fun flock to the pom pom and brim of the girl's hat.


Supplies:
Stamps - Inkadinkado
Ink - Ranger Archival Jet Black
Paper - watercolour paper, white and black cs
Size - A2
Accessories - Gansai Tambi watercolour paints, fun foam, fun flock


Saturday 7 October 2017

Brown for a Christmas Card?

I wasn't sure I'd make a card for the October Christmas Cards All Year Round challenge - "Monochromatic Browns".  But then I pulled out a vintage style stamp I'd never used and thought it could work well in brown.  Here it is:


I stamped it in my Misti using my Oxide ink - when I reinked some of the paler parts of the stamp, I seemed to get some colour variation in the final stamped image, but I think it only adds to the vintage look.

I then sponged around the edge using two shades of brown to make it look aged.

I attached a Tim Holtz Christmas token with a brad and popped the panel up on fun foam.

So what do you think?  Does brown work for a Christmas card?


Supplies:
Stamps - Deep Red Vintage Santa
Ink - Distress Oxide Vintage Photo, Distress Vintage Photo, Ranger Potting Soil
Paper - PTI Vintage Cream cs
Size - A2
Accessories - Tim Holtz Christmas token, metallic brad, fun foam


Friday 6 October 2017

Heat Embossed Poinsettias

The current Jingle Bells Christmas Card Challenge is "Embossing Around the Christmas Tree" - any kind of embossing.

Here's my card using heat embossing in black for the poinsettias:


I sprayed a background with three different colours of sprays. When dry, I stamped and heat embossed my poinsettia and sentiment in black.

I wanted the black border to really match the stamping so went around the edge of another square of cs with the same ink and then heat embossed it.

It's popped up on fun foam.


Supplies:
Stamps - Tim Holtz poinsettia, Rosie's Roadshow sentiment
Ink - Versafine Onyx Black 
Paper - white cs
Size - 4.75" square
Accessories - clear embossing powder; various red, pink and orange sprays; fun foam


Thursday 5 October 2017

Pup and Christmas Tree

This week's Merry Monday Christmas Card Challenge is to add a Christmas tree to our cards:


I love the little pup decorating his Christmas tree that I used for this card:


It's stamped, coloured with markers, bordered with a deckle edged red panel, and embellished with Glossy Accents on the ornaments.

I'm also taking it over to the Merry Christmas Challenge where it's anything goes as long as it's Christmas.


Supplies:
Stamps - Penny Black
Ink - Memento Tuxedo Black
Paper - white and red cs
Size - A2
Accessories - markers, Nesties deckled edged rectangle die, Glossy Accents


Wednesday 4 October 2017

NBUS Robin and Holly

Here's my third and final card for Darnell's NBUS challenge.


Darnell limits us to three entries - a good thing or she'd be swamped with entries.  I'm sure I could make a dozen cards using different NBUS things on each one - shame on me for having so much stuff I haven't used.  And for my three entries, I only thought about stamps - never got around to dies, stencils, embossing folders, sprays, inks.......

For this card, I used two Sheena Douglass stamps that came in the same set.


I stamped the holly first and then carefully positioned the robin so that he's perched on it.  I heat embossed both (and the sentiment) so that I could do wet-on-wet watercolour painting and have the embossed edges act as dams.

After watercolouring the robin and holly, I debated adding a sky or a wash around the image and decided I wanted to leave it completely plain - not even a bit of splatter.  What do you think?  Add a wash?  Add some splatter? 


Supplies:
Stamps - Sheena Douglass bird and holly, Paper Smooches sentiment
Ink - Versafine Onyx Black
Paper - red pre-made card base, mixed media cs
Size - 4.5" square
Accessories - clear embossing powder, Gansai Tambi watercolour paints, Nesties square die cut, fun foam