A blog devoted to the cards I make in my tiny upstairs space. When my sister stays there, she calls it an "artist's garret". I'm not an artist, but am an enthusiastic cardmaker - hence the title "Cardmaker's Garret".
___________________________________________________________________________________________
Showing posts with label gelli plate. Show all posts

Thursday, 3 September 2026

Sentiment Sticker with Snowflakes and the Sport of Show Jumping

First up for Jingle Belles - use Christmas stickers, whether images or sentiments.  The challenge reminded me that I have a lot of stick-on sentiments that I never use so pulled them out of a dusty drawer and used one on this card.

I used a round gelli plate, various snowflake stamps, and various shades of blue ink for the background.The gold snowflakes were stamped and heat embossed once the gelli plate print was dry.  I used a gold sentiment sticker to tie in to the gold snowflakes.  I must remember to use those stickers more often!

And then a non-Christmas card for The Sisterhood of Crafters "Sports".   I went with the sport of show jumping!

 
The image is by a well known British cartoonist, Thelwell, who did wonderful cartoons of very naughty ponies and small children.  
 
It's stamped and coloured with coloured pencils, and then I added Nuvo Crystal Glaze to the water the pony is about to jump into (or the child is going to fall into!).  I've stamped Happy Birthday inside it and I'm giving it to a good friend who is an avid rider.


Please Grab Our Badge!


Supplies for card 1:
Stamps - various snowflake stamps
Ink - gold and various blue inks
Paper - white cs
Size - A2
Accessories - gelli plate, gold embossing powder, gold sentiment sticker

Supplies for card 2:
Stamps - Isobel Craft Collection Thelwell stamps
Ink - Versafine Onyx Black
Paper - white and kraft cs
Size - 5.75x5"
Accessories - coloured pencils, Nuvo Crystal Glaze


Thursday, 26 June 2025

Gelli Plate Snowflakes and a Reindeer

I had my sister and brother-in-law visiting for 10 days and we were so busy that I had no time for crafting or writing blog posts.  My sister bought 14 of the Christmas cards I'd already made this year for my fundraiser in November.  Happy to get advance money for my fundraiser but it's depleted my supply for the sale (I aim to have 100 Christmas cards made for it!).  So I have to get busy and make more (be prepared for lots of posts with Christmas cards!).

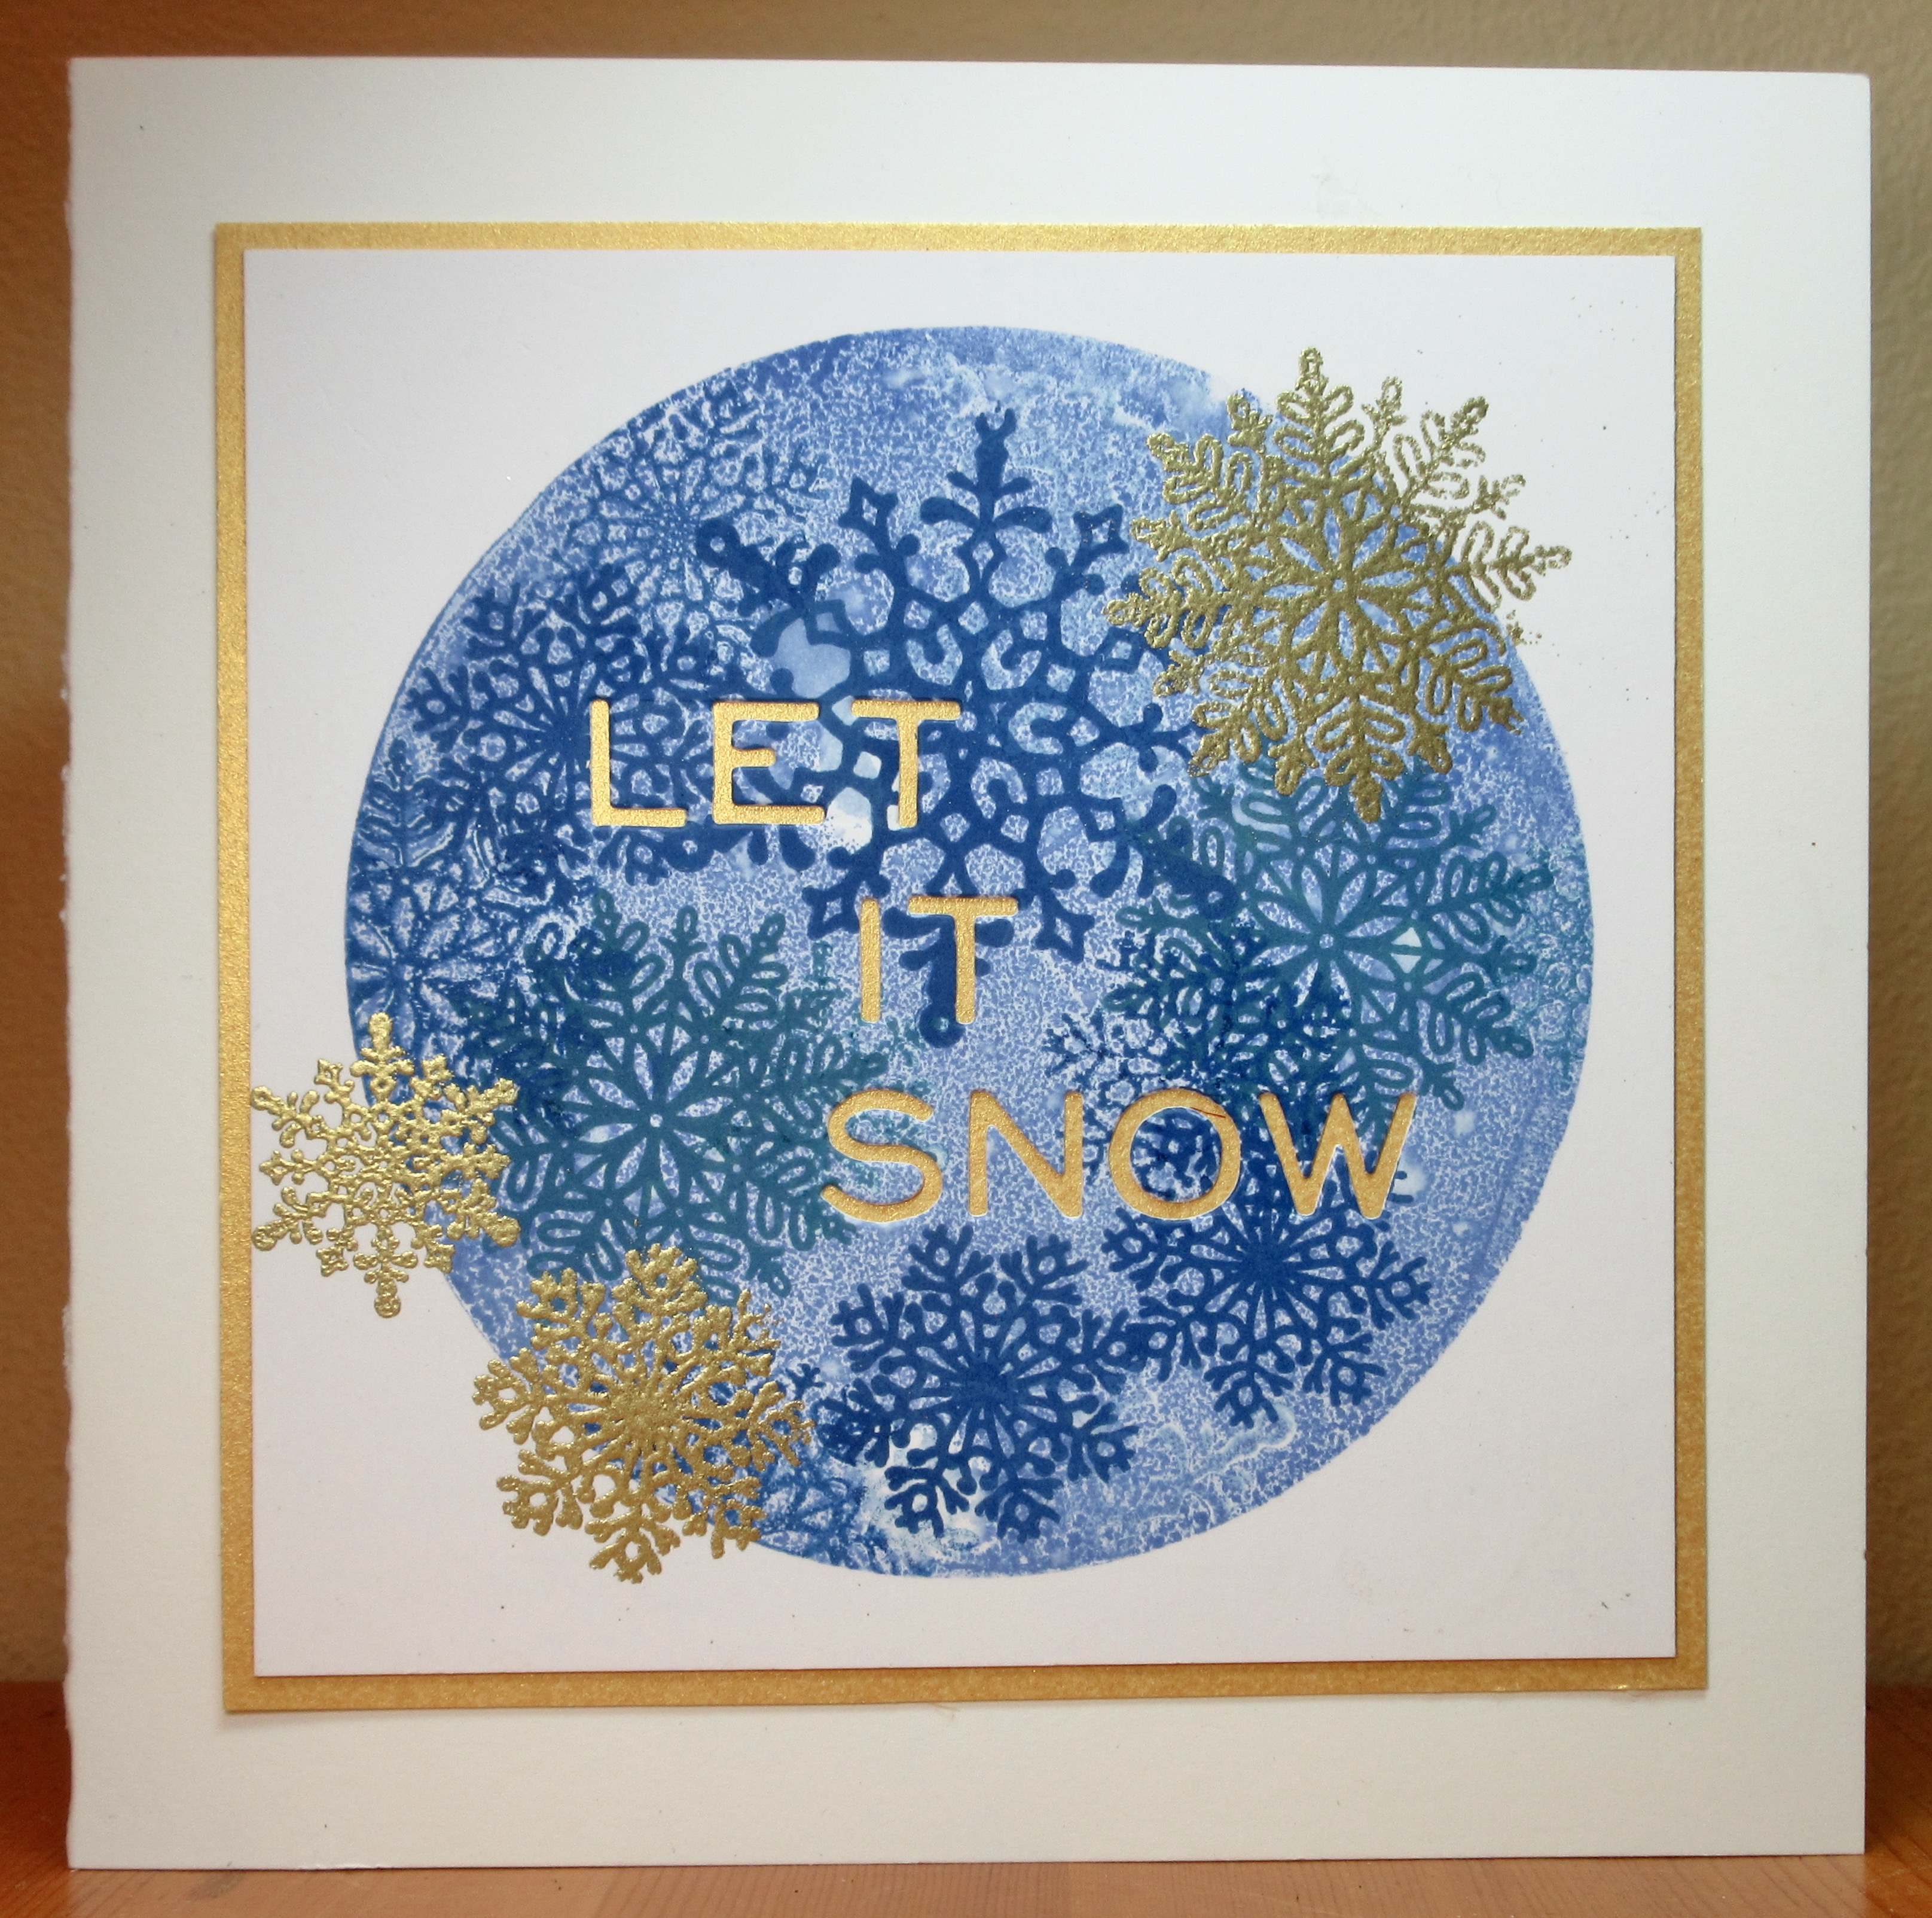
For The 12 Months of Christmas "One or Two Layers Only" and Colorful Options (blues from their mood board - see it at the end of my post).

The snowflake circle was done following the instructions on this video. I used a round gelli plate, various snowflake stamps, and various shades of blue ink.  I trimmed the panel with a round die and popped it up on fun foam on a coloured card base.

For the above card, I left off the gold snowflakes seen in the video but on this second card made at the same time, I did add them:


I trimmed my piece into a square and die cut "let it snow" out of the blue section.  I mounted it on a slightly larger square of gold cs that both borders it and puts gold behind the sentiment.

I carefully kept all of the letters die cut from this second card, and glued them onto the first card. 

And one more card for the Sparkles Christmas Challenge (Include the Word "Merry").

I smooshed a background with various blue oxide inks and then stamped and heat embossed the reindeer.  Trimmed the panel, mounted it on off-white, and added a sentiment. 

   Please take a copy of our badge


Supplies for card 1 and 2:
Stamps - various snowflake stampes
Ink - various blues and a gold
Paper - white cs, dark aqua cs (card 1), gold cs (card 2)
Size - 4.75" square (card 1), 5.5" square (card  2)
Accessories - gold embossing powder, Let It Snow die, gelli plate, fun foam

Supplies for card 3:
Stamps - Studio Light reindeer, Rubber Soul sentiment
Ink - Versafine Onyx Black, blue Oxide inks
Paper - mixed media cs, off white cs
Size - A2
Accessories - clear embossing powder

Tuesday, 26 December 2023

Celebrations

For the Stencil Fun challenge "Christmas" and the Inkspirational challenge "Celebrate", I have this card:

I did the background with red and green acrylic paints and a poinsettia stencil on a gelli plate.  Trimmed it and topped it with the Merry Christmas sentiment frame die cut and bordered it with dark red cs.

My Time to Craft wants to see December or January holidays.  I have a Hanukkah card:

I sprinkled blue Brushos on mixed media cs, spritzed with water and let it run to make a free-form background. I stamped and heat embossed the sentiment, then trimmed the panel, popped it up on fun foam, and added the silver die cut Star of David.

LOVE to have you SHARE our BADGE   

My Time To Craft!
I hope you all had a good holiday, whatever one you celebrate!


Supplies for card 1:
Paper - mixed media, white, and dark red cs
Size - A2
Accessories - gelli plate, red and green acrylic paints, Imagination Crafts poinsettia stencil, Simon Says Stamp sentiment frame

Supplies for card 2:
Stamps - SU sentiment
Ink - ColorBox silver
Paper - white, mixed media, and silver cs
Size - A2
Accessories - PTI die, silver embossing powder, blue Brushos, fun foam

Monday, 18 December 2023

Three More Christmas Cards

There are still lots of Christmas challenges I want to link up to this month!

First of all, for Can You Handle the Pressure? "Dry Embossing with a Twist of Holly":

I used one of my very first embossing folders that has a swirly holly design.  It creates an ideal background for an older Penny Black stamp.  I inked it and the sentiment with a Kaleidacolor ink pad in various shades of green.  I popped the stamped panel up on fun foam and added red Stickles to the berries.

Second is a card for My Time to Craft Christmas "Elements Beginning with the Letter S".  I have snowflakes, Santa, and sleigh.

The background is a piece that I created when making a gelli plate print for a card I posted earlier (see this post for the earlier card).  I had a lot of blue acrylic paint left on the snowflake mask - before cleaning off the mask, I pressed it onto a piece of mixed media cs to use up the paint.  I added a die cut Santa and sleigh, and a narrow black border.

Lastly, for Festive Friday "Christmas Festive Food":

The challenge requires at least 3 things from their list - I have Christmas pudding, red, white, and brown.  The image is coloured with coloured pencils, trimmed with a Nordic frame, and bordered with dark red.

Please Grab Our Badge My Time To Craft Christmas!


Supplies for card 1:
Stamps - Penny Black Winter Bough, Make an Impression sentiment
Ink - Kaleidacolor Caribbean Sea
Paper - white cs
Size - A2
Accessories - Sizzix embossing folder, red Stickles, fun foam

Supplies for card 2:
Stamps - Penny Black sentiment
Ink - Versafine Clair Nocturne
Paper - mixed media cs, off white and black cs
Size - 6x3.25"
Accessories - Santa / sleigh die, blue acrylic paint, Memory Box snowflake mask

Supplies for card 3:
Stamps - unknown image, PB sentiment
Ink - black ink
Paper - white and red cs
Size - A2
Accessories - coloured pencils, The Greetery Nordic Frame die, fun foam, glossy accents

Saturday, 2 December 2023

Santa Flying Over Snowflakes

Peace on Earth has a lovely mood board (see below).  The Santa flying in his sleigh on the bottom right inspired me as did the colours and the snowy scene on the top left.

 
The background is a gelli plate done with blue acrylic paint and a snowflake mask.  The Santa and his reindeer are die cut from black cs twice and glued together for more substance.  The sentiment is white heat embossed on black and die cut with a banner die.
 
Please come and join us at Peace on Earth.  You can either be inspired by the mood board or make an "anything Christmas" card.


Supplies:
Stamps - Penny Black sentiment
Ink - ColorBox white
Paper - mixed media cs, off-white and black cs
Size - A2
Accessories - unknown Santa die, tag die cut, white embossing powder, Memory Box snowflake mask, blue acrylic paint

Saturday, 18 November 2023

Black Trees, Blue Sky

Peace on Earth has a lovely mood board of winter tree scenes.  I chose the top right image to inspire this card:


Rather than do a splattering of many tiny snowflakes, I did a few large snowflakes by using snowflakes masks on a gelli plate with a couple of shades of blue acrylic paint.  I die cut a line of evergreen trees twice out of black cs and glued them together for more dimension.  The sentiment is heat embossed in white on a banner die cut.

Here's the Peace on Earth mood board:


Please come and join us.  We'd love to see how you're inspired by the mood board (but if you're not, you can post an "anything Christmas" card.


Supplies:
Stamps - Rubber Soul sentiment
Ink - ColorBox white
Paper - mixed media cs, black and white cs
Size - 6x4.25"
Accessories - snowflake masks made on a cricut, evergreen tree die, white and various blue acrylic paints, stitched banner die, white embossing powder

Monday, 18 September 2023

Dogs and Flowers - Two of My Favourite Things

As most of you know, I love dogs.  And I'm a very keen gardener.  So today has a post featuring each.

For the My Time to Craft Challenge, the theme is dogs and / or cats.  I did a very CAS card that I will use as a Christmas card for a dog-loving friend.

The dog and sentiment are heat embossed with a champagne coloured embossing powder.  It's bordered with red and green glitter cs.

For the Flower Challenge "Use a Die", I went more mixed media.


I created a gelli plate background with acrylic paints, die cut a flower twice and glued them together for dimension, and also die cut a sentiment.  I added gold Stickles to the centres of the flowers.

My Time To Craft!


Supplies for card 1:
Stamps - Technique Junkies Cold Noses
Ink - Versafine Clair Fallen Leaves
Paper - white cs, red and green glitter cs
Size - A2
Accessories - Recollections Champagne embossing powder

Supplies for card 2:
Paper - mixed media cs, white cs
Size - A2
Accessories - acrylic paints, gelli plate, Memory Box Honeysuckle Blossom die, gold Stickles


Friday, 28 April 2023

Alcohol Inks on a Gelli Plate

Our Group of Seven Cardmakers' technique for this month is Alcohol Inks on a Gelli Plate.  See the Group of Seven post for full instructions.

 
I used a small round gelli plate and various blue and green alcohol inks.  I squirted them on the gelli plate, added blending solution to dilute them, and moved them around with my Tim Holtz air puffer.  I pressed regular white cardstock on top and pulled the print.

I stamped and heat embossed the wildflowers and sentiment on top, trimmed the panel, and popped it up on fun foam on a dry embossed background.

Using the same colours and more blending solution, I did a second print for this card:

I used different stamps but also heat embossed them.  Die cut it into a circle and popped it up on fun foam on the card base.

Head on over to Group of Seven to see more examples from the rest of the group and feel free to try it and link up your card.  It's not a challenge so we won't be moderating the entries.  But we'd love to see more examples using this technique.


Supplies for card 1:
Stamps - Magenta Lunaria Foliage, SSS sentiment
Ink - Versafine Clair Nocturne
Paper - white cs
Size - 5.5" square
Accessories - blue and green alcohol inks, blending solution, Spellbinders square dies, Nellie's Choice Writing embossing folder, clear embossing powder

Supplies for card 1:
Stamps - Magenta Thistle, PTI sentiment
Ink - Versafine Clair Nocturne
Paper - white cs
Size - 5" square
Accessories - blue and green alcohol inks, blending solution, clear embossing powder, Spellbinders circle die, fun foam


Tuesday, 6 December 2022

Embossed and Stencilled Snow

I live in Vancouver, Canada and we normally have mild rainy winters but we've already had two periods of extra cold snowy weather.  So this card is perfect for what I see when I look out my windows.


The background for the focal panel was done with blue acrylic paint and a dotted stencil on a gelli plate. I die cut the house / trees and stuck a small piece of gold cs behind the windows of the house, then stamped and heat embossed my sentiment on it, and bordered it with the same gold cs. I ran the card base through a dotted embossing folder.

Tic Tac Toe Challenge - I chose the top horizontal row of snow, stencil, tree.

Time Out Challenge - winter / holiday


Supplies:
Stamps - PB sentiment
Ink - ColorBox gold
Paper - white and gold cs
Size - A2
Accessories - gold embossing powder, Cuttlebug dotted embossing folder, blue acrylic paint, dotted stencil, house / tree die

Friday, 10 September 2021

Turquoise Background

The Flower Challenge is asking for turquoise this month.

I created a turquoise background with a bit of orange in it as those are one of my good friend's favourite colours and I'm a bit late getting a birthday card in the mail for her.

The background was made on a gelli plate with acrylic paints and a coffee rings stencil (the coffee rings are there but they are quite faint).

When dry, I added some script stencilling with embossing paste. And added a die cut white flower and a stamped sentiment on a banner.

The Flower Challenge


Supplies:
Stamps - SU sentiment
Ink - Memento Potters Clay
Paper - white and mixed media cs
Size - 4.75" square
Accessories - various blue and orange acrylic paints, coffee rings stencil, script stencil, embossing paste, Memory Box Honeyblossoms Sprig die

Wednesday, 28 April 2021

Dear You

The CASology challenge has a cue card that just says "dear".  I thought of the sentiment I used on this card:

I used a scrap of background from my box of backgrounds. It was done on a gelli plate with pale blue acrylic paint. I put it and the wildflower stamp in the MISTI and inked the wildflower in Distress Seedless Preserves, spritzed very lightly and stamped, then moved the cs over and stamped off very gently for a very pale second impression. Added the sentiment and some sequins and popped it up on fun foam.


CASology Challenge


Supplies:
Stamps - Red Lead Paperworks sentiment, Inkadinado Meadow wildflower
Ink - Distress Seedless Preserves, Archival Jet Black
Paper - mixed media and white cs
Size - A2
Accessories - pale blue acrylic paint, sequins, fun foam

Wednesday, 18 March 2020

Acrylic Paint and a Leaping Horse

CAS Mix Up is asking for "acrylic paint" this month.


I used a stamp that my dear friend and creator of this challenge gave to me as she knows I love horses.


I created a gelli plate background with pale blue acrylic paint and some streaks of copper Magicals.

I put it in my MISTI as I knew it would take a few reinkings to get the horse well-inked on all the solid parts of the image. Then I heat embossed it, added the sentiment, bordered with black, and popped up on fun foam.

Thanks for the fabulous stamp, Loll!  I'm sure my sister (who also loves horses) will love this birthday card!


Supplies:
Stamps - Visible Image horse, Tim Holtz sentiment
Ink - Versafine Onyx Black
Paper - mixed media cs, black and white cs
Size - 5.25" square
Accessories - blue acrylic paint, copper Magicals, embossing powder, fun foam