A blog devoted to the cards I make in my tiny upstairs space. When my sister stays there, she calls it an "artist's garret". I'm not an artist, but am an enthusiastic cardmaker - hence the title "Cardmaker's Garret".
___________________________________________________________________________________________
Showing posts with label mistletoe. Show all posts

Thursday, 2 July 2026

M is for Mistletoe

Christmas Cards All Year Round, wants something starting with "M" card.  I went with mistletoe - die cut, dry embossed, and a mistletoe sentiment.  It's also for the 52 Christmas Card Throwdown technique challenge "Embossing Folder".

I used a narrow mistletoe embossing folder across the lower part of the linen cs card base.  I die cut the mistletoe out of white shimmery cs and out of scrap cs and glued them together for more dimension.  And stamped the sentiment in grey ink.


Supplies:
Stamps - Penny Black sentiment
Ink - Versafine Smokey Grey
Paper - white linen cs, white shimmer cs
Size - A2
Accessories - narrow mistletoe embossing folder, mistletoe die


Thursday, 29 January 2026

Die Cut Heart and Three Little Robins

I make a few Valentine cards for my best friend each year.  Here's one for Shopping our Stash "Love Me Do" and Cut It Up "My Heart".

This card is perfect for the Cut It Up challenge as it uses nothing but die cuts.  I have this lovely swirly IO die with hearts in it so thought it would be perfect for the background. I die cut it in gold and added it to a cream card base. Then die cut a heart out of a scrap of Yupo coloured with red alcohol ink and gold foil pressed into the wet sections of the alcohol ink. The sentiment is inside as I thought it would spoil the look of the card if I put it on the outside.

And here's a Christmas card for the ABC Christmas Challenge "A is for Anything Christmas / B is for Bright" (it qualifies for both letters as I have the word "bright" in my sentiment), Christmas Cards All Year Round "Things Starting with A and / or B" (I have birds and the word "bright"), Sweet Stampin' "Bright and Beautiful" (my little birds are so bright and beautiful in their Santa hats, and I have the word "bright" in the sentiment), and AAA Cards Challenge (CASE Francesca's card - I have the same layout with three objects going across a narrow strip).

I had a leftover little strip embossed with a narrow mistletoe embossing folder and thought it would work with the AAA Card Challenge.  I used it to ground three little robins in Santa hats - stamped and watercoloured and fussy cut.  

Grab Our Badge!  Grab My Button   

  Grab our badge!  Sweet Stampin' Challenge Blog


Supplies for card 1:
Paper - cream and gold cs, scrap of yupo with alcohol inks and foil
Size - 4.75" square
Accessories - Memory Box heart die, Impression Obsession background die

Supplies for card 2:
Stamps - Penny Black birds, Art Impressions sentiment
Ink - Versafine Onyx Black
Paper - watercolour paper, white linen cs
Size - A2
Accessories - watercolour paints, narrow mistletoe embossing folder

Thursday, 28 August 2025

Embossing with Dies

The Group of Seven Cardmakers has changed its name to the Group of Cardmakers.  We're still doing the same thing - trying different techniques and products.  This month we're embossing with dies.  

My first two cards use the embossed die cut as a background pattern or almost a shadow for the actual die cut.

For this one I smooshed the actual die cut in green ink and then slightly offset it over the embossed die, making the embossed one appear to be a shadow.  I used red liquid pearls to create the berries and added a matching green sentiment.  The shape of the die made it ideal for a mini slimline card.

 
I went with a white-on-white look for this second one.  I trimmed the embossed die panel with a deckle die and added a sentiment in grey.  I die cut the mistletoe twice and glued them together for more dimension.  Then glued it over the background with it very much offset from the embossed pattern.  I finished off with using white liquid pearls for the berries.
 
This third card uses an embossed die to frame the image.  This is a great use for dies - I must remember to do it more often.
 
I stamped and coloured (with coloured pencils) the dog, then fussy cut it.  On my focal panel, I embossed with a postage stamp die and glued the dog's feet onto it and popped up his body and head with dimensionals.   I sketched a few lines under him to ground him.
 
Head over to Group of Cardmakers for some more ideas on embossing with dies and get more out of your supplies!
 
Group of Cardmakers badge  Please Help Us Spread the Word ... Sweet Stampin' Challenge Blog


Supplies for card 1:
Stamps - Make an Impression sentiment
Ink - Distress Bundled Sage
Paper - white cs
Size - 6x3.25"
Accessories - unknown berry die, red liquid pearls

Supplies for card 2:
Stamps - Penny Black sentiment
Ink - Versafine Smokey Grey
Paper - white cs
Size - A2
Accessories - unknown mistletoe die, Spellbinders deckle edge die, white liquid pearls

Supplies for card 3:
Stamps - Colorado Craft Co. (Anita Jeram)
Ink - Versafine Onyx Black
Paper - white cs
Size - A2
Accessories - coloured pencils, PB postage stamp die, dimensionals, tiny sentiment label die

Friday, 31 January 2025

Fussy Cut Snowman / Sprig of Mistletoe

52 Christmas Card Throwdown wants to see Fussy Cutting.  I fussy cut my favourite new snowman stamp.


I created the background by spritzing a panel of watercolour paper till quite wet, then dropping in various blue watercolour paints and spritzing some more to let them run together. When dry I stamped the pine branches at the top in green and the snowman in black. I stamped the snowman again on white cs, watercoloured him, and fussy cut him (except for his twig arms) and the snowy ground. The sentiment is die cut. I used white watercolour paint to splatter some snow, but it came out very faint so definitely not the best medium for splattered snow.

Christmas Cards All Year Round wants us to be inspired by a phrase or a word in the song The Christmas Song (Chestnuts Roasting on an Open Fire).  I was inspired by "some mistletoe helps to make the season bright".

I had great fun playing with a lot of mixed media products (quite out of my comfort zone) to create some backgrounds using some of the techniques in Jennifer McGuire's video "Background Magic".

On a large piece of heavy mixed media cs, I brayered different shades of blue ink and sprayed with some mica spray, stamped with a snowflakes background stamp in darker blue, stamped a few bits of tiny stars in gold, and stencilled some larger stars and snowflakes with grit paste. Then trimmed the panel into a few different pieces and used one of the pieces for this background.

I added a Lavinia word sticker (Mistletoe) and a mistletoe die cut (cut twice and glued together for more dimension. Then used my Liquid Pearls on the berries of the mistletoe.

Grab our badge!


Supplies for card 1:
Stamps - Tim Holtz Mr. Frostie, unknown pine branch stamps
Ink - various Distress green inks
Paper - watercolour paper, white cs
Size - A2
Accessories - watercolour paints, Essentials by Ellen merry die

Supplies for card 2:
Stamps - Mama Elephant sentiment, unknown tiny star stamp, unknown snowflake background stamp
Ink - various green and blue Distress inks, Ranger Archival Cobalt, Delicata gold
Paper - white and mixed media cs
Size - A2
Accessories - mistletoe die, white Liquid Pearls, Lavinia mistletoe sticker


Friday, 28 June 2024

Monochrome Christmas and Birthday

This month the Group of Seven Cardmakers chose Monochrome as the technique for our cards.  I opted to do Christmas cards to build up my stash.  The first card I made followed the method in this video.

I stamped and heat embossed the poinsettia in white on red cs, then added colour to the poinsettia with red coloured pencils.  I trimmed the panel, added a red glitter border, added it to a red card base, popped on a white heat embossed sentiment, and embellished with clear gemstones in the centre.

Next up, shades of green:

For this card, I put the stamp in my MISTI and coloured it directly on the stamp with Memento Dew Drop ink pads, stamping and reinking until I was happy with the results.  Trimmed it, mounted it on a dark green card base, and added sparkly embellishments on the berries and a green bow on top of the stems.

And I had to get some blue in here so my third card is all shades of blue, and will go off to my sister in Ontario for her birthday.


I sprayed the background with various blue sprays, then die cut the hexagon out of it in three places.  I stamped various script and postmark stamps on the hexagon pieces I'd cut, and sponged around their edges.  I then cut hexagons again from scrap cs - put the scrap ones in first and then the sprayed and stamped ones on top for some dimension.  I created a piece of smooshed blue and die cut the wildflowers, sentiment, and tiny butterflies from that.    

There are lots of ways to make monochromatic cards - head on over to the Group of Seven blog and see all of the cards our Design Team has made.  We'd love to have you link up a card using your favourite method for monochromatic cards.


Supplies for card 1:
Stamps - Penny Black poinsettia, unknown sentiment
Ink - ColorBox white
Paper - red cs, red glitter cs
Size - 4.75" square
Accessories - white embossing powder, coloured pencils, Spellbinders square dies, clear gemstones

Supplies for card 2:
Stamps - Penny Black greenery, Purple Onion sentiment
Ink - Memento Dew Drops Northern Pine, Bamboo Leaves, Cottage Ivy
Paper - light green and dark green cs
Size - A2
Accessories - sparkly stick-ons, green ribbon

Supplies for card 3:
Stamps - various postage and script stamps
Ink - Distress Faded Jeans
Paper - mixed media and off white cs
Size - A2
Accessories - Tattered Angels, Perfect Pearls, and Mr. Huey's blue sprays; Gummiapan sentiment die, Poppy Stamps butterfly dies, Tim Holtz wildflowers dies, Spellbinders hexagon die

Wednesday, 5 July 2023

Greenery for Dec. 25

Shopping our Stash wants to see numbers for their new challenge and Sweet Stampin' wants no designer paper.  Here's my card:

I put the greenery stamp in my MISTI, inked up the leaves with various green Tombow markers, spritzed with water, and stamped on watercolour paper. Then stamped the sentiment with green Archival ink. I added clear rhinestone stickers for the mistletoe berries - I'd been thinking I'd have red holly berries and then realized all the berries were on the mistletoe stems and mistletoe berries are white, so no red berries this time. I used a matching dark green cs for the card base.

Grab Our Badge! 

Sweet Stampin' Challenge Blog


Supplies:
Stamps - Penny Black image, unknown sentiment
Ink - Archival Library Green
Paper - watercolour paper, dark green cs
Size - 6x4.25"
Accessories - green Tombow markers, Recollections Clear Rhinestone Stickers

Friday, 23 December 2022

White on White / Waiting for Santa

A couple of Christmas cards for challenges.

For Colorful Options "Winter White", the Double Trouble challenge that Colorful Options is partnering with this month, and the Snippets challenge :


I die cut the Merry Christmas frame twice from leftover bits of white cs and glued them together and added them to the card base. I die cut the mistletoe once from a scrap of white shimmer cs and once from a scrap of white glitter cs, and glued them inside the frame. Finished off with clear gemstones on the mistletoe berries.

And for Christmas Cards All Year Round "Waiting for Santa":


I sponged a background with a few blue Distress inks, then stamped the TH trees on it.  I made sure that was all dry as I was heat embossing the sleigh and sentiment and didn't want stray embossing powder sticking to the background.  Finished off with a few die cut gold stars.

Challenges:

Colorful Options "Winter White"


Double Trouble Challenge - I have Thing 1 "Some Thing, Anything" and Thing 3 "an all white card" 


Snippets Challenge 

Player's Badge 

Christmas Cards All Year Round "Waiting for Santa"


Supplies for card 1:
Paper - white shimmer, white glitter, and white cs
Size - A2
Accessories - SSS Holiday Frame, unknown mistletoe die, clear gemstones

Supplies for card 2:
Stamps - SU Santa and sleigh, TH trees, Technique Junkies (?) sentiment
Ink - Distress Chipped Sapphire and Stormy Sky, Archival Library Green, Versafine Clair Nocturne
Paper - white cs, scrap of gold cs
Size - A2
Accessories - clear embossing powder, tiny star die

Friday, 28 January 2022

Favourite Colours and Hand Writing


A Twofer today.  Two cards, each for two challenges.

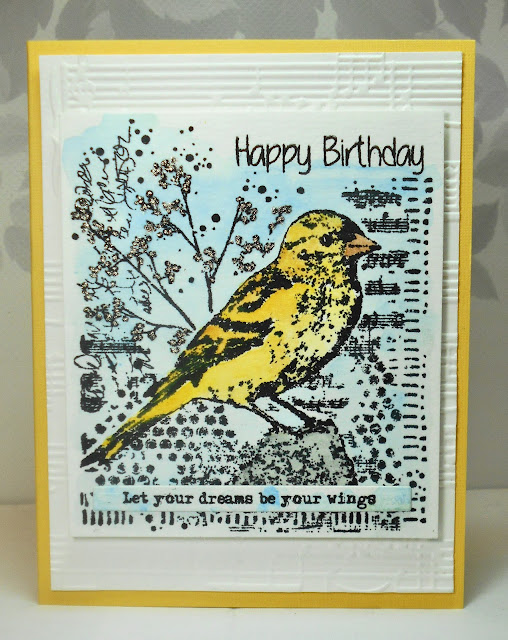
First up my favourite colours (blue and yellow) and a bird for AAA Birthday ("Two Favourite Colours"), Seize the Birthday (option of Embossing), and We Love Stamping ("Anything Stamped with Option of Wings").

I stamped the lovely collage image and watercoloured it.  I layered it on the background panel that is dry embossed with a musical score.  I added it to a yellow card base.  And then went over all the little berries with a Stardust gel pen.

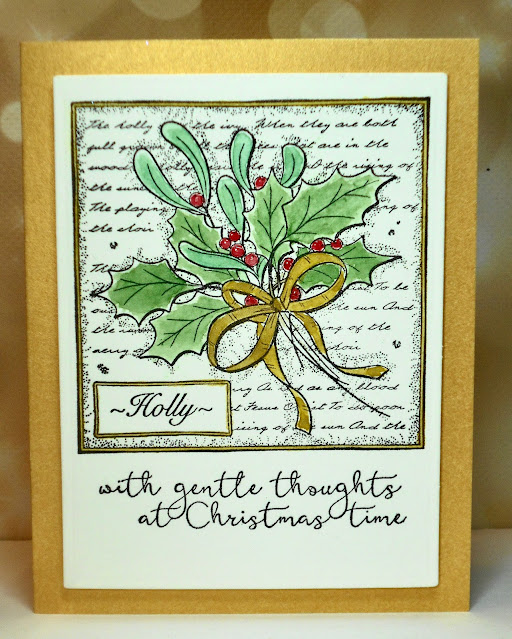
Next up for Day of the Month Card Club ("National Handwriting Day") and Rudolph Days ("Anything Christmas").

 
I picked a collage stamp with handwritten text in the background.  And my sentiment at the bottom is in a handwriting font.  So I think that qualifies it for "National Handwriting Day".

Stamped and watercoloured, trimmed, and popped up on fun foam on a gold card base.


Supplies for card 1:
Stamps - Carabelle Studio Dream Wings
Ink - Versafine Onyx Black
Paper - watercolour paper, white and yellow cs
Size - A2
Accessories - watercolour paints, Darice musical score embossing folder, Stardust gel pen

Supplies for card 2:
Stamps - Cuddly Buddly Holly Collage, Impression Obsession sentiment
Ink - Versafine Onyx Black
Paper - watercolour paper, gold cs
Size - A2
Accessories - watercolour paints, fun foam


Monday, 21 June 2021

Mistletoe and Another Snowman

ABC Christmas Challenge wants "L for Letters or M for Mistletoe" this month.  I went with mistletoe.


A friend (and I'm sorry, I don't remember which one) sent a few die cuts in my birthday card last November including this mistletoe branch.  I smooshed it into a mix of green Distress inks to match a scrap of background cs in my UFO box.  I die cut the background scrap into an oval.  I added the mistletoe to the oval by gluing the top of the stem and using pieces of foam tape to give dimension to the leaves.

I layered it on a larger background embossed with an old embossing folder, added a heat embossed sentiment tag, and finished off with white stick-on pearls for the mistletoe berries.

My second card is another one I made for CAS Christmas' Snowman Challenge.


I stamped and watercoloured the snowman, using the blue for shading the snow.

I used glitter embossing paste through a tiny snowflake stencil to fill in the background around the snowman.

I bordered the panel with green glitter cs and mounted it on red card base.

CAS Christmas


Supplies for card 1:
Stamps - Penny Black sentiment
Ink - various green Distress inks, Versamark
Paper - white cs
Size - A2
Accessories - platinum embossing powder, Cuttlebug snowfall embossing folder, Spellbinders sentiment tag die and oval die, foam tape,

Supplies for card 2:
Stamps - Old Island Stamp Co.
Ink - Archival Jet Black
Paper - watercolour paper, red cs, green glitter cs
Size - 4.75" square
Accessories - watercolour paints, Memory Box tiny snowflakes stencil, glitter embossing paste