A blog devoted to the cards I make in my tiny upstairs space. When my sister stays there, she calls it an "artist's garret". I'm not an artist, but am an enthusiastic cardmaker - hence the title "Cardmaker's Garret".
___________________________________________________________________________________________

Thursday 31 August 2023

Stamped and Dry Embossed Pine and Pinecones

52 Christmas Card Throwdown wants an embossing folder on our Christmas cards this time.  I used one as a background that totally ties in with my stamped image.


I love the way the embossing folder has the pine branches and pine cones that are in the stamped image.  The image is coloured with coloured pencils and die cut with a circle die.  The sentiment is die cut once out of dark green and once out of white and glued together to give it more dimension.


Supplies:
Stamps - Serendipity chickadees
Ink - Versafine Onyx Black
Paper - white and dark green cs
Size - 4.75" square
Accessories - coloured pencils, Sizzix embossing folder, MFT sentiment die, Spellbinders circle die

Wednesday 30 August 2023

Poppies on Music

A birthday card for a friend who  and loves the colour red, made for Seize the Birthday "Make It Musical" and Can You Handle the Pressure "Embossing Folder with a Twist of Poppies".


A musical embossing folder for the background since my friend plays the ukulele and is in a choir.  And red poppies were a perfect choice as red is her favourite colour and she's a keen gardener.  I die cut the poppies out of watercolour paper and then wet just the flowers and sprinkled red brushos on them, and then watercoloured the stems in dark green.  I cut them twice more out of scrap cs and glued them together for substance.  I sprinkled the same red brushos on a scrap of watercolour paper and die cut the sentiment from that.

I'm also linking it to My Time to Craft Challenge "Using Die Cuts", to AAA Birthday "Anything Birthday Goes", and to Beautiful Blossoms "Anything Goes Flowers".

  Please Grab Our Badge 

My Time To Craft!

Our Blog Badge


Supplies:
Paper - watercolour paper, white cs
Size - A2
Accessories - Penny Black Bodacious die, Gummipan Happy Birthday die, red and green Brushos, Darice music embossing folder

Monday 28 August 2023

Water Lifting on Christmas Cards

This month the Group of Seven Cardmakers all tried water lifting from an ink blended background.  I love the results so made three Christmas cards using the technique.

First up a green ink blended background that was ideal for a holly image:

I started by sponging three colours of Distress inks onto card stock, blending well between each colour.  Then dried it with my heat tool and went over it with anti-static powder.  I stamped the image and heat embossed it in white.

Then came the water lifting of the holly leaves and berries - I painted inside the embossed lines with plain water and a brush, blotting with paper towel as I went along (this lifts the ink inside the image).  The image becomes lighter as the cs dries.  I love the ethereal image you get!

I finished off by trimming it into a square and adding it to a shimmery off-white cs base and added a few opaque white sequins in random spots.

I went on to make two more backgrounds, each in different shades of blue.  I stamped dove images on each and again used the water lifting technique on the doves.  I added the first one to a white card base, stamped the sentiment on a scrap of white cs, and embellished with two opaque white sequins in the bottom right corner to balance with the sentiment in the upper left corner.

My second blue background had a really splotchy section on one side so I trimmed it down to make a mini slimline card, stamped with a different dove stamp (it includes the sentiment), popped it up on fun foam on a dark grey-blue glitter border, and added that to a white card base.

This is a great technique that I'll use again for sure.  Head over to the Group of Seven Cardmakers' blog to see what the others made and for more info and links to videos for the techniques.


Supplies for card 1:
Stamps - Visible Image
Ink - Distress Evergreen Bough, Iced Spruce, and Rustic Wilderness; ColorBox White
Paper - white cs, off-white shimmer cs
Size - 4.25" square
Accessories - white embossing powder, opaque white sequins

Supplies for card 2:
Stamps - Magenta dove, unknown sentiment
Ink - Distress Broken China, Stormy Sky, and Faded Jeans; ColorBox White
Paper - white cs
Size - A2
Accessories - white embossing powder, opaque white sequins

Supplies for card 3:
Stamps - Penny Black
Ink - Distress Salty Ocean, Broken China, and Weathered Wood; ColorBox White
Paper - white cs, slate glitter cs
Size - 6x3.25"
Accessories - white embossing powder, fun foam


Sunday 27 August 2023

Christmas Card for a Child

Christmas Cards All Year Round wants a card for a child.  I thought this image of a dog and a cat having fun sledding was perfect.


The image is watercoloured with a little bit of very pale blue splatter, and bordered in red cs.

I'm also adding it to the Penny Black Saturday Challenge "anything Penny Black goes" and Rudolph Days Christmas Card Challenge.

 Christmas Crafts All Year 'Round

...or Hedgie


Supplies:
Stamps - Penny Black image, SSS sentiment
Ink - Versafine Onyx Black
Paper - watercolour paper, red and cream cs
Size - 6x3.25"
Accessories - watercolour paints

Thursday 24 August 2023

A CAS Butterfly and Christmas Food

A Twofer today to sneak in under the wire for some challenges I wanted to enter.

First for The Paper Players "CAS with an Insect":


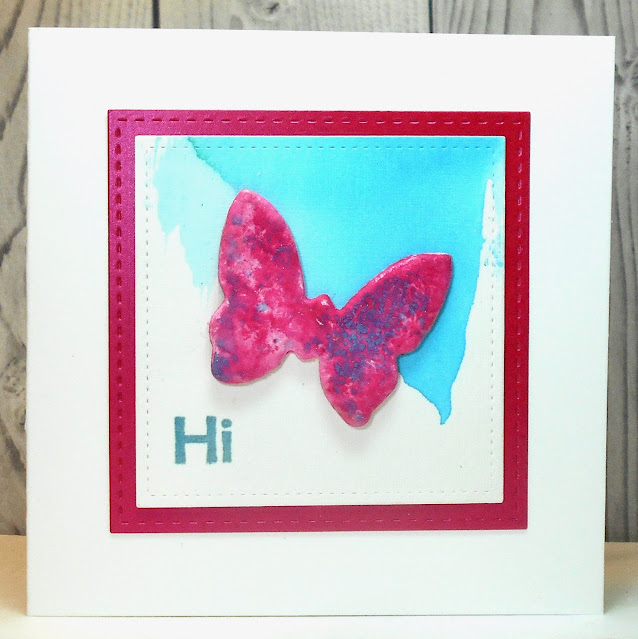
For the background, I dripped some Tumbled Glass and Broken China reinkers along one edge of a panel of cs, spritzed with water, and tipped the cs to let them run. The butterfly is die cut from a couple of layers of very thick and absorbent handmade paper, stuck together for substance and then sprayed with various blue, purple, and pink sprays. I didn't quite get the colour variation I wanted so sprays probably weren't the best medium to use. I found a piece of pink shimmer cs that matched perfectly so bordered with that.

Next up, for 52 Christmas Card Throwdown "Christmas Food" and for Sparkles Christmas Challenge "Christmas Food":

Many years ago I admired this image on someone's card and I contacted her to ask her to stamp off a few for me. She kindly mailed them to me and I'm ashamed to say I've forgotten both who it was and who made the stamp. If anyone knows, please let me know!!

The image is coloured with coloured pencils, with a tiny bit of glossy accents just on the holly berries. I then bordered it with red and green cs.

   Please take a copy of our badge


Supplies for card 1:
Stamps - unknown sentiment
Ink - Distress Tumbled Glass and Broken China
Paper - white cs, pink shimmer cs, thick handmade paper
Size - 4.75" square
Accessories - blue and pink sprays, Lil Inker stitched square dies

Supplies for card 2:
Stamps - unknown image, PB sentiment
Ink - black ink
Paper - white, red, and green cs
Size - 5" square
Accessories - coloured pencils, glossy accents, Spellbinders square dies


Tuesday 22 August 2023

A Christmas Tree with Holly Background and a Stencilled Snowflake

Vancouver has watering restrictions as we've had such a dry summer - we are no longer allowed to water our lawns so I have a very brown lawn.  I'm making up for that lack of green with a very green card today.

I went with a green card base, a focal panel background created with a stencil monoprint of holly, and a smooshed green die cut tree.  I also die cut the tree out of white cardstock and glued them together for more dimension and slightly offset to give a bit of a line of snow on the branches.  Embellished with a silver star on top and off it goes to Jingle Belles and My Time to Craft Christmas who both want to see Christmas trees.  

My Time to Craft Christmas has a sister challenge, My Time to Craft, and it wants stencilling on a card.  So I kept going with Christmas cards and stencilled a snowflake on this card:

I started by using gesso to stencil the snowflake on black cs to create a resist for my stamping, then stamped the text background stamp over it.  I replaced the snowflake stencil and sponged Distress Speckled Egg ink over it to add colour to the snowflake.  I die cut the pierced frame die twice and stacked them for more dimension and embellished with stick-on pearls.


 My Time To Craft Christmas!

My Time To Craft!


Supplies for card 1:
Ink - various green Distress inks
Paper - white and dark green cs
Size - A2
Accessories - Sizzix holly embossing folder, unknown tree die, silver star

Supplies for card 2:
Stamps - unknown text stamp
Ink - Distress Speckled Egg
Paper - black and cream cs
Size - 4.75" square
Accessories - snowflake stencil, gesso, MFT pierced square frame die, blue pearls

Saturday 19 August 2023

Snowy Farm

Peace on Earth has a wonderful mood board for the new challenge - four great images of barns in the snow.  It inspired me to make this card:


It's an older stamp and I've had it for years but never inked it up.  The buildings and trees are coloured with alcohol markers and the sky is sponged with two shades of Distress Oxide ink.  I splattered with a white paint pen and added glitter to the snowy roofs, the ground, and the snow on the trees.  The image is bordered with dark green cs (though it looks black in the photo).

Here's the Peace on Earth mood board that inspired the card:

Please head over to Peace on Earth for more inspiration from the rest of the Design Team, and join us with your card inspired by the mood board or with an "anything Christmas" card.

I'm also going to enter it in Darnell's NBUS (never before used stuff) challenge as it's the first time that stamp got inked up.


Supplies:
Stamps - Serendipity Winter Farm, Rubber Soul sentiment
Ink - Versafine Clair Nocturne, Distress Oxide Chipped Sapphire and Stormy Sky
Paper - white and dark green cs
Size - A2
Accessories - alcohol markers, glitter, white paint pen

Thursday 17 August 2023

Music for Guys and a Simple Pet Sympathy Card

I've been away for a few days so no crafting or blogging.  Here's a Twofer to make up for it.

Cardz 4 Guyz wants to see "Music" so I did a notecard with a bird against a musical background:

The image is stamped and heat embossed, then trimmed and layered on green and red cardstock, popped up on fun foam on a square card base, and added red stick-on dots to the berries on the leaves.   

The second card is for The Sisterhood of Crafters "Keep It Simple".


A very simple card - stamped the sentiment and pawprint in navy on the card base, die cut a heart out of navy cs, and layered it over the base.  I like to have a few dog sympathy cards on hand as well as people sympathy cards.

Cardz 4 Guyz Logo  Please Grab Our Badge!


Supplies for card 1:
Stamps - Magenta
Ink - ColorBox gold
Paper - cream cs, red and green cs
Size - 4.25" square
Accessories - gold embossing powder, Spellbinders square dies, red Stampendous dot stickers, fun foam

Supplies for card 2:
Stamps - Technique Junkies sentiment, SU paw print
Ink - Memento
Paper - white and navy cs
Size - 6x4.25"
Accessories - Memory Box heart die

Saturday 12 August 2023

To Travel or to Stay Home in My Garden?

I'm a very conflicted person when it comes to travelling - I do love seeing new parts of the world or revisiting favourite parts, but I also really love spending my time at home, especially in the summer in my garden.

Shopping Our Stash wants to see a "Vacation Destination".  One of my favourite vacations ever was a trip to the Netherlands.  I really loved that country and would happily go back there (I'd especially love to go in the spring when all the bulbs are blooming).  I combined Shopping Our Stash with Color Hues "Teal and Orange".


I had a piece of mixed media cs that I'd drizzled masking fluid on. I sponged it in the Dutch colours of blue and orange, then stamped and heat embossed the windmill, lines from Gorgeous Grunge, and sentiment. Next, using Texture Paste, I glued down some torn dictionary pages with definitions of "windmill" and "Dutch". For a final touch I splattered some Archival Jet Black ink on the card.

A bit outside of my comfort zone, but fun to make!   And it will be perfect for a Dutch-Canadian friend whose birthday I missed!

My twofer is a tribute to my garden where my yellow roses are having a second flush of bloom.  It's for Beautiful Blossoms "Anything Goes Flowers" and The Flower Challenge "Add Spots or Stripes" (I went with spots).

I was inspired by something I saw on Pinterest to make this card. I love the watercoloured flowers with all the random stamping around it rather than the paint splattering I often do.

After stamping and watercolouring the image, I stamped the splatters, postmark, script etc. with a very pale ink. Added a heat embossed sentiment on a black cs strip, trimmed the panel with a square die, and popped it up on fun foam. 

Grab Our Badge!    

Our Blog Badge  


Supplies for card 1:
Stamps - Deep Red windmill, unknown sentiment, SU Gorgeous Grunge
Ink - Distress Salty Ocean and Spiced Marmalade, Versafine Onyx Black, Ranger Archival Jet Black
Paper - white cs, mixed media cs, pages from dictionary
Size - A2
Accessories - clear embossing powder, masking fluid, Ranger Transparent Matte Texture Paste

Supplies for card 2:
Stamps - SU Elements of Style and Gorgeous Grunge, Tim Holtz postmark, SU sentiment, unknown script stamp
Ink - Versafine Clair Nocturne, Adirondack Lake Mist, ColorBox white
Paper - watercolour paper, off white cs, scrap of black cs
Size - 5.5" square
Accessories - watercolour paints, white embossing powder, Spellbinders square die, fun foam


Wednesday 9 August 2023

Stencilled Snowflakes and Blue Sympathy

Both the Inkspirational Challenge and the Double D Challenge want us to use stencils.  And I need to get going on Christmas cards so I pulled out a snowflake stencil and made this card:


I used a "stencil sponging bleed" technique by using various blue and mauve Distress inks to sponge through a snowflake stencil, and then lightly sponging the same colours around the snowflakes to give an ethereal look.  I bordered the panel with a grey/blue glitter cs, cut the sentiment with the same glitter cs, and cut its shadow out of white cs.

You can see instructions for the technique on this video.

My Time to Craft wants to see "Shades of Blue".  I need some sympathy cards in my stash so made this:


I masked a panel and sponged inside the mask with blue, going lighter at the top, darker at the bottom.

I stamped a branch and sentiment in dark blue, trimmed the panel, added some twine and a navy border, and popped it up on fun foam.


GRAB OUR BADGE! 

 My Time To Craft!


Supplies for card 1:
Ink - various blue and mauve Distress inks
Paper - white cs, blue/grey glitter cs
Size - A2
Accessories - Paper Rose snowflake stencil, Simon Says Stamp Snowy Greetings die

Supplies for card 2:
Stamps - SU Watercolor Trio branch, PTI sentiment
Ink - Memento Summer Sky, Archival Cobalt
Paper - white and navy cs
Size - A2
Accessories - navy twine, fun foam