A blog devoted to the cards I make in my tiny upstairs space. When my sister stays there, she calls it an "artist's garret". I'm not an artist, but am an enthusiastic cardmaker - hence the title "Cardmaker's Garret".
___________________________________________________________________________________________
Showing posts with label poinsettias. Show all posts

Thursday, 10 July 2025

Red and White, and Red, White, and Blue

Cards for two colour challenges today.

For Color Hues "Red and White", I did a Christmas card.  It features poinsettias so it's also going to the Jingle Belles challenge "Poinsettia Perfection".


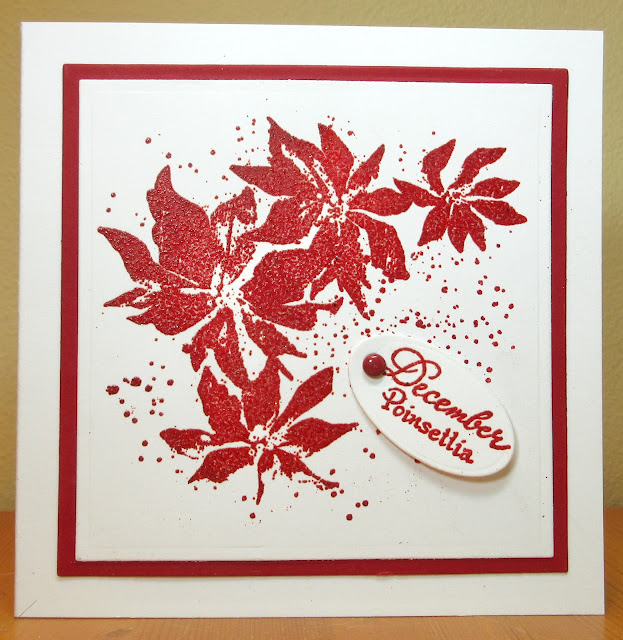
I stamped and heat embossed the poinsettias and the sentiment.  Trimmed the poinsettias with a square die and bordered with red cs.  Cut the sentiment out with a tag die and attached it with a red brad.  Added it all to a white card base.

Shopping Our Stash wants to see red, white, and blue.  I made a summer birthday card for my cousin who lives on the south coast of England - she loves the traditional beach huts on their beach front and of course, red, white, and blue are the colours of the British flag.  I am also linking it up with AAA Birthday's Summer Birthday challenge.  And I've never used the beach huts die before so I'm adding it to the NBUS challenge.

I die cut the beach hut die three times, out of red, white, and blue cs and then inset the blue and red into the white.  It was very fiddly but thank goodness for my fine-pointed scissors.  I used mottled blue and mottled light brown cs for the sky and sand, and added a die cut sentiment.

     Grab our badge to display on your blog.


Supplies for card 1:
Stamps - Impression Obsession poinsettias, Northwoods sentiment
Ink - Versamark
Paper - white and red cs
Size - 4.5" square
Accessories - Ranger Rich Red embossing powder, Spellbinders square dies and tag die, red brad

Supplies for card 2:
Paper - red, white, and blue cs; light brown and light blue mottled cs
Size - A2
Accessories - unknown beach huts die, Lawn Fawn Happy Birthday die

Thursday, 19 December 2024

Masculine Christmas and Poinsettias Embossed and Stamped

Cardz 4 Guyz wants a masculine Christmas card. 


I started with the background - used a circle die to cut a round mask for the moon and a hilly slopes die for the snowy ground (both cut out of masking paper). Then splattered masking fluid on the sky for snow. Then sponged with two shades of blue Distress ink, leaving it lighter around the moon. Once the ink was dry, I removed the paper masks and rubbed off the masking fluid. I die cut the buildings and trees out of black cs and added them to the background. Finished off by using white gouache on a fine paint brush to add snow to the roofs.

My second card today is for Can You Handle the Pressure (dry embossing with an optional theme of poinsettias - I went with this theme).

I stamped and watercoloured the candle / poinsettia image, trimmed it with a square die, popped it up on fun foam on a square of off white cs that I'd run through a floral embossing folder that could well be poinsettias.

Cardz 4 Guyz Logo  Please Grab Our Badge


Supplies for card 1:
Stamps - Make an Impression sentiment
Ink - Versafine Onyx Black, Distress Chipped Sapphire and Dusty Concord
Paper - white and black cs
Size - 4.75" square
Accessories - masking fluid, masking paper, SSS Winter Village dies, circle die, hilly slope die, Dr Phil Martin's bleed-proof white gouache

Supplies for card 2:
Stamps - Stamplorations
Ink - Versafine Onyx Black
Paper - watercolour paper, off white cs
Size - 4.75" square
Accessories - watercolour paints, square dies, Sizzix embossing folder

Monday, 4 November 2024

Reindeer with Birch Trees and Candles with Poinsettias

Jingle Belles wants to see animals on our Christmas cards, and My Time to Craft Christmas is specifying winter animals.  What better than a reindeer?  Which means I can also link it up with Christmas Cards All Year Round as they want to see reindeer.

I rubbed Distress Speckled Egg over an embossing folder and ran it through with mixed media cs.  I tore a snowy hill out of white cs and stamped my sentiment on it.  Using various brown Distress inks, I smooshed a scrap of cs and die cut a reindeer from it.  I cut it again from scrap cs and glued them together for more strength and dimension.

Next up, ABC Christmas Challenge is "U for Unusual Colours".  I did a candle / poinsettia stamp in shades of blue and mauve - definitely not a typical Christmas card for me!

I stamped the image and sentiment in navy ink, coloured it with Cosmic Shimmer Botanical Stains (lovely muted colours), splattered with some of the leftover colours, and bordered with navy on an off-white card base.

  Grab our badge! My Time To Craft Christmas!


Supplies:
Stamps - unknown sentiment
Ink - Versafine Clair Twilight, Distress Speckled Egg, various Distress browns
Paper - mixed media cs, white cs
Size - A2
Accessories - Sizzix embossing folder,

Supplies:
Stamps - unknown candle / poinsettia stamp, Make an Impression sentiment
Ink - Versafine Clair Twilight
Paper - watercolour paper, off-white and navy cs
Size - A2
Accessories - Cosmic Shimmer botanical stains

Thursday, 24 October 2024

Stencilled Poinsettias and Tower Bridge

Sneaking in under the wire for the Flower Challenge "Add a Stencil"!  I used a poinsettia stencil and let it be the focus of the card.

I used FineTec Pearlescent watercolour paints applied with small sponge daubers through the stencil.  Make sure the paint isn't too watery - you don't want it to seep out under the stencil.  You want more of a paste kind of texture than a really watery watercolour paint.  They give a wonderful shimmer - much better in real life.  I trimmed the panel, bordered it with red and green shimmery cs, wrapped cream coloured ribbon around it, added a sentiment to the top of the ribbon, and added the whole lot to a cream shimmer card base.

For a change of pace, I've made a card for a friend who loves travelling - he's heading off to England.  I'm entering it at Cardz 4 Guyz  "T is for ....".  I went with travel and Tower Bridge.

The focal panel was made by smooshing with blue Distress Oxide inks, then stamping the image of Tower Bridge and the London text stamp on it, bordering with black cs, and popping it up on fun foam on a background of blue speckled dp.

Cardz 4 Guyz Logo


Supplies for card 1:
Stamps - unknown sentiment
Ink - gold ink
Paper - cream cs, cream shimmer cs, light red and light green shimmer cs
Size - A2
Accessories - Tim Holtz poinsettia stencil, cream ribbon, sentiment banner die, FineTec pearlescent watercolours

Supplies for card 2:
Stamps - unbranded stamps
Ink - various blue Distress Oxide inks, Archival Jet Black
Paper - white and black cs, blue dp
Size - A2
Accessories - fun foam


Monday, 20 November 2023

Dry Embossed Snow, Heat Embossed Poinsettias

Two new Christmas cards today.  For Can You Handle the Pressure (anything goes with dry embossing;  I didn't use the twist of turkey / Thanksgiving as I'm in Canada and we've already had our Thanksgiving), and for Stamping Sensations "Christmas":


The image is stamped in black and coloured with coloured pencils, then trimmed and bordered with black cs, layered on a dry embossed panel, and added to a white card base.

My second card is for My Time to Craft Christmas "Poinsettias" and Color Hues "Red and Gold":

I sponged a bit of darker red ink around the edges of a piece of red cs, then stamped and heat embossed the Christmas poinsettias / holly image in gold.  I bordered in gold shimmer cs, added a sentiment from my leftovers box (die cut from a piece that had gilding flakes stuck to it), and added Glossy Accents to all the berries in the image.

Please Grab Our Badge Please grab our logo   My Time To Craft Christmas!


Supplies for card 1:
Stamps - Serendipity farm, Penny Black sentiment
Ink - Versafine Clair Nocturne
Paper - white and black cs
Size - A2
Accessories - coloured pencils, Darice embossing folder

Supplies for card 2:
Stamps - Penny Black
Ink - ColorBox gold, Distress Aged Mahogany
Paper - gold shimmer and cream cs
Size - A2
Accessories - gold embossing powder, Glossy Accents, Tattered Lace "greetings" die, gilding flakes

Wednesday, 13 September 2023

A Tag with Poinsettias and a Green, Brown, and Blue Christmas Card

My first card is for three challenges - AAA Card Challenges "Add a Tag", ABC Christmas Challenge "T is for Three of a Kind", and the Snippets Playground Challenge (to use up little scraps).

I used the Tim Holtz tag die that has raised ridges that you can rub over with ink (red, in my case) and then when you die cut it, the colour transfers to the cs and makes the coloured border on the tag.

I die cut three poinsettias from snippets of white and red shimmer cs, and some holly sprigs from a leftover bit of cs that I'd smooshed with various green Distress inks.  Put it all together on the tag, added gold pearls to the centres of the poinsettias, and tied a bit of red and green twine through the hold.  I left the card base completely plain as the AAA Card Challenge is a clean and simple challenge.

My second card today is for the 52 Christmas Card Throwdown "Green, Brown, and Blue".  Perfect colours for an outdoor winter scene.

The background is blue Magicals sprinkled on a stencil, spritzed with water, and monoprinted on mixed media cs.  I die cut the evergreen tree from green cs, the deciduous tree from dark brown cs, and the two deer from lighter brown cs.  I also die cut two snow banks with a slopes die.  Then assembled my scene.  I stamped the sentiment in blue but smudged it so restamped it on a scrap and die cut it to layer over the smudged one.

   Player's Badge 


Supplies for card 1:
Stamps - Penny Black sentiment
Ink - various green Distress inks, Distress Fired Brick
Paper - white cs, red shimmer and white shimmer cs
Size - A2
Accessories - Tim Holtz tag die, Dee's Distinctively poinsettia dies, red and green twine, gold adhesive pearls

Supplies for card 2:
Stamps - Make an Impression sentiment
Ink - Encore Metallic Blue
Paper - white, green, dark brown, medium brown cs; mixed media cs
Size - A2
Accessories - Memory Box Twiggy Tree die, Impression Obsession evergreen tree die, Memory Box deer dies, SSS slopes dies, Spellbinders tag die, snowflake stencil, blue Magicals

Saturday, 2 September 2023

Red Poinsettia on White

Peace on Earth has a wonderful mood board this month.  The top left image inspired me to use poinsettias and to keep the colour scheme to red and white.


I started by die cutting the poinsettia from red cs.  While it was still in the dies, I sponged a darker red over the veins that show through the gaps in the dies.  After I took it out of the dies, I sponged around the edges.  I used a stylus to add some shaping to the layers and glued them together.

The background uses my "never before used" Tim Holtz negative corner die and the Tim Holtz negative sentiment die to cut through the white background layer.  I layered it over the red card base and added the poinsettia to it.   A few gold gemstones finished it off.

Here's the Peace on Earth mood board that inspired me:


Head on over to see what the rest of the Design Team created and then link up your card, either inspired by the mood board or "anything Christmas".

I'm also linking up with NBUS because I used the corner die for the first time.


Supplies:
Ink - Memento Rhubarb Stalk
Paper - red and white cs
Size - A2
Accessories - Tim Holtz poinsettia corner die and sentiment die, Spellbinders layered poinsettia dies, gold gemstones

Saturday, 5 August 2023

Poinsettias Inspired by Flamingos

The new Peace on Earth challenge has a mood board to inspire a beach-themed Christmas card.  I just couldn't wrap my mind around that so I chose the bottom right image and used the colours in it for this card:


I'd been trying some techniques that involved colouring embossed images.  For this one, I used a 3D embossing folder of poinsettias with watercolour paper.  Then I started out trying the watercolouring technique in this video using a couple of shades of pink but I wasn't liking the results so after I'd laid down some watercolour, I switched to lightly swiping a pink ink pad over the highest parts of the embossing (as in this video).  I was finally happy with the mix of colours and the shading.

Using the colours in the image I was inspired by, I added a green shimmer border and matching die cut sentiment.  I lost the tiny die cut dot that goes over the "i" so added a green stick-on pearl instead. For the yellow of the flamingos beaks, I added some yellow liquid pearls and yellow glitter drops to the centres of the poinsettias.

Here's the Peace on Earth mood board where you can see my colour inspiration on the bottom right:


Please come and join us at Peace on Earth with either something inspired by our mood board or an "anything Christmas" card.


Supplies:
Ink - Distress Oxide Worn Lipstick
Paper - watercolour paper, green shimmer and off white cs
Size - 7x3.75"
Accessories - Nellie's Choice slimline poinsettia embossing folder, various shades of pink watercolour paints, Penny Black Merry Christmas die, green stick-on pearl, yellow liquid pearls, light gold glitter glue

Friday, 28 July 2023

Embossing Folder Colouring

For the new Group of Seven technique post we tried three methods of colouring panels after they were embossed in a 3D embossing folder.

We tried three different methods.  For this one, I ran white cs through in the embossing folder and then used the ink pad swipe method seen in this video.  I swiped two different shades of red Distress inks over the top of the embossing.  

I trimmed the panel, bordered it with gold matte mirror cs, die cut "merry" from the same cs twice, gluing them together for more dimension, added it to the top of the poinsettias, and stamped and trimmed "Christmas" on white cs and added it below the "merry".

It's hard to photograph anything with mirror cs so here's another view of it:


I was able to make a second card from the same panel.  
I had enough left to just fit behind the SSS Holiday Frame so made this CAS card with it:

I cut the Holiday Frame once from the matte gold mirror cs and once from white cs, took the gold letters out of "Christmas", and glued them together so that the white would show through.

I then tried one of the other methods for my next card - sponging with pigment inks over the embossing as seen in this video.


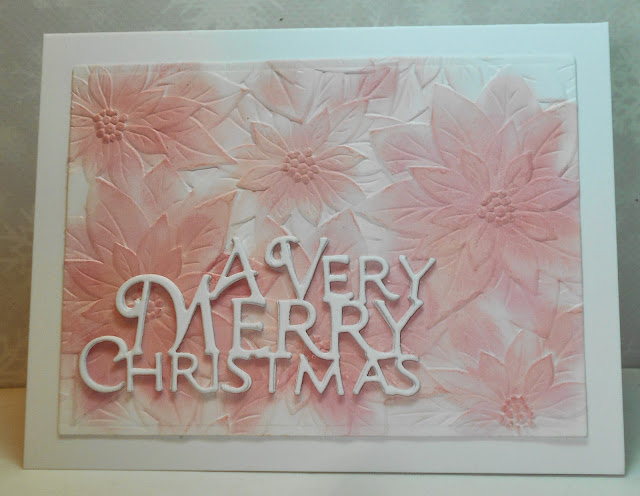
I used blending brushes and three shades of pink pigment inks, leaving some bits white for contrast and shading.

I die cut the sentiment three times and glued them together so that it would stand out.

For the third technique, and for many more examples, go to our Group of Seven page.  You're welcome to try one of the techniques and add your card for inspiration to others but we are not a challenge so will not be selecting winners or commenting on all cards.

I'll be posting a card using the third technique soon.


Supplies for card 1 and 2:
Stamps - unknown Christmas (card 1)
Ink - Distress Festive Berries and Candied Apple
Paper - white cs, matte gold mirror cs
Size - card 1 is A2, card 2 is 4.5" square
Accessories - Nellie's Choice slimline poinsettia embossing folder, PTI "merry" die (card 1), SSS Holiday Frame (card 2)

Supplies for card 3:
Ink - Adirondack Pink Sherbert and Shell Pink, Vivid Tea Rose
Paper - white cs
Size - A2
Accessories - Nellie's Choice slimline poinsettia embossing folder, Penny Black sentiment die