A blog devoted to the cards I make in my tiny upstairs space. When my sister stays there, she calls it an "artist's garret". I'm not an artist, but am an enthusiastic cardmaker - hence the title "Cardmaker's Garret".
___________________________________________________________________________________________

Wednesday 24 November 2021

Stencil Monoprint with Berries

A very last minute card for CAS Mix Up - I really wanted to get one done as I like the stencil monoprint technique.


I used a never-before-used stencil.  I swiped three green Distress inks over it, spritzed with water, and flipped it onto watercolour paper.  I pressed down gently with a rag and then lifted the stencil off.

I trimmed out the part I liked best, framed it with a pierced rectangle frame die cut, and with dark red shimmer cs, I punched out tiny circles to add to the berries and die cut "joy".

In hindsight, I wish I'd used a brighter, lighter red, but too late now!

CAS Mix Up

NBUS Challenge
Grab our badge to display on your blog.


Supplies:
Ink - Distress Rustic Wilderness, Mowed Lawn, Crushed Olive
Paper - watercolour paper, cream cs, dark red shimmer cs
Size - A2
Accessories - Simon Says Stamp "berries and leaves" stencil, single hole punch, TH joy die, MFT pierced frame die

Tuesday 23 November 2021

A Tiny Image on a Snippet

The Christmas Kickstart Challenge is asking for Christmas Snippets and of course Pixie's Crafty Workshop always wants snippets.  I used up a little scrap of dp, a small piece of leftover dry embossing, and a small oval of cream cs.

I have a tiny cardinal stamp that perfectly fit the leftover oval of cream cs.  It's heat embossed in gold, with the tiny leaves and berries coloured with very fine-pointed alcohol markers.  I was able to find a sentiment stamp that would just fit the space.

I die cut a larger oval out of my snippet of dp and layered over a leftover bit of dry embossed cream cs.

Christmas Kickstart Challenge

Pixie's Crafty Workshop "Snippets Playground Challenge"


Supplies:
Stamps - unknown cardinal stamp, Penny Black sentiment
Ink - ColorBox gold
Paper - PTI Vintage Cream cs, Graphic 45 dp
Size - A2
Accessories - Sizzix embossing folder, gold embossing powder, red and green alcohol markers, Spellbinders oval dies

Sunday 21 November 2021

Weekend Cards

A couple of cards from me, one Christmas, one a sympathy.

Cardz 4 Guyz wants a masculine card with gingham and the Double D challenge wants trees so this fulfills both:


I had a perfect scrap of green gingham dp to go with a Christmas tree.  The tree is stamped and heat embossed, then decorated with a few stick-on stars and tiny dots.  It's popped up on fun foam on top of the dp for some dimension.

The second card is for Less is More "Silhouette".

I decided to create a shadow background for the silhouette using the same stamp.  I put the wildflower stamp in my MISTI and inked up with Distress Weathered Wood, then spritzed with water and stamped onto watercolour paper. I moved the stamp over and repeated twice more.

Then I used black pigment ink and embossing powder for the clear sharp black silhouette of the flower and for the sentiment.

Cardz 4 Guys "Gingham, Checks, or Plaid"

Double D Challenge "Trees"

Less is More "Silhouette"


Supplies for card 1:
Stamps - Art Impressions tree, Rosie's Roadshow sentiment
Ink - ColorBox Evergreen
Paper - cream cs, gingham dp
Size - A2
Accessories - clear embossing powder, fun foam

Supplies for card 2:
Stamps - TH wildflower, PTI sentiment
Ink - Distress Weathered Wood, Versafine Onyx Black
Paper - watercolour paper, ivory cs
Size - A2
Accessories - clear embossing powder, fun foam, Spellbinders layering rectangle die

Wednesday 17 November 2021

Alcohol Ink Ornaments

I seem to be very last minute for lots of things in my life these days!  Here I am sneaking in under the wire for the Jingle Belles challenge "Holiday Ornaments".


I created the ornaments by dropping various blue and green alcohol inks on Yupo and spritzing with rubbing alcohol.  I then die cut the ornaments from it.  For more substance (because Yupo is quite thin), I also die cut them from scrap white cs and stacked them together.  I used a scrap of silver shimmer cs to cut the fancy ornament trim for the largest ornament.

I die cut a pine branch from green shimmer cs, added the ornaments to it using silver twine, and then stamped a sentiment in a co-ordinating colour.  In hindsight, I wish I'd either pushed the sentiment to the right or used a more square (rather than long) sentiment.  But I am happy with the ornaments.

Jingle Belles "Holiday Ornaments"


Supplies:
Stamps - Stampabilities sentiment
Ink - Versafine Ocean Depth chalk ink
Paper - Yupo, white cs, green shimmer cs
Size - A2
Accessories - Spellbinders and Memory Box ornament dies, Impression Obsession pine branch die, blue and green alcohol inks

Tuesday 16 November 2021

A Sanded Foil Slimline

When the slimline cards first became popular, I didn't think I'd jump on that particular bandwagon but more and more I'm enjoying making them. 


For this one, I dry embossed a piece of gold foil cs with a 3D embossing folder and then sanded off some of the raised parts.  I bordered it with dark red and then cut a matching sentiment.

It was really hard to photograph.  The gold is not quite that yellow so here are a couple of other photos using different light (the true colour is somewhere in between!).

It's a really easy technique, a great way to use foil cs and to get more use out of our embossing folders.

I'm linking up with these challenges:

Just Us Girls "Mini Slimline Cards"

Krafty Chicks "Christmas Week Challenge"


Supplies:
Paper - gold foil cs, red and cream cs
Size - 6.25x3.25"
Accessories - TH 3D embossing folder, Penny Black sentiment die

Sunday 14 November 2021

Magical Christmas for Bears

A reminder that the CAS Christmas "Christmas Critters" challenge is ending on November 24th.  And a reminder that we don't have a challenge in December.

Here's my reminder card:


I love this stamp of the sweet polar bear giving her baby a ride.

Very CAS and quick to make - stamped, watercoloured, bordered with gold, and a bit of gold pen on the stars.

I hope you can join us with your Christmas critters.  There's lots more inspiration from the Design Team over at CAS Christmas.


I'm also adding it to:

Krafty Chicks' "Week 2 - Christmas" challenge

We Love Stamping "Christmas" challenge

ABC Christmas Challenge "W for Whimsical" 

Winter Wonderland "For a Child"

Stamping Sensations "Christmas"


Supplies:
Stamps - Crafter's Companion
Ink - Archival Jet Black
Paper - watercolour paper, gold and cream cs
Size - 5" square
Accessories - watercolour paints, Spellbinders square dies, gold pen

Thursday 11 November 2021

A "Merry" Card and a Thank You Card

Two cards from me today.

First up for Just Us Girls "Word Week - Merry", Jingle Belles "Ornament", and Christmas Kickstart Challenge "Christmas Snippets":

I've been trying to use up leftovers and scraps!  This card started with the scrap of navy background that had been sprayed with a shimmery white spray.  It was just the right size to use under an ornament die cut (cut out of a shimmery white cs scrap).  Using some more of the shimmery white cs scraps, I cut the word "merry" and the branch of holly.  I also cut "merry" out of some navy cs and layered them for a slight shadow effect.  I put it all together on a kraft cardbase, hanging the ornament from the "e" in "merry" with sparkly twine.

My second card is for The Paper Players "Give Thanks" challenge.  A talented friend made me some new cushion covers for the throw cushions on my couch so I wanted to make a thank you card for her that depicted what she'd made.

I stamped the couch onto decorative paper, then fussy cut it, and stamped it again onto red dp and fussy cut just the cushion, layering that over the full couch.  I stencilled a bit of pattern onto cs to ground the couch, trimmed that piece down, popped it up on fun foam on the card base, layered the couch onto it with foam tape, and stamped and die cut the sentiment (also popped up with foam tape).

Challenges:

Just Us Girls


Christmas Kickstart Challenge


Jingle Belles "Holiday Ornaments"

The Paper Players


Supplies for card 1:
Paper - white shimmer, navy, kraft cs
Size - A2
Accessories - PTI merry die, SSS holly ornament, Spellbinders circle die, Memory Box holly vine, white shimmer spray, white sparkly twine

Supplies for card 2:
Stamps - Poppy Stamps sofa, Emerald Creek thank you
Ink - various Distress inks, Archival Jet Black
Paper - scraps of decorative paper, cream cs
Size - A2
Accessories - Memory Box Texture Flourish stencil, Poppy Stamps sofa die, Spellbinders oval die, fun foam, foam tape

Sunday 7 November 2021

Mini Retreat Ornaments

My friends, Loll (Stamping with Loll) and Christine (It's a Card Day's Night), and I got together at Christine's house for a mini crafting retreat.  We decided to work on making wooden ornaments and offer them at my annual fundraising Christmas card sale (for Southlands Therapeutic Riding Society) at the end of the month.  It will be an experiment to see if my customers are interested in more than cards and shortbread cookies.

I used two types of blank wood ornaments - very smooth flat ones that are only about 1/8" thick and rustic rounds of real logs that are 3/8" thick.  All of them are about 2 3/4" in diameter.  I also used up lots of small scraps of glitter and shimmer cs as I had to choose smaller dies for decorating the ornaments.

I'm including photos of 5 of the ones I made.  First up, one of the thin smooth ones:


I coated this one with gold acrylic paint and then a layer of crackle paste.  When dry and crackled, I added a die cut wreath and sentiment, cutting each one three times and stacking them for more strength and dimension.  I used shimmer cs and Gina K Connect Glue.  And embellished with red pearl gemstones for the berries.

Two more also on the thinner wood ornaments:


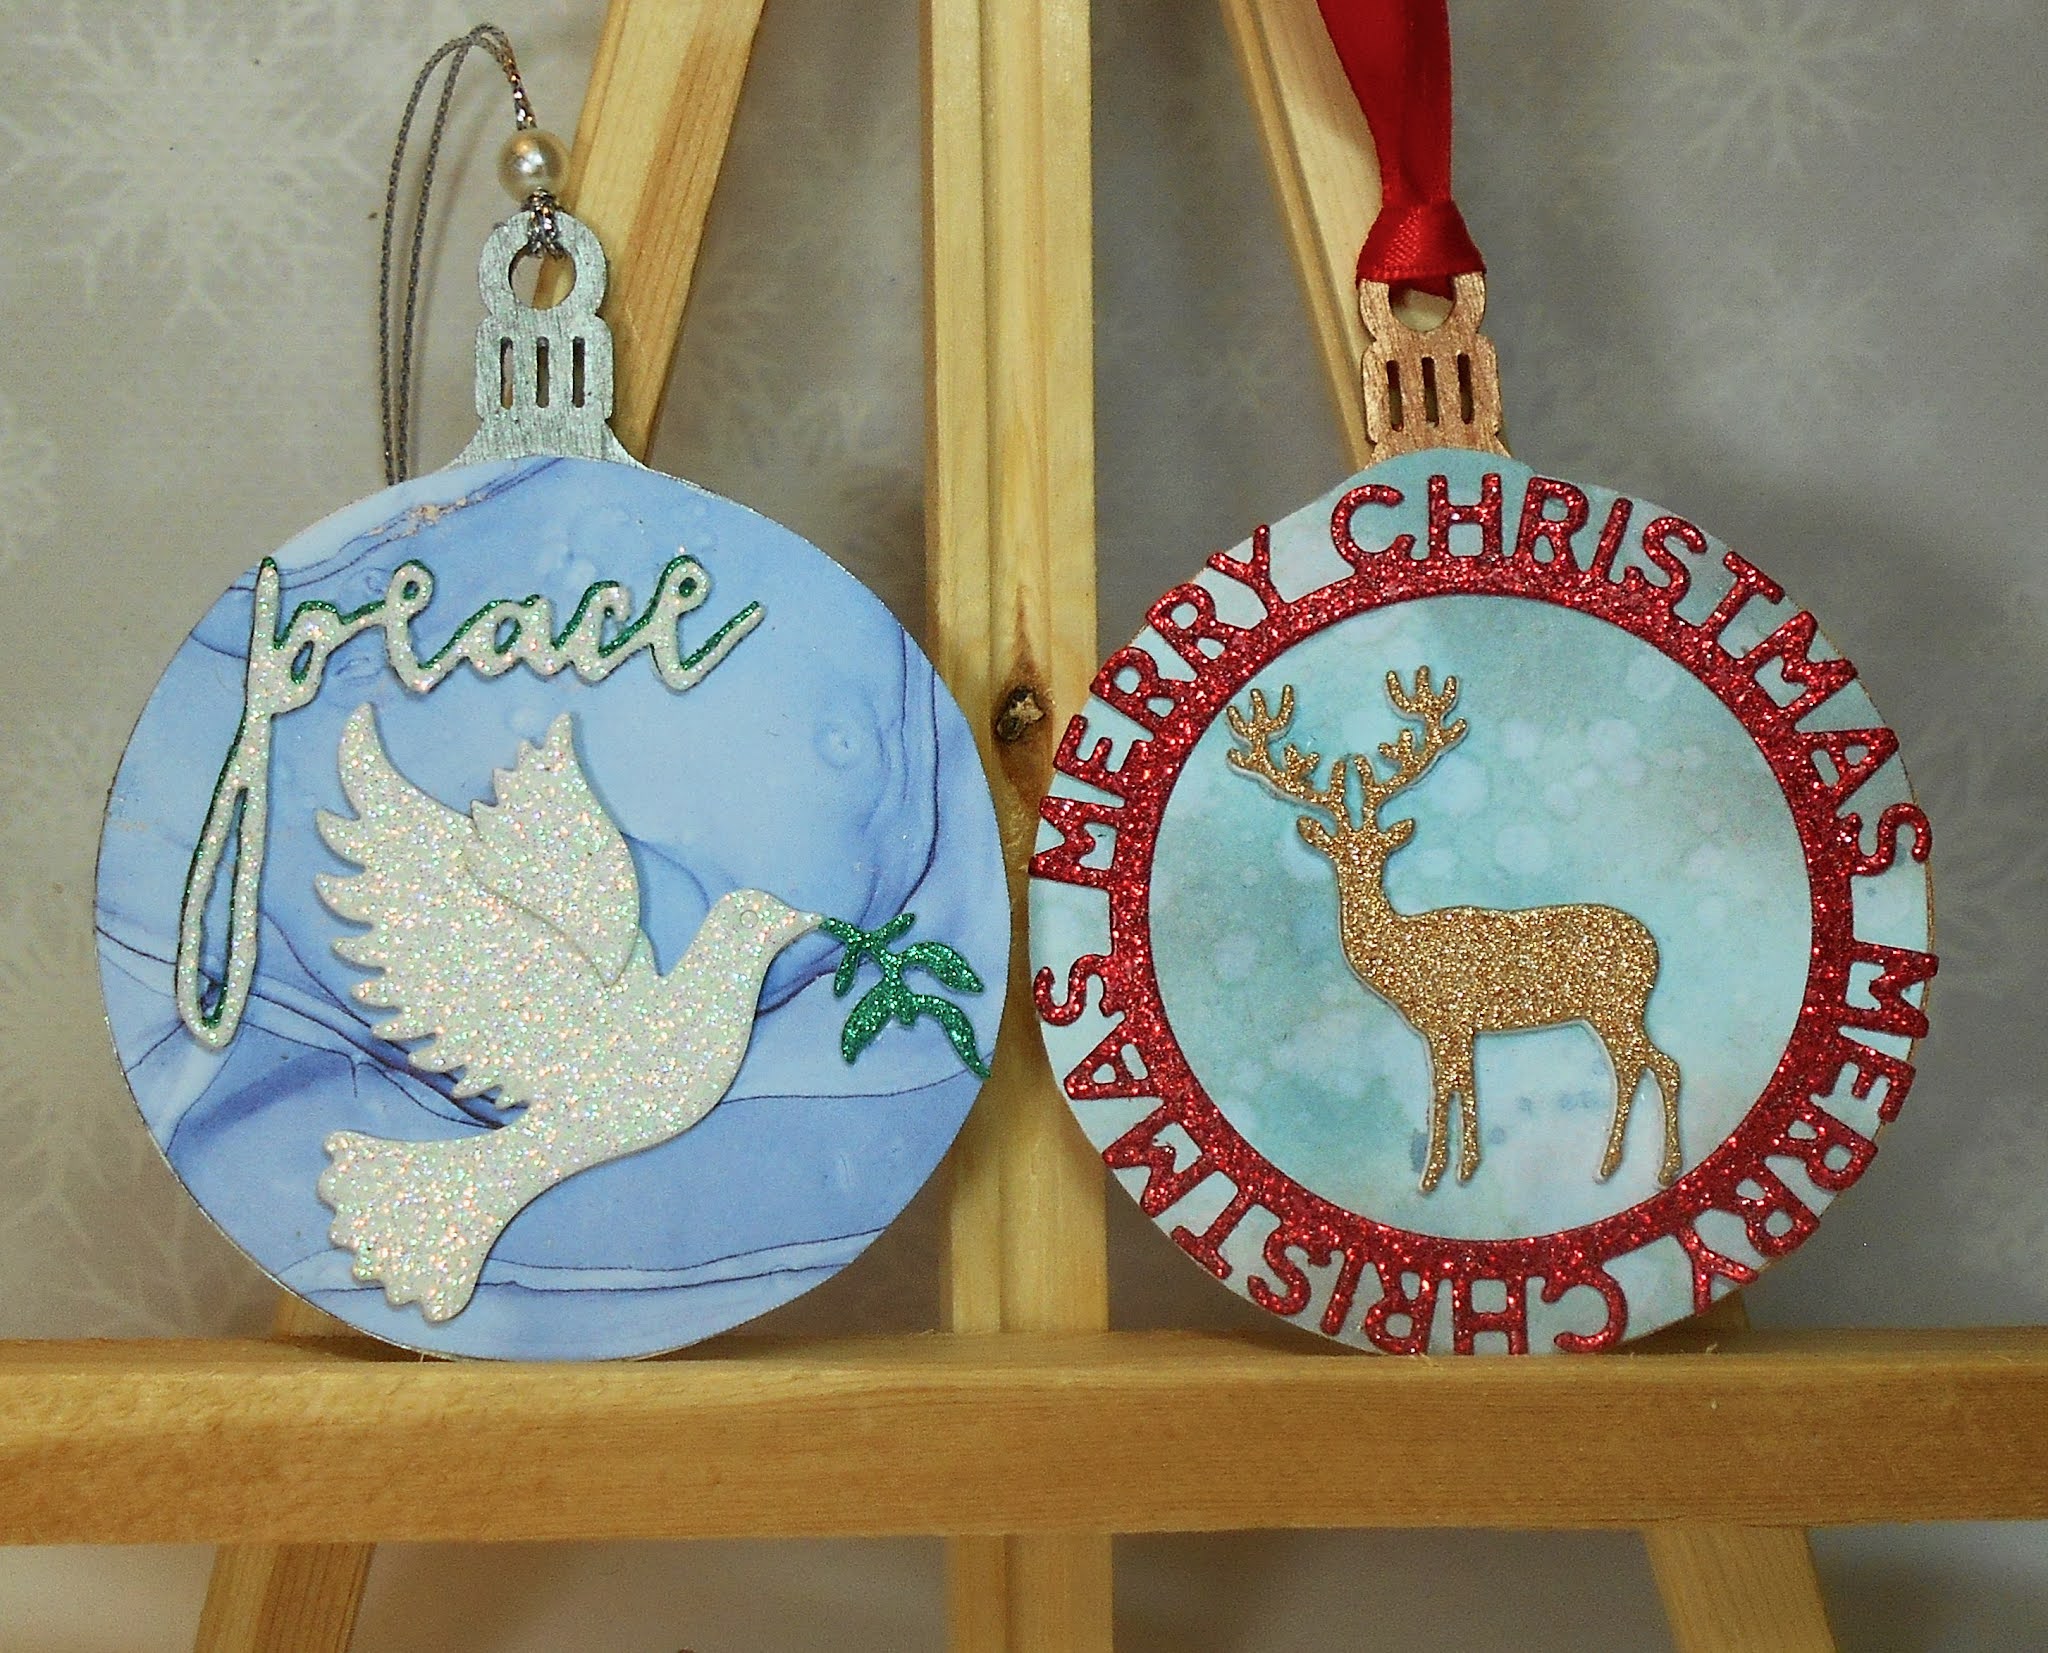
These two use beautiful dp by Craft Consortium (a gift from Loll).   The ornaments are covered with circles of the dp and then the die cuts placed on top - again cut and layered three times, using glitter cs this time.  For the "peace" die cut, I layered a green one slightly out of alignment behind the white one to tie in with the olive branch.

And I'm finishing off with two that use the thicker slices of an actual log:


These ones were inspired by this video by Vicky Papaioannou.  I randomly and roughly painted some gesso on parts of the wood slice before layering with the die cuts.  I went with poinsettias and greenery as I loved Vicky's one that used a poinsettia.

If you'd like to see the ones made by Loll and Christine, please go to these links (we're all posting on the same day):

Loll - Mini Retreat Ornaments

Christine - Craft Retreat Making Christmas Ornaments

Since I used up a bunch of scraps of shimmer and glitter cs to make the die cuts, I'm also entering these in:

Pixie's Snippets Playground's challenge

And because I used the wood ornaments and wood slices that have never been used and have sat in my craft room for about 3 years, I'm also entering these in:

NBUS "Never Before Used Schtuff"

It was so great to spend an extended period of time with friends, crafting together.  We've missed it so much during Covid! 


Dies:

Sizzix wreath die, Penny Black joy die, Impression Obsession peace dove, MFT merry Christmas circle, Impression Obsession reindeer, Dee's Distinctively small poinsettias, TH greenery, Spellbinders poinsettia, Tattered Lace merry and noel, unknown entwined circles

Wednesday 3 November 2021

CAS Christmas Critters

It's already time for the last CAS Christmas challenge of the year (we don't run a December challenge)!  Barb is our host and she wants to see cards featuring Christmas Critters.

A good chance for me to use a die and stamp I've never used before!  Love the sweet little mouse with his pile of gifts!

Stamped, watercoloured, bordered with gold shimmer cs that matches the gold paint I used on parts of the image, and a matching gold shimmer die cut sentiment.

Please come and join us at CAS Christmas!  There's lots more inspiration from our wonderful Guest Designer, Valerie (Le Scrap de Vava), and the rest of the Design Team.

I'm also adding my card to:

Penny Black Saturday Challenge - "Anything Goes"

NBUS Challenge - "Never Before Used Schtuff"

Sparkles Christmas Challenge - "Christmas Presents"


Supplies:
Stamps - Penny Black
Ink - Versafine Onyx Black
Paper - watercolour paper, gold and white shimmer cs
Size - mini slimline - 6.25x3.25"
Accessories - watercolour paints, Penny Black "Be Merry" die

Tuesday 2 November 2021

Tic Tac Toe Poinsettia

I really enjoy Tic Tac Toe challenges so am happy to be posting a card for The Paper Players.  I chose the row that reads "foil / embossing / embellishments".


I ran a piece of red foil cs through my Cuttlebug using the TH 3D poinsettia embossing folder.  I then sanded off some of the raised area to bring out the design.  I cut a thin diagonal strip out of the panel, put the two sections on fun foam, stamped and heat embossed the sentiment in the recessed section between the two sections of the panel, and added lots of tiny gemstone embellishments to the centres of the poinsettias.

The Paper Players "Tic Tac Toe"


Supplies:
Stamps - unknown sentiment
Ink - Versafine Clair Nocturne
Paper - white cs, red foil cs
Size - A2
Accessories - TH 3D poinsettia embossing folder, small clear gemstones, clear embossing powder, fun foam