A blog devoted to the cards I make in my tiny upstairs space. When my sister stays there, she calls it an "artist's garret". I'm not an artist, but am an enthusiastic cardmaker - hence the title "Cardmaker's Garret".
___________________________________________________________________________________________

Saturday 31 December 2016

New Year Wishes

Happy New Year to all my followers!

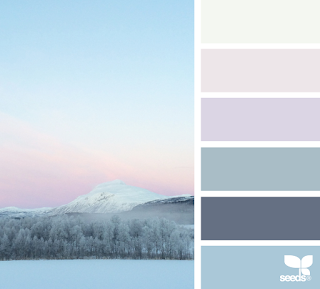
A couple of challenges over at SCS inspired today's cards.  The Free for All challenge is "Happy New Year" and the Inspiration Challenge is to be inspired by a beautiful website of colourways called Design Seeds.

I found two colourways that I loved  "Winter Horizon":

and Color Dreams:


The first was a bit pale and the second a bit too bright - I wanted something in between (Goldilocks or what!).  Here's what I came up with:


I created a background with brushos on watercolour paper, and then stamped my image and heat embossed it in white. I darkened up the edges with a bit of sponging with Distress Faded Jeans.

I added white liquid pearls to the berries.  I stamped the sentiment directly on the panel and it came out crooked so re-did it on a scrap of the brushos background.


Then I decided to repeat the design with black embossing powder instead of white.


I made the brushos closer to the paler of the two inspiration colourways.  And got my sentiment straight on the panel this time!  Instead of sponging the edges, I mounted it on a piece of black cardstock.

I personally prefer the white version.  Which do you prefer?


Supplies:
Stamps - Penny Black bush, Happy Little Stampers sentiment
Ink - Versamark (1st card), Versafine Onyx Black (2nd card)
Paper - watercolour paper;  white linen cs (cardbase for 1st card); white and black cs (2nd card)
Size - 4.75" square
Accessories - white liquid pearls; white embossing powder (1st card); black embossing powder (2nd card)


Friday 30 December 2016

New Moon Through a Window

I like doing the SCS Ways to Use It challenges but was too busy with Christmas baking last week to do the "Windows on the World" challenge so combined it with this week's "A New Moon" challenge.


The trees are stamped and heat embossed, and at the end I put some Rock Candy glitter on the snowy parts.

I made the moon mask by cutting a small Spellbinders circle and then recutting it with the die moved over to get a crescent shape.

Then I sponged the sky, leaving it lighter where the moon would cast some light.

I cut two of the windows and glued them together for substance. And used a dp as "wallpaper".

I've stamped "Happy New Year" inside so will send it to a friend I didn't send a Christmas card to.


Supplies:
Stamps - unknown tree stamps
Ink - Versafine Olympia Green; Distress Faded Jeans, Chipped Sapphire, and Dusty Concord
Paper - white cs, Recollections dp
Size - A2
Accessories - Memory Box window die, clear embossing powder, Rock Candy glitter


Sunday 25 December 2016

Happy Christmas, Everyone!

52 Christmas Card Throwdown has us picking any one of their challenges from 2016.  I chose the April Colour Challenge:


And made these cards using an older cardinal stamp:


I thought I'd do the same card but with different gold embossing powders.  Here are larger photos of each:


The first one is a very shiny metallic look and the second a sparkly glittery look.

One of my goals for next year is to try and use whatever stamps or dies I have out and make at least two cards from them.  The cards need not be identical - I just want to make my card making more efficient and productive.

A very Merry Christmas to you all!


Supplies:
Stamps - Inkadinkado bird, SU sentiment
Ink - ColorBox gold
Paper - white cs, gold cs, gold glitter cs
Size - 4.75" square
Accessories - Lil Inker stitched circle die, Spellbinders circle die, Stampendous gold embossing powder, Ranger Ancient Gold embossing powder


Friday 23 December 2016

Mixing Sponging and Watercolouring

I needed a couple of Christmas-themed cards that didn't actually say "Merry Christmas" on them, to send to friends who won't be feeling very merry this Christmas because of losing loved ones recently.

I'm linking this first one to the CAS Mix Up challenge.


This month the challenge is sponging.  Because I'm not very good at watercolour wash backgrounds, I thought I'd try watercolouring the image and sponging the background.


I stamped and watercoloured the image, then masked it, and sponged the background with a couple of shades of blue Distress ink.  I splattered with watered-down white acrylic paint but I'd watered it down too much so wasn't happy with the splatter I got, so added some white Frantage and heated from underneath.  I die cut the focal image and added it to a dry embossed background.

So for CAS Mix Up, I have sponging and stamping, and for my choice, I have watercolouring, splatter, die cut, heat embossing (the Frantage), and an embossing folder.

Because I'd fussy cut the mask, I decided to use the same image and technique for the second card but didn't add as many options to it.


I used slightly different colours for both my watercolouring and sponging, and added a less diluted acrylic paint splatter and a few die-cut snowflakes.

I love this new stamp!  I didn't do anything fancy with the snow on the leaves and branches, but want to use it for future cards and add glitter or Flower Soft to the snow.


Supplies:
Stamps - Penny Black
Ink - Ranger Archival Jet Black, various blue Distress inks
Paper - watercolour paper, white cs, black cs (for border in card 2)
Size - A2
Accessories - white acrylic paint, Gansai Tambi watercolour paints;  Card 1 - Stampendous Frantage chunky white embossing enamel, Cuttlebug embossing folder, Sizzix framelit die;  Card 2 - small snowflake die


Thursday 22 December 2016

Trees Two Ways

I'm still making Christmas cards!  Very last minute I know!  Here are a couple with trees as their theme.


SCS's Free for All challenge is to make a project with something wood. Real wood, wood texture or stamp, or a tree or branch image. I've got embossed birch trees and stamped fir trees.

I used the technique that I've seen on SCS where you add colour to the debossed side of the embossing folder and then stamp an image on it. Then put your cs into the folder and run it through the Cuttlebug or Big Shot.

I added a snowy bank, two die cut deer, and a die cut sentiment.


And a totally different tree:


The SCS Ways to Use It challenge is "Sing, Sing a Song" - be inspired by a song. I chose "O Christmas Tree".

I used Loll Thompson's alcohol ink smooshing technique with various green alcohol inks and Yupo.  See her video here (go to the 2:20 minute point).  Loll uses glossy cs, but the technique is the same with Yupo.

I had a negative left from a Tim Holtz Christmas tree die cut so layered it over the Yupo. I stencilled some snowflakes around the tree and added the sentiment "O Christmas Tree". It's popped up on fun foam for dimension.


Supplies for Card One:
Stamps - SU trees
Ink - SU Pool Party, Ranger Archival Jet Black
Paper - white, brown, and grey cs
Size - A2
Accessories - SU embossing folder, Impression Obsession deer dies, Tim Holtz winter die, foam tape, fun foam

Supplies for Card Two:
Stamps - Rosie's Roadshow sentiment
Ink - Memento Cottage Ivy, various green alcohol inks
Paper - white cs, Yupo
Size - A2
Accessories - Tim Holtz tree die, Memory Box snowflakes stencil, Aleene's glitter snow paste, fun foam


Wednesday 21 December 2016

Classic Gold, Black, and White

This week's SCS Color Challenge is gold, black, and white with something sparkly for dessert.


I stamped and heat embossed in a very sparkly embossing powder and added a few sequins to balance with the sentiment.

Nothing fancy but I still like doing simple cards with simple techniques, especially heat embossing which was the first technique I ever learned to do!


Supplies:
Stamps - Penny Black ornament, Rubber Soul sentiment
Ink - ColorBox Gold, Ranger Jet Black
Paper - white and black cs
Size - A2
Accessories - Ranger Ancient Gold embossing powder, gold sequins, fun foam


Monday 19 December 2016

Peace on Earth

Today's CAS challenge at SCS is "Peace on Earth, Goodwill to Men".  Here's the card I made for it:


I made a background with my favourite colours of Inka Gold by putting dabs of them on my craft sheet, spritzing with water, and smooshing the mixed media cs into it.  I learned this technique from Loll Thompson.  If you're interested, she has a video tutorial on it.

When dry, I stamped my image and sentiment in black, and because I wanted to get really good black contrast to the background, I used black embossing powder. Even though I'd used my embossing buddy, I still got some little black dots of powder elsewhere.

Wishing all my blog followers not just "Merry Christmas" but "Peace on Earth" as well.


Supplies:
Stamps - Penny Black dove, Paper Smooches sentiment
Ink - Versafine Onyx Black
Paper - white shimmer and mixed media cs
Size - 4.75" square
Accessories - various blue and silver Inka Gold, black embossing powder, fun foam


Sunday 18 December 2016

Merry Monday Snowman

This week's Merry Monday challenge is "Winter Fun".


We are having an abnormal amount of snow in Vancouver right now and there are plenty of kids out in the neighbourhood making snowmen.  Even the university students who rent the house next door have made one.  So that's my theme!


I was tidying up my stamps and came across a set I'd bought in a sale ages ago and never used.  So inked up the snowman in the set, and added some Zig watercolour markers to his body and scarf.  I made a big red smudge below the scarf so decided to trim it down into a circle and border with some old dp from my stash.  Added a very old "let it snow" sentiment.  And felt good about using some older supplies.

But then moved on to newer things and did an embossed background with the new SU/Sizzix ef of falling snow - love the fact that it is a wider embossing folder as it works for square cards!  And tried my Nuvo Crystal Drops (Robin's Egg blue) for the first time.  They are great and I'll probably get some more colours.

For those of you with snowy conditions, enjoy the beauty and fun of it, but stay safe when you're driving!


Supplies:
Stamps - Inkadinkado snowman, Rubber Soul sentiment
Ink - Ranger Archival Jet Black
Paper - white cs, watercolour paper, Kaiser dp
Size - 4.75" square
Accessories - Spellbinder circle dies, SU embossing folder, Nuvo Crystal Drops, Zig watercolour markers


Friday 16 December 2016

Resisting Pine

December is flying by with Christmas preparations but hopefully you're finding time to create a watercolour card for the December CAS Watercolour Challenge.


My favourite way of doing watercolouring is with an embossed resist - it makes it so easy to just let the watercolour pigment flow where you want it.  Here's my reminder card to give you some additional inspiration:


I stamped and heat embossed the pine branch in white.  Then with a few shades of blue from my Gansai Tambi watercolour paints, I did a watercolour background.  It's something I'm really working on getting better at, and am actually quite happy with this one!  This time I added lots of water first, then dropped in the colours and let them do what they wanted to do - and I made myself leave it alone!

I then stamped the pine cone in brown twice, and went over the snowy bits on one of them with my Versamarker pen and added white embossing powder.  I fussy cut both and glued them together for a bit more substance and added it to the branch.

I die cut with a Sizzix framelit die for more interest and popped it up on fun foam.  A simple stamped sentiment in the brown of the pine cone tied it together.

You have until December 24th to link up.  And please remember to keep your cards Clean and Simple.


Supplies:
Stamps - SU Ornamental Pine, Make an Impression sentiment
Ink - ColorBox white, Memento Rich Cocoa, Versamarker pen
Paper - white cs, watercolour paper
Size - A2
Accessories - Sizzix framelit die, white embossing powder, Gansai Tambi watercolour paints, fun foam


Thursday 15 December 2016

Faux-Mother-of-Pearl Ornament

Time to remind you to join in the December CAS Mix Up challenge!  You have until December 24th to link up a card.


I did a combination of plain sponging and some faux-mother-of pearl.


I die cut the ornament out of some shimmery white cs and out of a scrap of sponged faux-mother-of-pearl (see this video by Loll Thompson for the technique).  I took the internal bit from the faux-mother-of-pearl one and set it inside the white one.  I'll use the rest of it on another card.

I cut a panel of the same shimmery cs and sponged a random patch with the same ink colours - I didn't want to sponge the whole panel, but just enough for a contrasting background for the ornament.  It's interesting how different the same sponged ink colours look on the shimmery cs and on the regular cs that was used for the faux-mother-of-pearl piece.

I originally stamped my sentiment directly onto the panel but it smudged (the problem with shimmery cs), so did it on a scrap and punched it out.

Looking forward to seeing what you link up at the CAS Mix Up challenge!  Please remember to keep your card clean and simple.


Supplies:
Stamps - A Muse sentiment
Ink - Staz-on black; Distress Tumbled Glass, Salty Ocean, Broken China, and Faded Jeans
Paper - scrap from previous faux-mother-of-pearl, shimmery white cs
Size - A2
Accessories -Tsukineko Frost White paint, Memory Box ornament die, Lil Inkers stitched rectangle, SU narrow oval punch, white ribbon


Wednesday 14 December 2016

Snowy Peace

This week's Technique Lovers' Challenge over at SCS is "Let It Snow".  It calls for creating snow in some way (other than a stamped image of snow).

One of my favourite ways is using the chunky white Frantage embossing powder - sprinkling it on and then heating from underneath so that you don't blow it off the cardstock.


I started by stamping the tree in Versamark and heat embossing in white. Then I created a mask for the snowy ground and sponged around the tree with three shades of Distress inks. I removed the mask from the horizon and added it lower down so that I could lightly sponge a bit of a snowdrift.

Then used the chunky white frantage all over the panel.

I finished off by added die cut doves and a die cut sentiment, and popped the panel up on fun foam.

It's for my best friend who loves blue and white, and only likes Christmas cards that have a theme of "peace".


Supplies:
Stamps - SU Solemn Stillness tree
Ink - Distress Faded Jeans, Chipped Sapphire, and Dusty Concord; Versamark
Paper - white cs, pale blue glitter cs
Size - A2
Accessories - Memory Box small dove dies, Impression Obsession Peace die, Frantage Chunky White embossing powder, white embossing powder, fun foam


Tuesday 13 December 2016

Shaking in the New Year

This week's CAS challenge on SCS is "Bringing in the New Year" - and the card has to have some kind of explosion theme - explosion of colour, explosion of fireworks, explosion of sparkle, etc.

I thought a shaker card works well as an explosion of sequins and glitter when you shake it.


I stamped and heat embossed a starry background for the shaker and a sentiment for the card front, filled it with sequins and tiny stars, and set it in a white card front. I added the sentiment and a scattering of the sequins and stars to the card front. The card base is gold shimmer cs.

I don't make many shaker cards but this was fun to make so must try a few more!


Supplies:
Stamps - Serendipity Happy New Year, Stamp Oasis star background
Ink - ColorBox gold
Paper - white and gold cs
Size - A2
Accessories - Impression Obsession shaker window, sequins and star glitter, Stampendous Pirate Gold embossing powder


Sunday 11 December 2016

Cling Wrap Background with Stars

Lydia (aka "UnderstandBlue") posted a great Mixability challenge over at SCS - "Feeling Clingy?".  She included a video and instructions for creating a great background using cling wrap and wet pigment.

Here's what I created:


I followed her instructions and sprinkled blue and black brushos on cling wrap, then spritzed with water, and laid a piece of watercolour paper on top of it. Scrunched up the cling wrap and left it to dry. I don't think I got as much nice texture as Lydia did but I like my panel.

When dry, I stencilled stars and the word "Dream" (using two different TCW stencils) with gold embossing paste. And left that to dry (this card took a long time to make because of all the drying time).

I stamped and heat embossed the sentiment on a small piece of white cs, and sponged it with a bit of blue ink so it didn't look so stark on the background.

I added the panel to fun foam for dimension and used a white card base.

I also had the Mixed Media December challenge in mind:


I've got both the gold and the optional element of "star" so I'm entering it over there.

Thanks for stopping by!


Supplies:
Stamps - Impression Obsession sentiment
Ink - ColorBox Gold, Distress Faded Jeans
Paper - white cs, watercolour paper
Size - A2
Accessories - blue and black brushos, TCW stencils, Dreamweaver gold embossing paste, clear embossing powder, fun foam


Wednesday 7 December 2016

Chickadee by the Light of the Moon

Audrie (aka girlgeek101) over on SCS chose a beautiful website for her Inspiration Challenge.  It features art by Rachelle Levingston.  I was inspired by this lovely watercolour:


I chose the chickadee stamp from the SU Beautiful Season set and created this card:


I like to keep practicing my watercolour wash backgrounds (still not really happy with them but I'll keep trying).

I stamped and watercoloured the chickadee image, then masked over it for the moon. I did the watercolour wash background, trying to get it like the inspiration. I added some salt to the right hand side but I think my paint was too dry as I didn't get much effect from it.

When the background was dry, I stamped the sentiment and splattered a bit of orange paint like the inspiration image.

I debated between a white cardbase and a red one and went with the red for more contrast. The watercoloured panel is popped up on fun foam. As a final touch, I added a bit of white gel pen to the berries and then coated them with glossy accents.


I'll keep working on my watercolouring - they do say practice makes perfect, though I'm not aiming for perfection!


Supplies:
Stamps - SU Beautiful Season, Rubber Soul sentiment
Ink - Ranger Archival Jet Black
Paper - watercolour paper, red cs
Size - 4.75" square
Accessories - Gansai Tambi watercolour paints, white gel pen, Glossy Accents, fun foam, kosher salt


Tuesday 6 December 2016

CASEing Loll's Tag

My good friend, Loll Thompson, is the Featured Artist at Tag You're It.  Here's her tag:

The challenge is to CASE her tag.  Here's what I made:


I changed Loll's sponged sky to a sprayed sky, using blue and green Lindy's sprays (quite sparkly IRL).  I used my Tim Holtz tree line die, and stamped and heat embossed the sentiment at the bottom.  I went over the trees and the snow line with a Quickie glue pen and sprinkled with glitter.  It's very CAS and I keep thinking it needs something more but not sure what.

Thanks for looking.


Supplies:
Stamps -  Rubber Soul sentiment
Ink - ColorBox aqua
Paper - mixed media and white cs
Accessories - Die-namics tag die, aqua ribbon, Tim Holtz tree line die, Lindy's blue and green sprays, clear embossing powder


Monday 5 December 2016

A Christmas Fairy

I've fallen in love with the Lavinia line of stamps - so magical!  I recently bought a couple of them and here's my first time using one:


I just love that sweet fairy sitting in the moon and reaching for some stars.  And SCS had the perfect challenge for me to use it: the Ways to Use It challenge - "Celebrating Hans Christian Andersen" - use an image that could be used in a fairy tale.

I started by splattering masking fluid on my cs. When it was dry, I sponged with two shades of blue Distress ink. Then rubbed off the masking fluid.

Then I stamped the fairy image in black and heat embossed all of it in clear, except for the four little stars by the fairy's hand - I carefully sprinkled gold embossing powder on them using a thin straw cut to a fine point.

I stamped the extra stars and added a few die cut snowflakes and a torn snowy ground with my sentiment stamped on it.

I didn't want the quarter moon or the fairy's wings to stay the blue of the background, so went over them with a Quickie glue pen, adding white glitter to the moon and a mixed iridescent glitter to the wings.  Here's a close-up showing the two types of glitter:


I'm hoping for some Christmas money so I can order some more of the Lavinia stamps!!


Supplies:
Stamps - Lavinia fairy, Stampendous star, A Muse sentiment
Ink - Versafine Onyx Black, Distress Faded Jeans and Chipped Sapphire
Paper - Gina K white cs
Size - A2
Accessories - masking fluid, clear embossing powder, white glitter, mixed glitter, snowflake die


Sunday 4 December 2016

A Twiggy Wreath

The December Happy Little Stampers' Christmas challenge for December is "wreath".


I just received a new wreath die from a small Canadian company called Lime Citron.

I created this card with it:


I die cut it from brown and made a sentiment banner with the same cs.  I love the tiny stars that are part of the vine wreath but they didn't look very good just in brown so I added tiny shimmery star stickers to the brown stars.


The background is a simple embossed panel.  I kept it all very flat as I need to mail it.

You have until the end of the month to link up your card at Happy Little Stampers.  I'm looking forward to seeing what you create.


Supplies:
Stamps - Rubber Soul sentiment
Ink - ColorBox white
Paper - white and brown cs
Size - A2
Accessories - Lime Citron vine wreath die, banner die, tiny silver star stickers, silver cord, white embossing powder, Crafts Too embossing folder