A blog devoted to the cards I make in my tiny upstairs space. When my sister stays there, she calls it an "artist's garret". I'm not an artist, but am an enthusiastic cardmaker - hence the title "Cardmaker's Garret".
___________________________________________________________________________________________

Wednesday 28 February 2024

Group of Seven Stencilled Stars

For this month's Group of Seven Cardmakers' technique, we are trying something called Masked Stencilling.  It was inspired by this card on Pat's Colourful Creations.  Basically you mask off part of your card front and stencil over the rest.  Here's my card:


I used one of the dies I use for cutting slopes or snow banks to cut a mask.  I laid that mask over the bottom right section of my card front and then stencilled the stars with a blend of two Distress inks and a gold ink.  I removed the mask and stamped my sentiment in the area that was masked.  I die cut the Christmas star twice out of white cs and once out of gold glitter cs and glued them together.  I popped the panel up on fun foam for more dimension.

There's lots of other ideas for using this technique on our Group of Seven post.  Feel free to give it a try but be aware, we're not a challenge blog - your linked cards will only be to provide more inspiration.


Supplies:
Stamps - Great Impressions sentiment
Ink - Distress Fossilized Amber and Wild Honey, Delicata Golden Glitz
Paper - cream cs, gold glitter cs
Size - A2
Accessories - handmade star stencil, masking paper, fun foam, star of wonder die, slope (hill) die

Tuesday 27 February 2024

Geometric Sympathy, Bright Butterfly, Christmas Heart

I need to send a sympathy card today so used the ATCAS "Geometric" challenge and a technique I learned from Eileen Godwin to make this card.  It's also for Shopping our Stash "It's Not Easy Being Green" challenge.

Using a straight edge and blending brushes, I lightly brushed four colours of ink on the background, turning the straight edge every time I changed colour.  This created the geometric pattern.  Then using the same colours, I lightly stencilled over top of it.

Then I stamped the image and sentiment on top of it, trimmed with a stitched rectangle and popped it up on fun foam.

Next up, a birthday card for my sister.  Penny Black Saturday Challenge wants "Wings", My Time to Craft wants "Create Your Own Background", and Sweet Stampin' wants "Bright Colours".


The background was created using the saran wrap technique with Brushos sprinkled on glossy cs, spritzed with water, then saran wrap scrunched on top and left to dry.  The butterfly was stamped on watercolour paper on which I'd sprinkled the same colours of Brushos and spritzed with water, letting the colours blend and dry naturally.  I then fussy cut the butterfly, glued its body to the background and popped the wings up with bits of foam tape.  I die cut the sentiment twice and glued them together for extra dimension.

For Christmas Crafts All Year Round "Hearts", I used a stamp that is a heart-shaped wreath.


The background was created by sponging with three shades of green Distress ink and splattering with some diluted white paint.  I stamped and heat embossed the heart wreath in white and added a bit of colour with Tombow markers.  Then trimmed the panel with a stitched square die.  Finished off with a dark red mat and a sentiment trimmed with a small rectangle die.

  Grab our badge!  Grab Our Badge!My Time To Craft!Sweet Stampin' Challenge Blog


Supplies for card 1:
Stamps - Stampendous Branch Flight, Great Impressions sentiment
Ink - Distress (Shabby Shutters, Iced Spruce, Peeled Paint, Old Paper), Versafine Clair Nocturne
Paper - white cs
Size - A2
Accessories - Lime Citron stencil, fun foam

Supplies for card 2:
Stamps - Penny Black butterfly
Ink - Versafine Onyx Black
Paper - white cs, white glossy cs, watercolour paper
Size - A2
Accessories - blue, yellow, and green Brushos; saran wrap, happy birthday die, foam tape

Supplies for card 3:
Stamps - Penny Black Christmas heart, unknown sentiment
Ink - green Distress inks, ColorBox white, Versafine Onyx Black
Paper - white and dark red cs
Size - 5.25" square
Accessories - Tombow markers, white embossing powder, Lil Inker stitched square die, Spellbinders small rectangle die

Sunday 25 February 2024

Kraft with a Christmas Tree, a Jolly Owl, and Forget-Me-Nots

Sparkles Christmas Challenge wants to see "kraft card". And the Christmas Kickstart Challenge is "Out on a Limb" - something you find on a limb of a tree.  I have created a snowy effect on all the limbs of my tree.

In keeping with the rustic look of kraft, I wrapped a piece of burlap around my top layer of kraft (which I'd trimmed with a wonky stitched rectangle die) and topped it with a Christmas tree die cut once out of green cs and once out of white, layered so that the white shows as if it were snow on the tree branches.  I embellished the tree with a few tiny die cut stars.

Jingle Belles challenge is "Text Me" - I picked the option of having the sentiment be the star. Stamping Sensations wants "Animals, Birds, and Creatures" - I have an owl.

I stamped the owl / sentiment (they are all on one stamp), coloured everything but the crown with coloured pencils, and coloured the crown with a gold glitter gel pen. Trimmed the panel with a square hemstitch die, added it to a red card base, and embellished with three tiny red gemstones on the holly sprig.

Just to balance out the Christmas cards, here's a non-Christmas one.  Festive Friday is celebrating International Women's Day.  I made a birthday card for a close girlfriend who loves blue and flowers.  It uses three things from the challenge list - blue, white, and a bouquet.

Stamped, coloured with coloured pencils, die cut with a stitched rectangle die, and bordered with blue cs. The sentiment is on a vellum strip wrapped around the focal panel.

Please take a copy of our badge


Supplies for card 1:
Stamps - TH sentiment
Ink - Memento Tuxedo Black
Paper - kraft, green, and white cs
Size - A2
Accessories - Christmas tree die, tiny star die, burlap, wonky stitched rectangle die

Supplies for card 2:
Stamps - Crafty Individuals
Ink - Versafine Onyx black
Paper - bristol and red cs
Size - 5.25" square
Accessories - coloured pencils, gold glitter gel pen, Spellbinders square hemstitch die, small red gemstones

Supplies for card 3:
Stamps - Memory Box sentiment, Penny Black forget-me-nots collag
Ink - Versafine Onyx black
Paper - white and blue cs, vellum
Size - A2
Accessories - coloured pencils, Lil Inker stitched rectangle die

Thursday 22 February 2024

One More Valentine and Winter Wishes

Still trying to get my Valentines posted.  This one is for Sisterhood of Crafters "Love".

I cut a rectangle of very pale silver shimmer cs that is the same colour as the silver hearts in the piece of ribbon I found in my scrap box. I attached the ribbon down the left side. I die cut the heart cluster and the love sentiment out of red cs, and popped out the interior hearts and set them aside for a future project. I glued the outline hearts to the panel. Then I cut the heart cluster out of white glitter cs and popped out the interior hearts and added them to the interiors of the outline hearts. For some dimension, I popped the panel up on fun foam on a white card base.

For The Four Seasons Challenge "Winter" and Word Power "The Sentiment as Focus".

I made a background with light blue Magicals sprinkled on mixed media cs and spritzed with water. The snowflakes are die cut from glitter cs; the sentiment from blue shimmer cs.

Please Grab Our Badge!  Please share our Blog Badge  


Supplies for card 1:
Paper - white and red cs, very pale silver shimmer cs, white glitter cs
Size - A2
Accessories - ribbon, TH love die, unknown cluster of hearts die, fun foam

Supplies for card 2:
Paper - off white glitter cs, off white cs, blue shimmer cs, mixed media cs
Size - A2
Accessories - blue Magicals, Penny Black sentiment die, Cheery Lynn snowflake dies

Monday 19 February 2024

A Splattered Birthday and a Flowered Heart

A birthday card for a friend who loves pink and for Seize the Birthday "Splatter" , Time Out "Birthday", and Colorful Options "Pink":


After stamping and watercolouring the image, I stamped the splatters, postmark, script etc. with a very pale ink. Added a heat embossed sentiment on a black cs strip.

Another Valentine before the month is over.   It's got flowers on it for The Flower Challenge "Add a Heart".

I put the flower stamp (a SU one but I can't remember what set it came from and it's the only one of that set I still have) in my MISTI and coloured it with Tombow markers and stamped and repeated till I was happy with the image. I die cut it with a heart die, die cut a larger heart die out of glitter cs that seemed to blend well with both the red and purple in the image, and added a purple sentiment.


Supplies for card 1:
Stamps - SU Elements of Style and Gorgeous Grunge, Tim Holtz postmark, SU sentiment,
Ink - Versafine Clair Nocturne, Adirondack Lake Mist, ColorBox white
Paper - watercolour paper, off white cs, scrap of black cs
Size - A2
Accessories - watercolour paints, white embossing powder

Supplies for card 2:
Stamps - SU Fresh Vintage flowers, Impression Obsession sentiment
Ink - Distress Seedless Preserves
Paper - off white cs, glitter cs
Size - A2
Accessories - heart dies, Tombow markers

Saturday 17 February 2024

Santa and Buffalo Check


I love to use the Peace on Earth mood board (see at end of post) to inspire my card for the Design Team.  For this one, I was inspired by the buffalo check in the top right image and the Santa and sleigh in one of the snow globes in the bottom left image.


I had a little scrap of buffalo check wool ribbon that I took off a Christmas floral arrangement.  I wrapped it around a piece of black cs.  Then die cut the Santa sleigh and the sentiment twice each out of white cs and glued them together.  Then glued them on the panel.  I specifically chose that sentiment die as the swirls on the word "be" went well with the swirls on the Santa die.  I taped the buffalo check to the back of the black panel, and added fun foam around it so that it wouldn't make lumps on the card base.

There's lots of other inspiration over at Peace on Earth - a few of the other Design Team members also used the buffalo check.  We'd love to have you join us, whether you're inspired by our mood board or just want to post an "anything Christmas" card.


Supplies:
Paper - white and black cs
Size - 6x4.25"
Accessories - buffalo check wool ribbon, Memory Box "be merry" die, unknown Santa sleigh die, fun foam

Friday 16 February 2024

More Valentines

I keep meaning to do another post with Valentines for some of the February challenges but life has been busy.  So finally, here we are.

For My Time to Craft "Cupid and / or Arrow", Sisterhood of Crafters "Love", Double D "Heartfelt", and Heart's Quest Fantasy Challenge "Cupid":

The cupid is die cut from a piece of mixed media cs smooshed with pink and red inks.  I also die cut three tiny red hearts and a red circle.  I layered a paper doily over the red circle, sat the cupid in the middle, added the hearts, and stamped a sentiment.

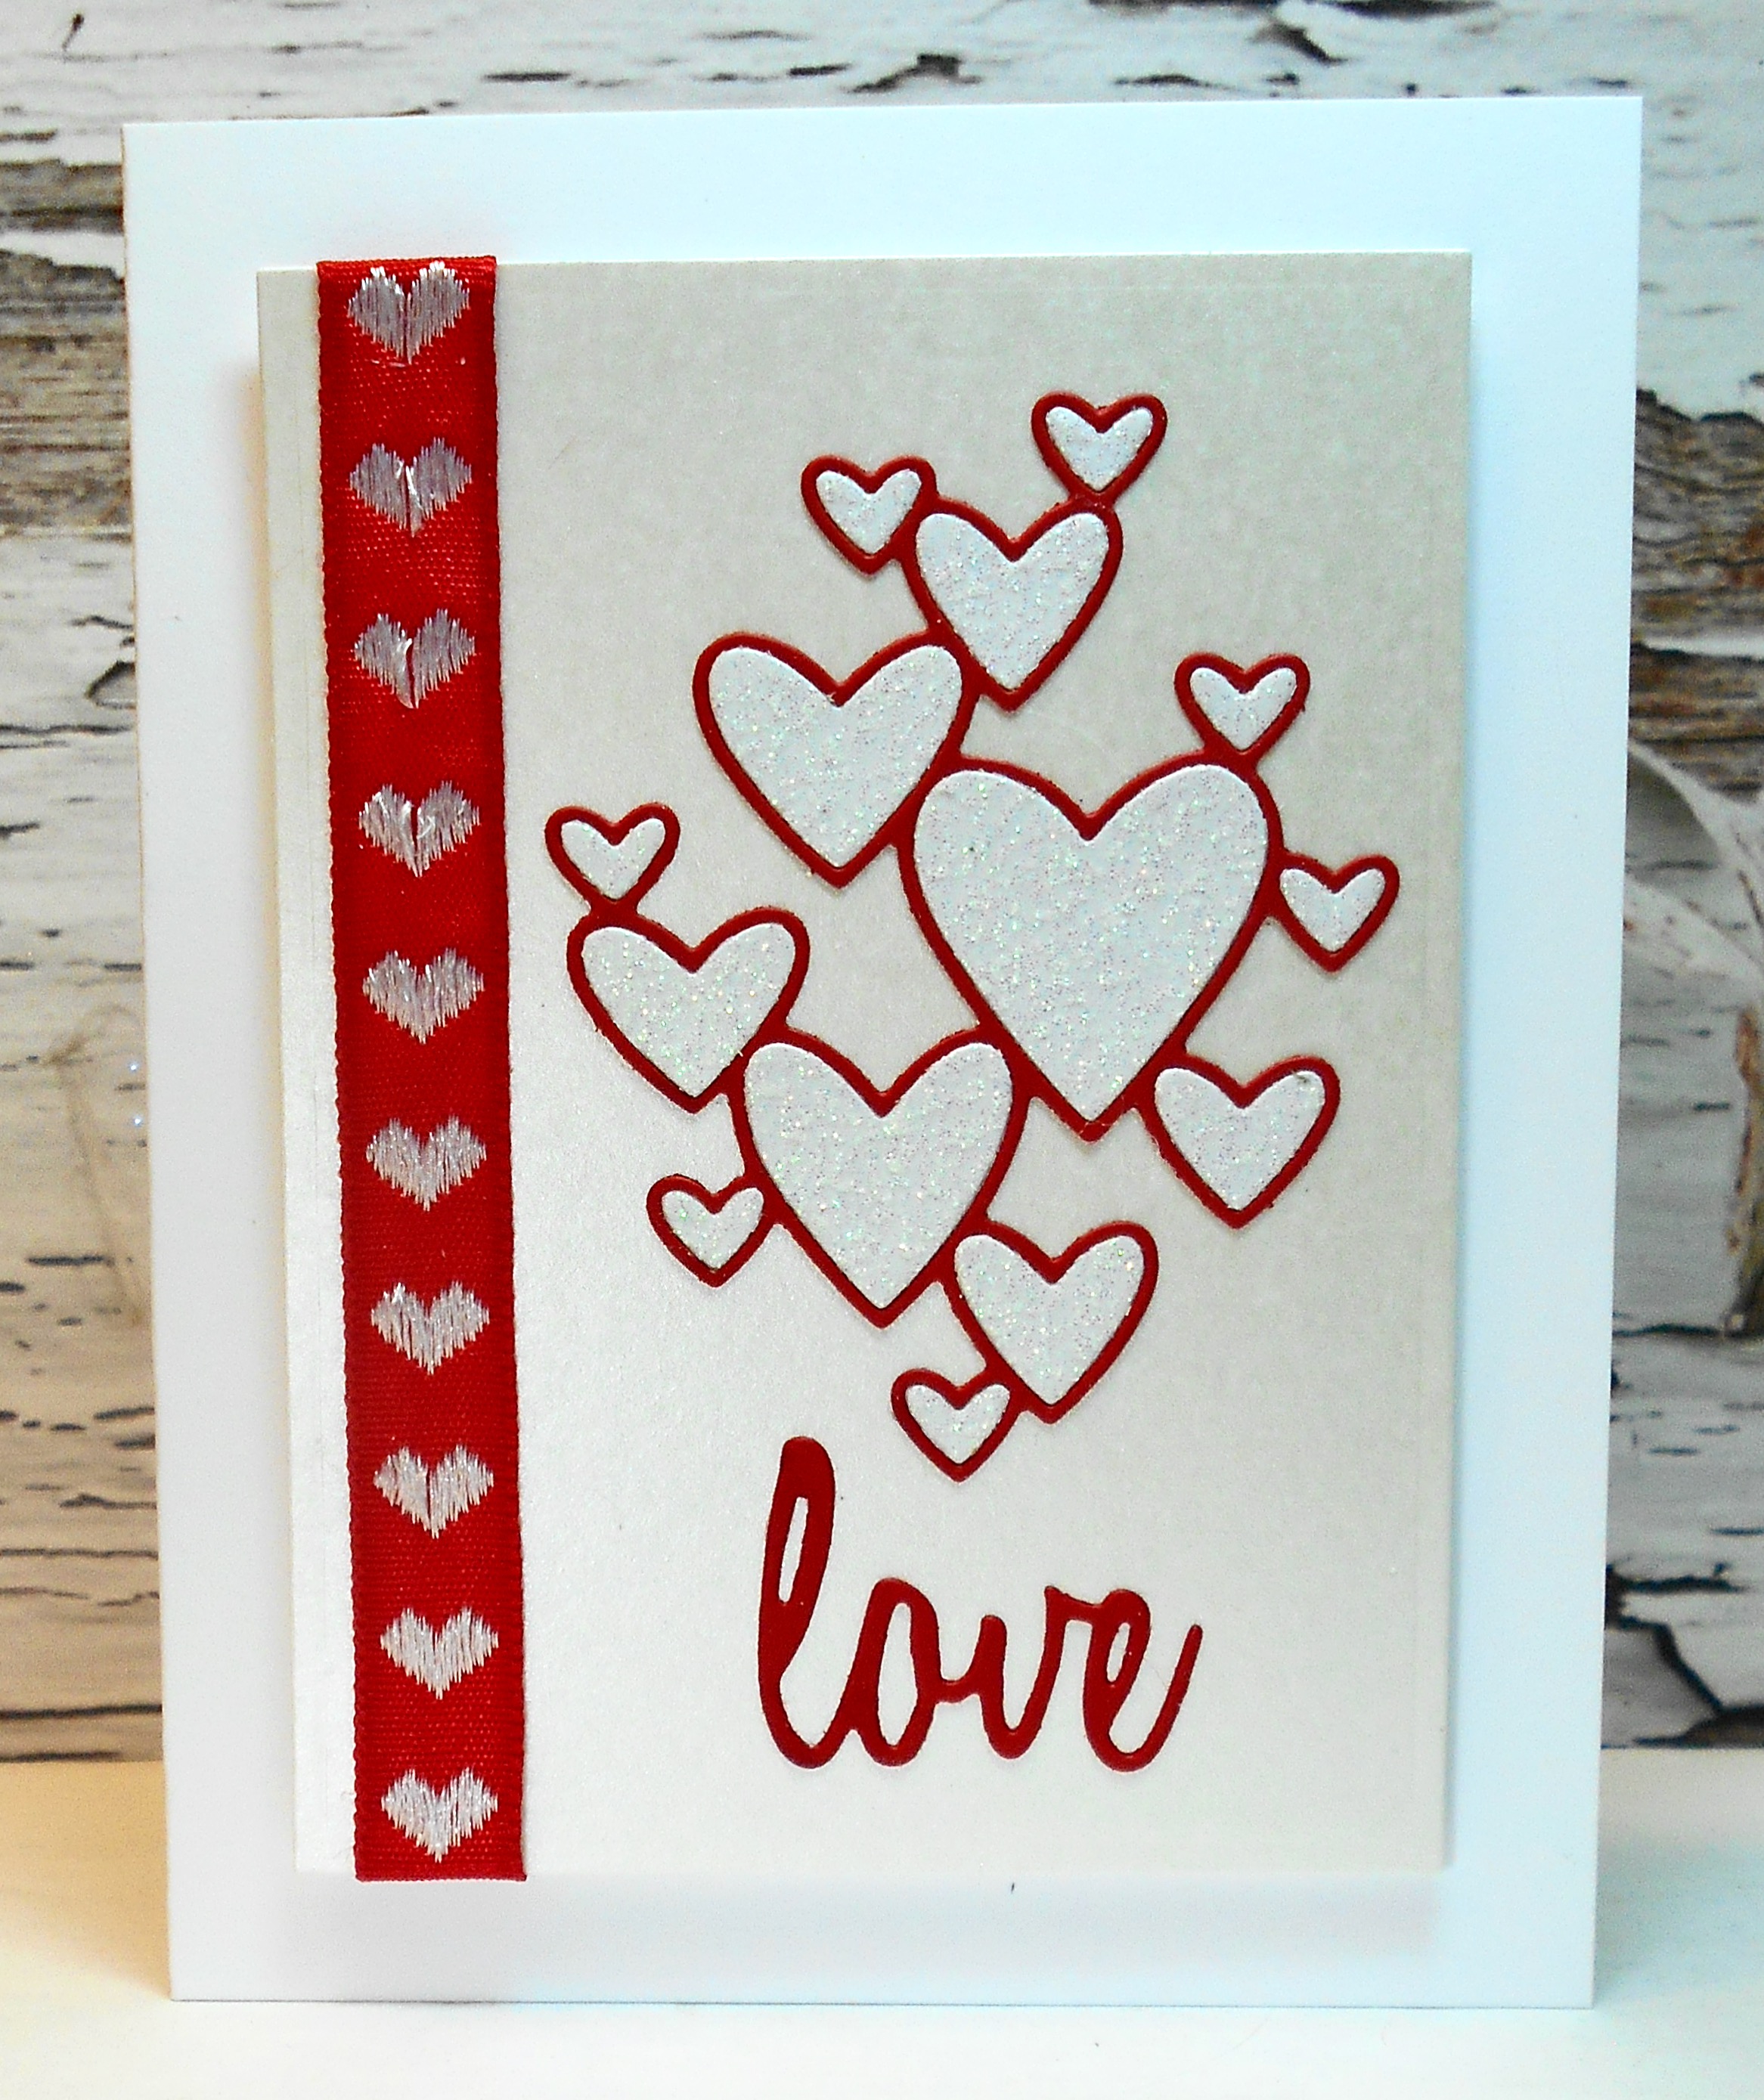
Next up, a card for Stencil Fun "Love / Hearts", Color Throwdown "Red, Kraft, and White", and Cardz 4 Guyz "Love".

On heavy-weight kraft cs, I stenciled the random grid lines with white embossing paste. In one of the gaps at the bottom right, I stamped my sentiment.

I die cut the red heart cluster and glued it over the centre. It looked too plain so I glued a bunch of tiny white hearts left over from another die cut.

And one more - for Can You Handle the Pressure? "Red and  / or Pink", Colorful Options "Pink", Simply Clean and Simple "Pink", and Heart's Quest Celebration of Love Challenge "Valentine's Day".

For this card, I used the Debossed Inky Resist technique seen in this video

Following the instructions in the video, I lightly rubbed Versamark over the raised design side of the embossing folder.  Then placed watercolour paper inside the embossing folder and ran it through my Cuttlebug.  I sprinkled with white embossing powder and heat set.  The Versamark and embossing powder created a resist for the next step of smooshing with various pink Distress inks. 
 
I die cut a stitched heart opening in a panel of white cs, layered it over my pink embossed resist panel, added it to a white card base, and topped with a black die cut sentiment.

GRAB OUR BADGE!  Please Grab Our Badge!  LOVE to have you SHARE our BADGE                                                  Cardz 4 Guyz Logo                Please Grab Our Badge  Changes coming in 2024 for TFATU   Heart's Quest Celebrations of Love Challenges Blog 
My Time To Craft!
 
  Please Help Us Spread the Word ...


Supplies for card 1:
Stamps - TH sentiment
Ink - various red and pink Distress inks
Paper - white and mixed media cs, white paper doily
Size - 5.5" square
Accessories - cupid die, small heart dies, circle die

Supplies for card 2:
Stamps - unknown sentiment
Ink - ColorBox white
Paper - kraft, red, and white c
Size - A2
Accessories - TCW Sketch Grid stencil, white embossing paste, heart cluster die cut, leftover tiny white die cut hearts

Supplies for card 3:
Ink - Versamark, pink Distress inks
Paper - watercolour paper, white and black cs
Size - A2
Accessories - flowery embossing folder, white embossing powder, Happy Valentine's Day die, stitched heart die