A blog devoted to the cards I make in my tiny upstairs space. When my sister stays there, she calls it an "artist's garret". I'm not an artist, but am an enthusiastic cardmaker - hence the title "Cardmaker's Garret".
___________________________________________________________________________________________
Showing posts with label poinsettia. Show all posts

Monday, 9 June 2025

Joy with Cardinals and Poinsettias

I'm not good at using large dies but having seen so many great cards using the Penny Black Joy die, I broke down and bought it a while ago and am finally getting around to using it.

I  stamped the image of the cardinals and coloured with coloured pencils, then trimmed it to fit behind the "o" of the die cut which I cut out of green cs.  I used a stitched rectangle die to add interest to the edges of the card.

I'm linking it up with Try It on Tuesday ("Things with Wings") and Word Power (the sentiment is the focus of the card).

I had enough of the sheet of green cs left from cutting out "Joy" to make an A2 card base - I don't very often use coloured card bases so it was fun to think of what to add to it.  

I put the poinsettia stamp in my MISTI and inked it up with various mini Distress inks and Memento Dew Drop inks, spritzing, stamping, and reinking until   I was happy with the results.  I trimmed it with a Sizzix die, added it to the green card base, and added a green TH Christmas sentiment sticker and some gemstones.

I'm linking it up to Addicted to CAS ("Florals") and Twelve Months of Christmas ("Only One or Two Layers"),


  Pop this on your blog to find us fast! Please share our Blog Badge


Supplies for card 1:
Stamps - Serendipity cardinals
Ink - Versafine Onyx Black
Paper - white and green cs
Size - A2
Accessories - Penny Black Joy die, coloured pencils, Lil Inkers stitched rectangle die

Supplies for card 2:
Stamps - Penny Black poinsettia
Ink - various mini Distress inks and Memento Dew Drop inks
Paper - green cs, watercolour paper
Size - A2
Accessories - TH Christmas sentiment sticker, Sizzix die, gemstones


Wednesday, 30 April 2025

Poinsettia and Star

Sneaking in under the wire with a poinsettia card for the Christmas Kickstart Challenge "Positively Poinsettias".  It's also going to My Time to Craft Christmas which wants Christmas flowers.  And I think it has enough of a vintage look for The Twelve Months of Christmas Link-up "Vintage" challenge.

I stamped the poinsettia postcard three times. For the bottom layer, I did a bit of watercolour painting on the tiny bell, tiny reindeer, and the flourishes. On the second layer I painted the green leaves and then fussy cut the whole poinsettia. On the third layer, I painted the red petals and just fussy cut that section of the poinsettia. I glued the two fussy cut layers onto the bottom panel and attached that to my card base.

I tried to photograph it so you could see the dimension and the layers.

My second card is for 52 Christmas Card Throwdown "Embossing", Can You Handle the Pressure? (use an embossing folder), Rudolph Days (anything Christmas), and Shopping our Stash "Outta this World" (I chose the option of stars).

 
I die cut the large star out of kraft cs and streaked a bit of white gesso across it. Pierced a hole in the top of it and threaded a strip of red gingham ribbon through it. Taped the ribbon on the back of the background panel that was run through a 3D embossing folder. I think this folder gives the idea of the star handing in a Christmas tree.  Added foam tape to the back of the star to pop it up a bit. Stamped the sentiment in red and added the bow and the small silver star.
 
 Please Grab Our BadgeGrab Our Badge!
My Time To Craft Christmas!


Supplies for card 1:
Stamps - Viva Decor
Ink - Versafine Onyx Black
Paper - watercolour paper, off white c
Size - 6x4.25"
Accessories - watercolour paints

Supplies for card 2:
Stamps - Impression Obsession sentiment
Ink - Distress Candied Apple
Paper - white and kraft cs, silver mirri c
Size - A2
Accessories - Spellbinders star dies, red gingham ribbon, SSS 3D embossing folder, gesso, foam tape

Wednesday, 23 April 2025

Vintage Poinsettia and Multi Coloured Holly

It's beautiful weather here at the moment - perfect for gardening.  Fortunately for my Christmas card quota, I can no longer garden all day like I could when younger (or my back protests very painfully) so I'm forced to do other things during the day.  Today I got a couple of cards made.

For The 12 Months of Christmas Link-up "Vintage" and the Christmas Kickstart "Positively Poinsettia" challenges:


With the stamp in my MISTI, I stamped it first in Antique Linen, then inked up the poinsettia with red and green TH crayons, misting lightly, and going back and forth until I was happy with the results. Trimmed it, bordered it with dark gold, added the sentiment, a dark gold border, and some champagne-coloured pearls in the centre of the flower.  

Then for Sparkles Christmas Challenge "Christmas Foliage" and Christmas All Year Round (be inspired by a line from Rockin' Around the Christmas Tree - I went with "Deck the halls with boughs of holly"):

I stamped the holly stamp twice with an old Kaleidacolor pad to get the lovely colour variation, added the sentiment, trimmed with a stitched rectangle and popped it up on fun foam, added red Stickles to the berries and a little red bow.


Grab our badge! Please take a copy of our badge


Supplies for card 1:
Stamps - TH poinsettia postcard, Mama Elephant sentiment
Ink - Distress Antique Linen, Versafine Clair Nocturne
Paper - off white and dark gold cs
Size - A2
Accessories - TH crayons, champagne pearls

Supplies for card 2:
Stamps - Penny Black
Ink - Kaleidacolor Caribbean Sea
Paper - off white cs
Size - A2
Accessories - Lil Inker stitched rectangle die, red Stickles, red cord, fun foam


Tuesday, 11 March 2025

A Feminine Shoe and an Encircled Poinsettia

My youngest sister loves shoes and she is a voracious reader.  I made this card for her and for Try It on Tuesday ("For a Lady"), Inkspirational ("CAS with a twist of stickers or ephemera" - I think the shoe counts as ephemera as I took it off a commercial card), and Word Power (the sentiment is the main focus).


I stamped the sentiment and trimmed with a pierced dot rectangle die, and popped the shoe up next to it - all on a matching pink card base.

And of course, getting on with Christmas cards.  This one uses up a lot of snippets of leftover cs so I'm linking up to the Snippets Challenge.  And to the Flower Challenge ("Add Circles") and Beautiful Blossoms (anything flowers). 


I die cut the poinsettia in red cs, sponged a bit of Distress Aged Mahogany around the edges, then layered them together. I embellished with dark red gemstones.

The sentiment and poinsettia are placed on white shimmer cs. I bordered the poinsettia's circle with a red cs inverted scallops circle. The card base is green shimmer cs.

Pop this on your blog to find us fast!    Please share our Blog Badge

Player's Badge 

Our Blog Badge


Supplies for card 1:
Stamps - Crafters Companion sentiment
Ink - Versafine Onyx Black
Paper - white and pink cs
Size - A2
Accessories - Spellbinders pierced dot rectangle die, shoe from a commercial card

Supplies for card 2:
Stamps - Rubber Soul sentiment
Ink - Staz-on black, Distress Aged Mahogan
Paper - white shimmer and green shimmer cs, red cs
Size - A2
Accessories - Memory Box Blooming Poinsettia die, Spellbinders circle and inverted scallop circle dies, dark red gemstones, stitched banner die


Friday, 28 February 2025

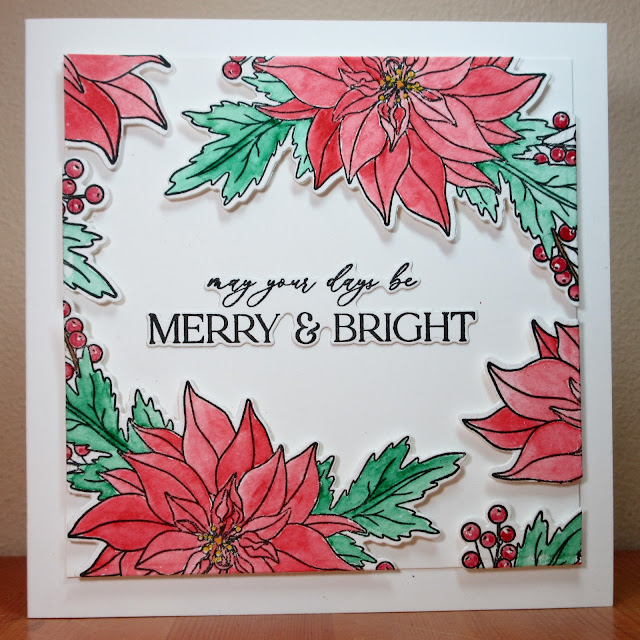
Floating Poinsettia Frame

This month the Group of Seven Cardmakers are trying a technique called Floating Frames.  It's a technique I'd never done before so I watched the two videos we're linking to on Group of Seven.  I ended up following the instructions in the Natasha Foote video as the Jennifer McGuire one called for Press'n'Seal kitchen wrap and I didn't have any. 


I don't buy many stamp and die cut sets but just happened to have bought this one recently.  I stamped the image twice on watercolour paper and coloured it with watercolour paints, then die cut it with the matching die.  I added foam tape to the back and arranged the two die cuts on opposite corners of my focal panel piece of cs.  I trimmed off the parts hanging over the edges.  From those extra parts, I chose bits of them that would fill in the gaps around the edges between the two pieces I'd already stuck down.  I used one of the sentiments from the same stamp set and its matching die and glued that to the centre.

I really like the final effect - the die cuts really do look like they are floating.  But I found it took a long time to make this card so if you're looking for a quick technique, this wouldn't be it.  If I had more stamp / matching die sets, I might try it again, but not if I had to fussy cut images for it!

Head over to Group of Seven and see what the others made in the way of samples, and then give it a try and link your results up with us!

I'm also adding it to the latest NBUS challenge as it's the first time I've used the stamps and dies.


Supplies:
Stamps - Simon Says Stamp Poinsettia Swag set
Ink - Versafine Onyx Black
Paper - watercolour paper, off white cs
Size - 5.5" square
Accessories - watercolour paints, Simon Says Stamp Poinsettia Swag dies, foam tape

Sunday, 23 February 2025

Red Acetate Poinsettia and Pink Watercoloured Sweet Peas

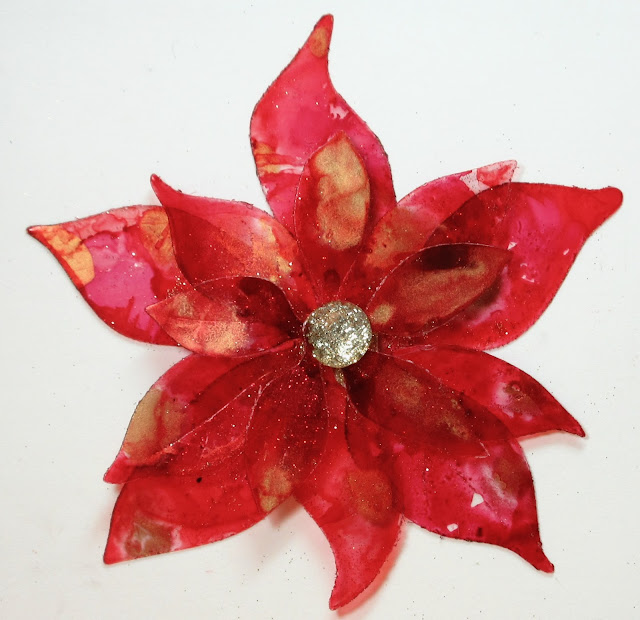
The Jingle Belles Christmas Challenge is asking for see-through elements.  I decided to create a layered acetate poinsettia.


I coloured a piece of acetate with a few different red alcohol inks and a bit of gold mixative.  Then die cut three layers of a poinsettia, and stuck them together with dimensionals in the centre.  To hide the dimensionals I added a gold sparkly rhinestone sticker.

I stamped and heat embossed the sentiment in gold on my focal panel, die cut with a hemstitch square.  I wanted to have exactly the same gold as the sentiment showing through the hemstitch openings so I took a scrap of cs, ran ink around its edges, and heat embossed the edges.

Here's a close-up of the poinsettia showing how see-through the layers are:

 
As a nice contrast to a red poinsettia, I went with shades of pink in my next card.  It's for The Flower Challenge "Feature the Colour Pink".
 

I love sweet peas and grow them every year in my garden.  The image is stamped and watercoloured, with a little bit of black splatter around the image.  Since it's a large image and not really enough room to add a border layer, I took a black marker and went around the edges of the focal panel.  I left it without a sentiment as I'll either use it as a notecard or add a sentiment on the inside. 


Supplies for card 1:
Stamps - Northwoods sentiment
Ink - ColorBox gold
Paper - off white cs
Size - 4.75" square
Accessories - acetate, red alcohol inks, gold mixative, gold embossing powder, poinsettia die, dimensionals, Recollections gold sparkly rhinestone sticker, Spellbinders square hemstitch die

Supplies for card 2:
Stamps - Stamps Happen Sweet Peas
Ink - Versafine Onyx Black
Paper - watercolour paper, off white cs
Size - A2
Accessories - watercolour paints, black marker

Tuesday, 28 January 2025

Dry Embossed Highlights

This month the Group of Seven Cardmakers are doing a technique called Dry Embossed Highlights over Ink Blending.  This works best with the newer 3D embossing folders.  First I tried one using the technique in this video.

I placed a border mask over my focal panel and blended three shades of blue Oxide inks inside the mask.  When dry, I dry embossed it with a snowflakes embossing folder.  I patted with a white pigment ink (but my pad was quite dry so didn't have the best results.  I also tried adding a bit more white with an ink blending tool but ended up getting a bit of the blue ink transferring to the snowflakes outside of the masked area.  I added a white die cut sentiment and three die cut snowflakes, and went around the edge of the focal panel with a blue metallic marker.

I'm also adding this card to The Sisterhood of Crafters "snowflakes" challenge.  And to Can You Handle the Pressure? "Snow".

For the second one, I used the same technique with a few shades of red Oxide ink.  But instead of using white to highlight, I used gold.

 
This poinsettia embossing folder worked better for the technique than my snowflake one did  - I think because it has higher larger raised areas.
 
Head over to the Group of Seven blog to see more examples by the rest of the Design Team, and feel free to try out the technique and link up your card. 


Please Grab Our Badge! Please Grab Our Badge


Supplies for card 1:
Ink - various blue Distress Oxide inks, Adirondack Snow Cap
Paper - white cs
Size - A2
Accessories - SSS snowflake embossing folder, blue metallic pen, Stamplorations sentiment die, Cherry Lynn tiny snowflakes die

Supplies for card 2:
Ink - various red Distress Oxide inks, Delicata Golden Glitz
Paper - white cs
Size - A2
Accessories - Sizzix poinsettia embossing folder, gold metallic pen

Friday, 13 December 2024

Christmas and Winter

My Time to Craft Christmas challenge's theme is Lights (candles, lamps, etc.).


A simple stamped and watercoloured image, bordered in red, popped up on fun foam on a panel embossed with stars.

Shopping our Stash wants to see "Winter not Christmas", My Time to Craft wants "Something Snow Related", and Stamping Sensations  wants "Winter".

I stamped a large snowflake background stamp in Versamark and then went over it with a couple of shades of Pan Pastels (a product I rarely use).  I trimmed the panel, popped it up on fun foam on a cream card base, and stamped and heat embossed a sentiment on a strip of the same cream card stock and popped it up on the panel.

My Time To Craft Christmas!
Grab Our Badge!  My Time To Craft!Stamping Sensations


Supplies for card 1:
Stamps - unknown candle stamp, Stampendous sentiment
Ink - Versafine Onyx Black
Paper - watercolour paper, off white cs
Size - 4.75" square
Accessories - watercolour paints, square dies, Sizzix stars embossing folder, fun foam

Supplies for card 2:
Stamps - unknown snowflake background stamp
Ink - Versamark, Versafine Onyx Black
Paper - cream cs, mixed media cs
Size - A2
Accessories - Pan Pastels, embossing powder, fun foam, rectangle dies