A blog devoted to the cards I make in my tiny upstairs space. When my sister stays there, she calls it an "artist's garret". I'm not an artist, but am an enthusiastic cardmaker - hence the title "Cardmaker's Garret".
___________________________________________________________________________________________
Showing posts with label snow scene. Show all posts

Saturday, 30 August 2025

Muted Blues and Greys

I've got three cards today, all in muted blues and greys.

For Double D "Butterfly", Triple B "Birds, Bees, or Butterflies", and Stamping Sensations "Birds, Bees, or Butterflies", I messed around with some mixed media:


I stuck random bits of Tim Holtz rice paper on a piece of white cs, added a bit of gesso, went over some sections of a harlequin stencil with molding paste, stamped with music, text, and splat stamps in grey on a few random places.  Then trimmed the panel and edged it with a black marker.  I stamped teh butterflies in grey, fussy cut them, and edged them with the black marker and popped them up on the card.

Still in the grey colour scheme, I did a variation on a card I made a while back.  This time it's for the Christmas Kickstart Challenge "Let's Wreath It Up" and the Cut It Up Challenge "Anything Goes with a Die Cut".

Using a brick wall stencil, I went over it with a rough mixture of black, copper, and white embossing paste. It came out way too dark and too shiny so I then sponged white gesso over it to lighten it and dull it down a bit. I also splattered a bit of the white gesso on it and then trimmed it with a square die. Trimmed it with a square die and popped it up on the card base with fun foam.  I die cut the wreath twice out of scrap cs and once out of off white shimmer cs, glued them together and added it to the brick wall.  I added a sentiment (die cut with a narrow banner die) over the centre of the wreath.

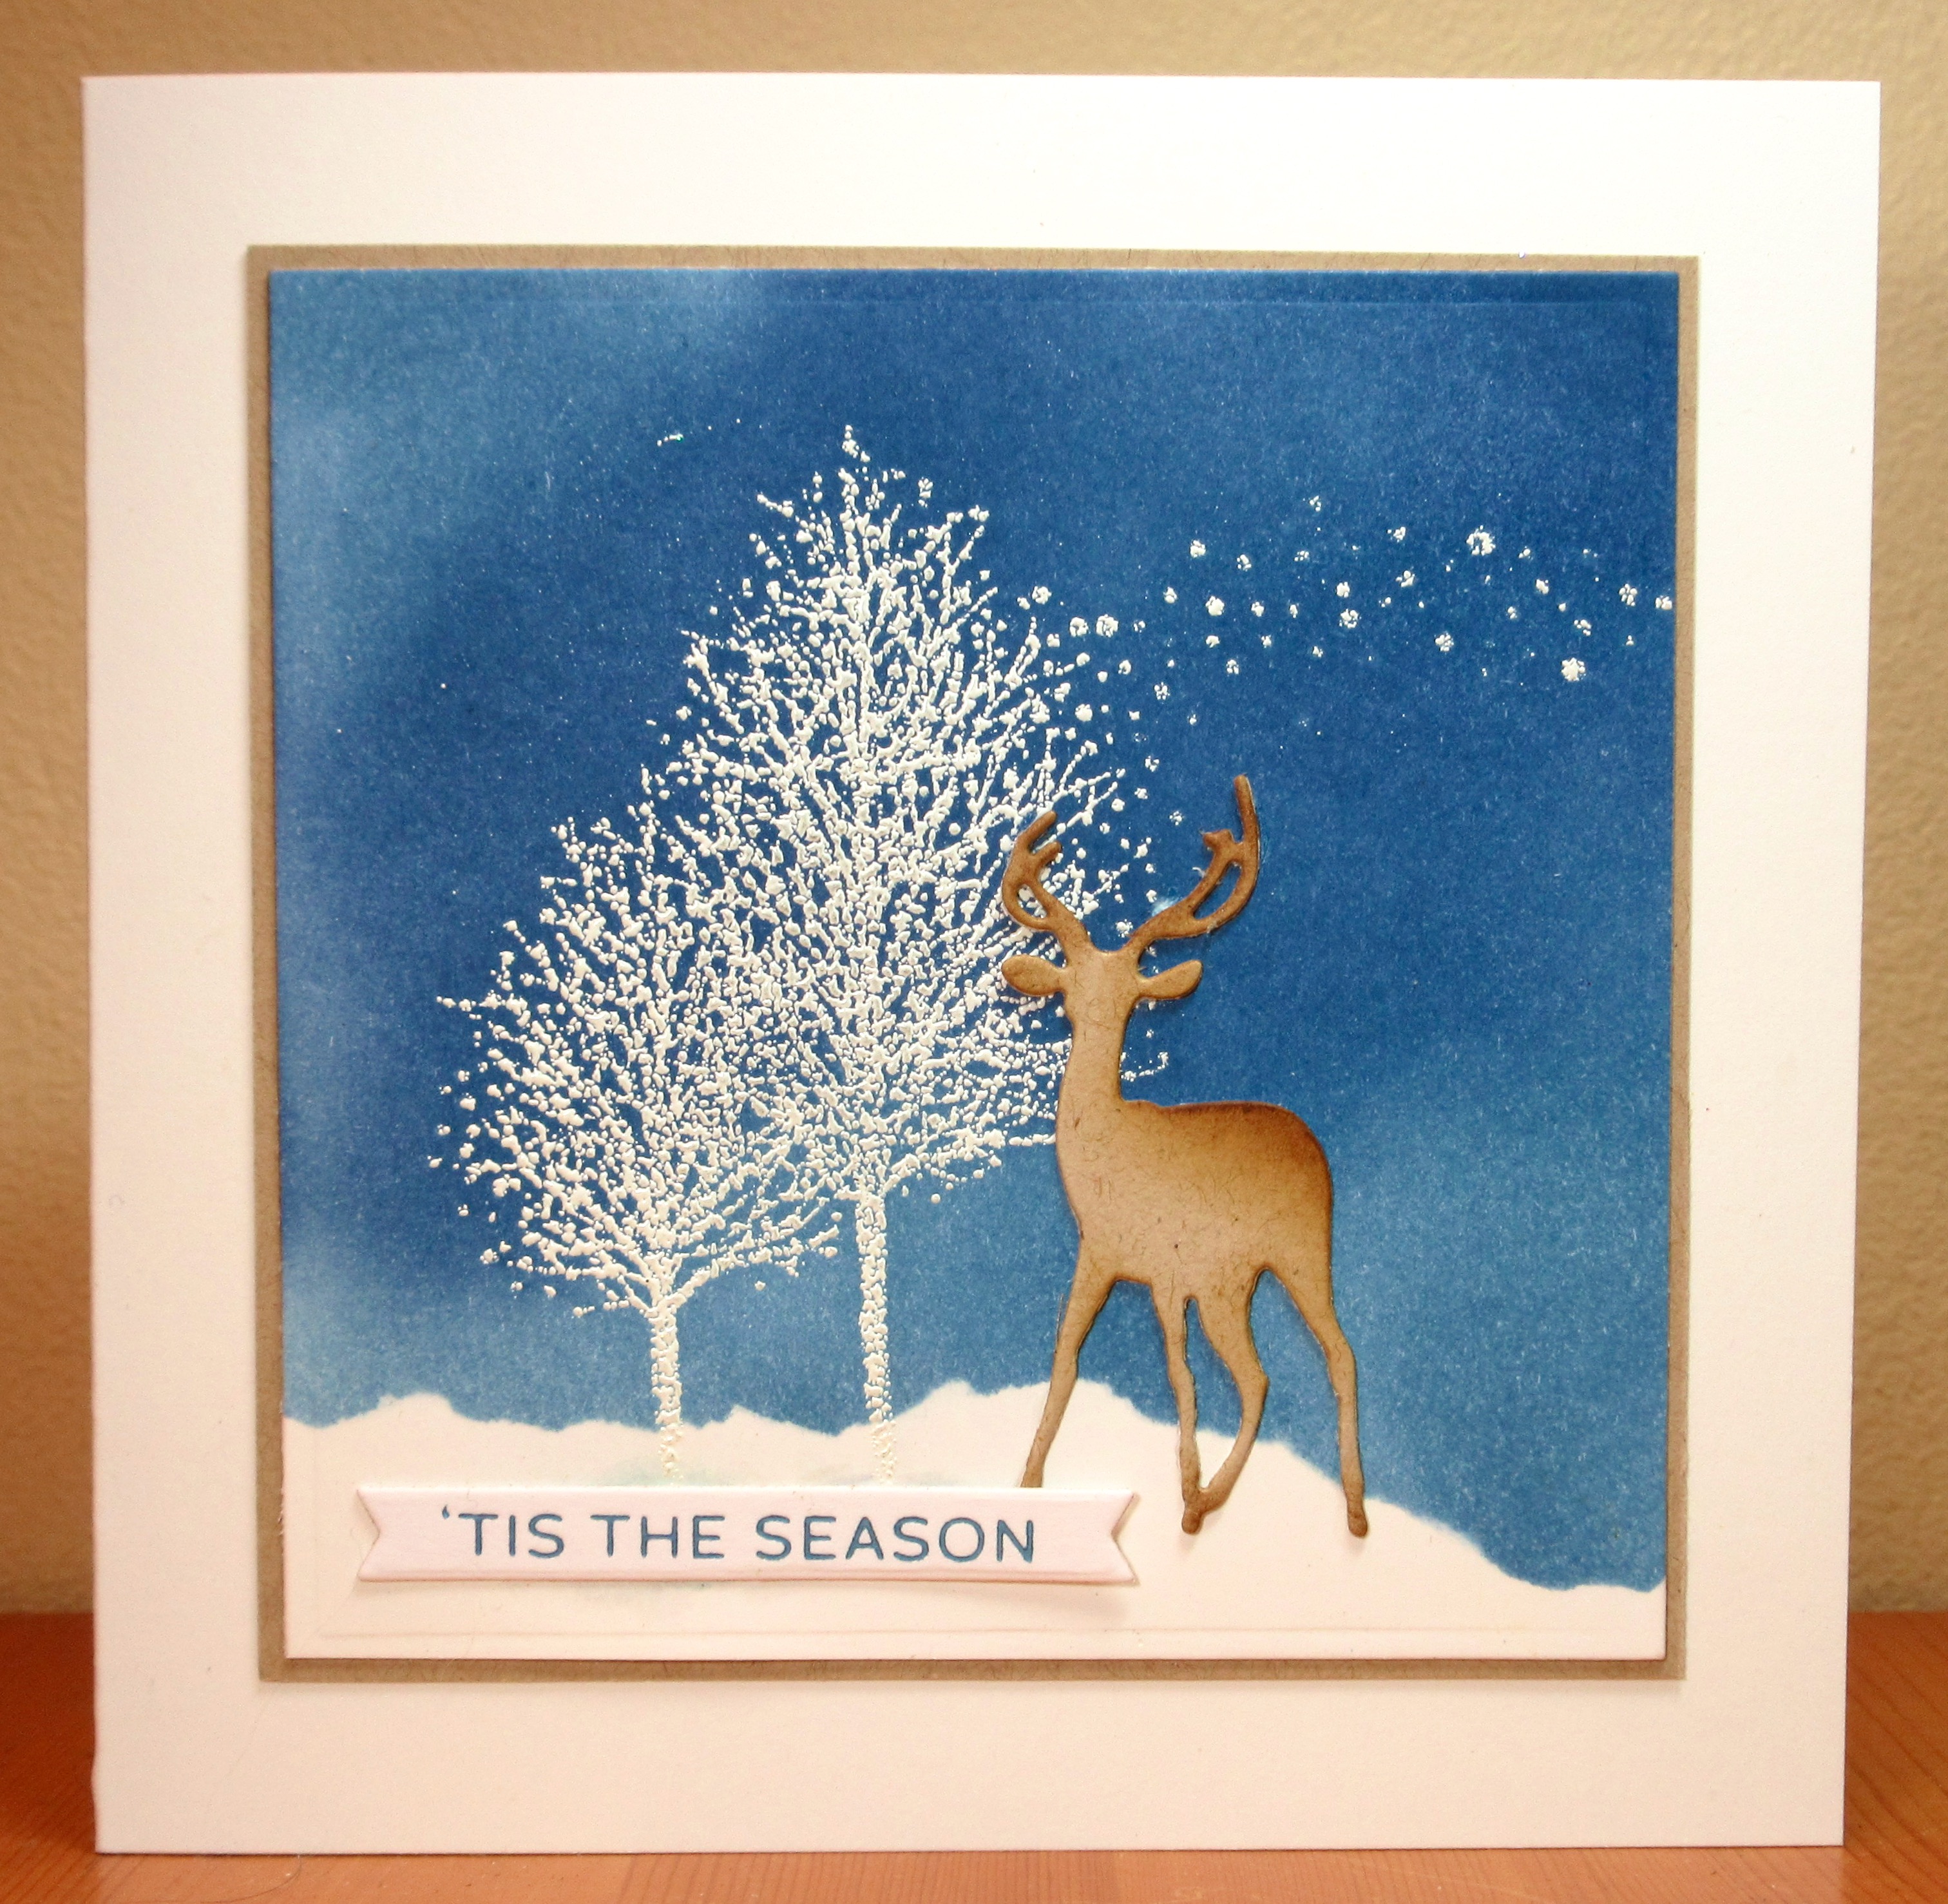
The new Sparkles Christmas Challenge is "Include a Tree".  

I went with my old Penny Black stamp of snow blowing off trees.  I laid down a circle mask for the moon and then stippled around it with pale blue ink.  Stamped the trees and sentiment and heat embossed with sparkly embossing powder.  Trimmed the panel and popped it up on fun foam.


The Double D's  Please share our badge!  Please grab our logo

   Grab My Button  Please take a copy of our badge


Supplies for card 1:
Stamps - The Stampin' Place butterflies, various music, text, and splat stamps
Ink - Versafine Morning Mist
Paper - white cs, TH rice paper
Size - A2
Accessories - molding paste, harlequin stencil, gesso, black marker

Supplies for card 2: 
Stamps - unknown sentiment
Ink - Distress Pumice Stone and Hickory Smoke, Versafine Smokey Gray
Paper - mixed media cs, chalk cs, off white shimmer cs
Size - 4.75" square
Accessories - MFT brick wall stencil, Dreamweaver black, copper, and white embossing paste, Sizzix wreath die, fun foam, white gesso, narrow strip die

Supplies for card 3:
Stamps - Penny Black Snow Dust tree, unknown sentiment
Ink - Versafine Clair Nocturne. Memento light blue
Paper - white cs
Size - A2
Accessories - clear sparkling embossing powder, circle die to create moon mask


Wednesday, 19 February 2025

Bits and Pieces 2 - the Tree Edition

Those of you who were kind enough to take a look at my post from a few days ago called Bits and Pieces - the Reindeer Edition, would have noticed there were quite a few die cut trees combined with the reindeer.  Well, I had even more leftover die cut trees hanging about on my desk.  So today those trees are the focus of the cards.  Again, these were put together to use up bits and pieces, rather than with any particular design in mind or to fulfill a challenge.


Thanks for taking a look, and if you desperately want to know what anything is on one of these cards, leave me a comment and I'll look for it in my supplies and get back to you.

I might be back with one more collection of odds and ends!


Thursday, 19 December 2024

Masculine Christmas and Poinsettias Embossed and Stamped

Cardz 4 Guyz wants a masculine Christmas card. 


I started with the background - used a circle die to cut a round mask for the moon and a hilly slopes die for the snowy ground (both cut out of masking paper). Then splattered masking fluid on the sky for snow. Then sponged with two shades of blue Distress ink, leaving it lighter around the moon. Once the ink was dry, I removed the paper masks and rubbed off the masking fluid. I die cut the buildings and trees out of black cs and added them to the background. Finished off by using white gouache on a fine paint brush to add snow to the roofs.

My second card today is for Can You Handle the Pressure (dry embossing with an optional theme of poinsettias - I went with this theme).

I stamped and watercoloured the candle / poinsettia image, trimmed it with a square die, popped it up on fun foam on a square of off white cs that I'd run through a floral embossing folder that could well be poinsettias.

Cardz 4 Guyz Logo  Please Grab Our Badge


Supplies for card 1:
Stamps - Make an Impression sentiment
Ink - Versafine Onyx Black, Distress Chipped Sapphire and Dusty Concord
Paper - white and black cs
Size - 4.75" square
Accessories - masking fluid, masking paper, SSS Winter Village dies, circle die, hilly slope die, Dr Phil Martin's bleed-proof white gouache

Supplies for card 2:
Stamps - Stamplorations
Ink - Versafine Onyx Black
Paper - watercolour paper, off white cs
Size - 4.75" square
Accessories - watercolour paints, square dies, Sizzix embossing folder

Monday, 18 November 2024

Blowing Snow and Candy Canes


I'm playing along with the current Tic Tac Toe challenge.  I chose the top horizontal row that says ink blending, snow, and tree.  A good chance to use one of my favourite stamps of snow blowing off a tree.

I stamped and heat embossed the tree in white, then tore a strip of scrap cs to create a mask for the snowy ground, then blended various blue Distress inks over it.  The heat embossed tree resisted the ink.  When done, I wiped the ink off the trees to make sure they really stood out.   I trimmed it into a square, bordered with kraft cs, added a reindeer die cut from the same kraft cs and with a bit of brown Distress ink blended on the edges, and added a sentiment die cut with a banner die.

My second card for today is for Jingle Belles challenge "Christmas Feast" - any kind of holiday sweets or treats.  I went with one of my favourites - candy canes.

The image is stamped and watercoloured, trimmed with the stitched die, mounted on fun foam on a dark green card base. I went over the ornaments with Glossy Accents, and over the ribbon with Wink of Stella.


Supplies for card 1:
Stamps - Penny Black Snow Dust, unknown sentiment
Ink - ColorBox white, various blue and brown Distress inks
Paper - white and kraft cs 
Size - 5.25" square
Accessories - white embossing powder, reindeer die, banner die

Supplies for card 2:
Stamps - Impression Obsession image, Stampendous sentiment
Ink - Archival Jet Black
Paper - watercolour paper, dark green cs
Size - A2
Accessories -


Saturday, 6 April 2024

Reindeer with a Christmas Tree

I love being inspired by a challenge's mood board to make a card!  This one is for Peace on Earth and I was inspired by the upper right image (see mood board below).


I used a piece of dp for my snowy sky and tore a piece of cs to make the snowy ground.  I die cut the reindeer out of white cs and then sponged with a couple of shades of Distress inks.  Then glued it on to two more layers of die cut deer to give it more substance.  I tucked him behind a tree die cut once from green and once from white and glued together to have a thin line of white on the branch tops.

Head over to Peace on Earth and check out how other members of the Design Team were inspired by our mood board.  We'd love to see if it inspires you or if you'd rather post an "anything Christmas" card.


I'm also linking my card up with the Christmas Craft Creations "Designer Paper" Challenge.


Supplies:
Stamps - Rubber Soul sentiment
Ink - Distress Brushed Corduroy and Pumice Stone, Memento London Fog
Paper - white and green cs, Echo Park dp
Size - A2
Accessories - deer die, tree die, SU punch

Sunday, 11 February 2024

Winter Scenes

For The Sisterhood of Crafters "Winter Blues" challenge, The Four Seasons Challenge "Winter", and the 52 Christmas Card Throwdown "Blue and White" challenge:


I sprinkled a couple of shades of blue Brushos onto watercolour paper, spritzed with water and got it all to run and create a soft blue background.  When dry, I sprinkled with "Fractured Ice" embossing powder and heated it from underneath so that it wouldn't blow off.  Trimmed the background to fit behind my die cut of two reindeer in a partial circle (I cut it twice for more dimension), glued it all together and stamped a winter sentiment in blue.

For Shopping Our Stash "Winter Wonderland" and Christmas Craft Creations "Glitter and Sparkle", I have another card with a winter die cut.

I had a piece of a cling wrap background done with blue and mauve reinkers that was just large enough to work with my die.  Normally the die cuts an aperture for the card (as it did in this card) but I didn't want the whole front of the card to be glitter cs so I cut it so that I only had the cabin and trees and some snowy ground, and trimmed the bottom of it with a circle die cut.  Trimmed the background with the same circle die and glued the glitter piece on top.  Out of the leftover bits of the glitter cs, I cut some tiny stars and some snowflakes and embellished the card with them.  To keep with the "glitter and sparkle" theme of the Christmas Craft Creations challenge, I used a sentiment with the word "sparkle" in it.

Please Grab Our Badge!                 Grab Our Badge! 


Supplies for card 1:
Stamps - Penny Black sentiment
Ink - Distress Chipped Sapphire,
Paper - watercolour paper, white cs
Size - 4.25" square
Accessories - Memory Box Deer Family, Emerald Creek Fractured Ice embossing powder

Supplies for card 2:
Stamps - Mama Elephant sentiment
Ink - Versafine Clair Nocturne, blue and mauve reinkers
Paper - mixed media, white, and white glitter cs
Size - A2
Accessories - Memory Box Countryside Circle die, Spellbinders circle die, cling wrap, small snowflake and star dies

Monday, 29 January 2024

Winter Wonderland and a Single Snowflake

I chose a lovely winter village scene for Sparkles Christmas Challenge "Winter Wonderland".


The image is coloured with plain old inexpensive watercolour paints - they aren't as vibrant as a lot of the newer watercolour mediums but I think the softness suits the wintery scene. I added glitter to all the rooftops and trees and along the snow lines. I cut the image out with an oval die and bordered with dark silver cs.

Christmas Cards All Year Round has an image of a Christmas sweater with one large gold snowflake on the front of it.  It inspired me to make this card with a gold snowflake.

I started by using gesso to stencil the snowflake on black cs to create a resist for my stamping, then stamped the Christmas script background stamp over it in white. I replaced the snowflake stencil and sponged gold ink through it quite lightly so that some of the white gesso showed through.  I trimmed the panel and popped it up with fun foam on a platinum shimmer card base.

Please take a copy of our badge  Grab our badge!


Supplies for card 1:
Stamps - Art-Kure Castle Combe Village, SU sentiment
Ink - Versafine Onyx Black
Paper - watercolour paper, dark silver and natural cs
Size - A2
Accessories - watercolour paints, SU label punches, Nesties oval dies, dimensionals, glitter

Supplies for card 2:
Stamps - text background stamp
Ink - gold and white ink
Paper - black cs, platinum shimmer cs
Size - 4.75" square
Accessories - snowflake stencil, white gesso, fun foam

Tuesday, 12 December 2023

A Church with Glitter and Snowy Greetings

The Inkspirational Challenge wants us to "Add Glitter".  Perfect for a snowy scene.  I chose a stamp I've never inked up before so am also adding it to NBUS.

The image is stamped and watercoloured, bordered with green cs, and glitter added on all the snowy sections with a Quickie glue pen.  It's quite a chunky glitter so really picked up the light when I photographed the card.

My second card is for Shopping our Stash "Whatever the Weather".  I went with snow.

I used the old Faux Batik technique that's been around for a long time.  I stamped and heat embossed the snowflake background stamp in white and then made several folds in all different directions.  Then unfolded it and sponged over the whole panel with various blue Distress inks.  I used blue glitter cs for a border and for the shadow background of the die cut sentiment.

 Grab our badge to display on your blog. Grab Our Badge!


Supplies for card 1:
Stamps - Power Poppy
Ink - Versafine Clair Nocturne
Paper - watercolour paper, cream and green cs
Size - 4.75" square
Accessories - watercolour paints, glitter

Supplies for card 2:
Stamps - Hero Arts snowflake background
Ink - ColorBox White
Paper - white cs, blue glitter cs
Size - A2
Accessories - white embossing powder, SSS Snowy Greetings die