A blog devoted to the cards I make in my tiny upstairs space. When my sister stays there, she calls it an "artist's garret". I'm not an artist, but am an enthusiastic cardmaker - hence the title "Cardmaker's Garret".
___________________________________________________________________________________________
Showing posts with label sleigh. Show all posts

Saturday, 16 August 2025

Sleigh Ride on Music

The bottom right image on the new Peace on Earth mood board immediately gave me the idea for this card.

I had a perfect piece of patterned paper for the background.  I put it in my MISTI and stamped the silhouette sleigh image a few times directly onto the patterned paper until I got a perfect impression, then heat embossed it.  I went around the edges of the panel with a black marker.  I stamped and heat embossed the sentiment, sponged a bit of Antique Linen ink on it to give it the same slightly aged look as the patterned paper, and also went around the edges of it with a black marker.
 
We'd love to have you join us at Peace on Earth, either inspired by the mood board below, or with an "anything Christmas" card.
 
 
I'm also entering the card at the Jingle Belles' "Vintage" challenge.


Supplies:
Stamps - Tim Holtz
Ink - Versafine Onyx Black, Distress Antique Linen
Paper - off-white cs, Paper Studio dp
Size - A2
Accessories - Spellbinders rectangle dies, black marker, clear embossing powder

Monday, 28 July 2025

Northern Lights Christmas Cards

I've seen various people make northern lights backgrounds for card and wanted to give it a go.  I tried the ones where they create swirls of colour but I ended up with a horrid mess and tossed them.  Then I tried the technique in this video where the colour is in more vertical bands.  I ended up with three backgrounds I was happy with and turned them into three Christmas cards.

My favourite is this one as I got a bit of quite vibrant colour.


I stamped the image in black using my MISTI so that I go quite an intense image.  I then sponged a lot of Distress Black Soot ink along the bottom of the panel.  I heat embossed the little Noel sentiment in white on black cs and cut it out with a tiny square die and covered up a bit of smudged ink.

My second favourite is this one:


I die cut the village scene out of black cs. layered it over the northern lights background, and added a very small sentiment.

My least favourite is this one:

My northern lights turned out a bit too muted and I wasn't happy with my white splattering as I got some blobs that are way too big.  Black stamping or a black die cut didn't look right - not enough contrast.  So I went with a white die cut sleigh and horse and added two coordinating sentiments.

I found it easier to sponge the sky on a very slightly glossy cs - not as glossy as photo paper but with a definite bit of gloss.  I didn't find much difference between regular Distress inks and Distress Oxide inks (the first one was done with Oxide, the second and third with Distress).

My friend, Loll, also did some northern lights cards and we decided to post them on the same day.  Please go to this post on her blog to see hers - quite different to mine but beautiful!


Supplies:
Stamps - Stampendous "noel", Katzelkraft deer and trees, SSS tiny Merry Christmas, SSS Jingle Bells and Dashing All the Way sentiments
Ink - various Distress and Distress Oxide inks, SSS Intense Black, Versamark, Versafine Clair Twilight
Paper - white and black cs, slightly glossy cs
Size - A2 (the first two) and 6x4.25" (the third card)
Accessories - white acrylic paint, white embossing powder, tiny Spellbinders square die, Memory Box Country Landscape die, tiny sentiment die, SU sleigh and horse die

Tuesday, 25 February 2025

A Sleigh Ride and a Bird in a Heart

A card for the Twelve Months of Christmas challenge "Couples" (I've got the man and woman, and a couple of horses), Christmas Cards All Year Round "Inspired by Jingle Bells", and Sweet Stampin' "Masculine Makes":

I stamped the snowflake background in light blue and the sleigh in black, trimmed the panel and dabbed on some Snow-tex paste for the snowy ground.  I bordered with black cs and added a sentiment on a stitched die cut sentiment banner.

For the Tic Tac Toe challenge (heart, die cut, love sentiment), Simply Clean and Simple (love and / or hearts), and Triple B (at least one of birds, blossoms, or butterflies, inspired by an all red mood board:


I die cut a red heart and red sentiment.  Then die cut a circular opening in the heart.  The bird is cut from a scrap of smooshed cs and glued into the circular opening.  


  Grab our badge!  Sweet Stampin' Challenge Blog
Please share our badge!  Please Help Us Spread the Word ...


Supplies for card 1:
Stamps - Tim Holtz sleigh, Penny Black sentiment
Ink - Distress Tumbled Glass, Versafine Onyx Black
Paper - white and black cs
Size - 6x3.25"
Accessories - Impression Obsession snowflake background stamp, Snow-tex embossing paste, stitched sentiment banner die

Supplies for card 2:
Paper - rustic cs, red cs
Size - A2
Accessories - Memory Box heart die, Poppy Stamps sentiment die, TH bird die, Spellbinders circle die, Lil Inker's stitched rectangle die

Wednesday, 12 February 2025

Back to Christmas Cards

After the recent flurry of Valentine cards, I'm now back to Christmas ones.

First of two for today is for the ABC Christmas Challenge "D for Die Cuts" and the 52 Christmas Card Throwdown "Black, White, and Gold".

I die cut the stars out of a square of black cs and layered it over a gold card base. The Santa and sleigh is die cut twice and glued together for extra dimension. The trees are only die cut once.
Today's other card is for Cardz 4 Guyz "Clean and Simple".


I used the Heated Copper Accents technique shown in this video by my friend Loll to create my copper Christmas tree. I glued it to a piece of blue smooshed background, tore little strips of white cs to layer for snowy ground, stamped and heat embossed the sentiment in copper embossing powder.

Cardz 4 Guyz Logo


Supplies for card 1:
Stamps - SSS sentiment
Ink - Versafine Onyx Black
Paper - black, white, and gold cs
Size - 5.75" square
Accessories - Sizzix Dash Away All stars and Santa, Spellbinders square die, evergreen tree die

Supplies for card :
Stamps - Rosie's Roadshow sentiment
Ink - Versamark, various blue Distress inks
Paper - white cs
Size - 6x4.25"
Accessories - thin copper sheet, tree die, copper embossing powder

Saturday, 28 December 2024

Ombre Sky, Trees, and Stars

This month the Group of Seven Cardmakers is showcasing Ombre as our Design Element.  For my first example, I used ink blending to create a blue sky.  This is the method I've typically used when I think of creating an ombre effect.


I blended various blue Distress inks from light up to dark on coated cs (easier to get a nice blend than on regular cs).  When dry, I stamped the image in archival ink, then coloured the berries with a white gel pen.  I did a little bit of splattering with a white Posca paint pen to give the effect of a few lazy snowflakes drifting down on a cold winter day.  I added a sentiment die cut with an oval die.

On our Group of Seven website we have a couple of videos showing different ways of doing ombre.  I followed the technique in this video for my next card.


I die cut the trees from three shades of green cs and layered them over a dry embossed background, using bits of foam tape to raise each layer off the previous layer.  Then I added a black die cut Santa and sleigh and a black border.

I made one more using the stacked die cuts ombre method.


For this one I used three shades of copper glitter cs and die cut stars out of it and stacked them on top of each other, and then on top of a star embossed background.  In hindsight, I wish I'd cut each word out of a different shade of the cs - but too late!

I'm adding this third card to My Time to Craft's "New" challenge (one of the options is a New Year's card).

Please check out the cards by the rest of the Group of Seven Design TeamWe'd love to have you link up cards using an ombre technique.  It's not a challenge but we all love seeing your ideas or interpretations.  

  My Time To Craft!


Supplies for card 1:
Stamps - Penny Black
Ink - Archival Jet Black, Distress Tattered Glass, Broken China, Stormy Sky, Salty Ocean
Paper - white cs, coated cs
Size - A2
Accessories - white gel pen, white Posca paint pen

Supplies for card 2:
Stamps - SSS sentiment
Ink - Archival Jet Black
Paper - white, black, 3 shades of green cs
Size - A2
Accessories - CuttleBug snowfall embossing folder, Frantic Stamper Santa / sleigh die, unknown trees die, foam tape

Supplies for card 3:
Paper - white cs, 3 shades of copper glitter cs
Size - 4.75" square
Accessories - star embossing folder, Spellbinders star dies, Tattered Lace sentiment die

Saturday, 28 September 2024

Group of Seven Stencil Monoprints

The Group of Seven Cardmakers are playing with the stencil monoprint technique this month.  I tried it with two different mediums - ink pads and mica sprays.

First up using Distress ink pads:


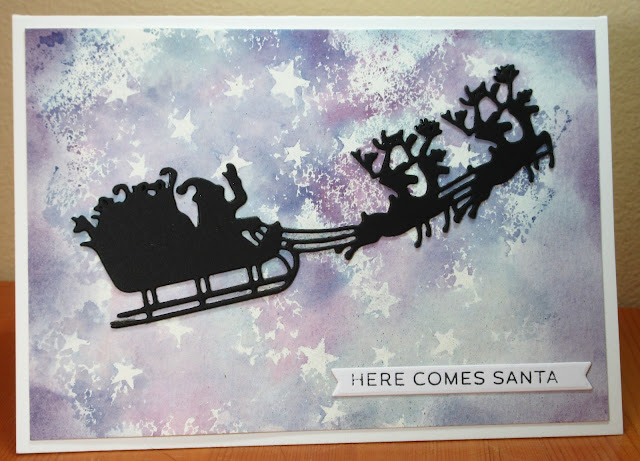
I patted various shades of blue and purple mini Distress ink pads on my star stencil, spritzed with water, and laid it down on watercolour paper, pressing lightly with a rag.  I removed the stencil and patted up any excess watery ink.  I had some areas around the edges without any colour so I sponged the same inks around all the blank edges.

I die cut the Santa and reindeer twice from black cs and glued them together, then added them to the stencil monoprint, along with a sentiment banner.

I wasn't 100% happy with the monoprint as there were some blotchy sections, especially around where the reindeer are - the result of not enough water when I spritzed.  So I decided to try doing one using TH mica sprays, thinking I'd get better coverage on the stencil:


I still got some blotchy sections over on the right but I trimmed the panel down and got rid of most of them.  I used three different colours of mica sprays and got a nice blend of colours.  I added a snow bank and sentiment (die cut from white glitter cs) and two reindeer (die cut from copper shimmer cs and from scrap cs and glued together for more substance).  The card base is the same copper cs as the reindeer.

There are two good videos on the technique here:

Stencil Monoprint by Lee-Ann Cross (6:50)
Stenciling with Brushos by Loll Thompson (2:29)
 
And please head over to the Group of Seven blog to see more samples by the rest of the group.  If you give it a try, we'd love to have you link your card up as inspiration for us and others. 


Supplies for card 1:
Stamps - unknown sentiment
Ink - TH Distress inks (Chipped Sapphire, Faded Jeans, Stormy Sky)
Paper - watercolour paper, white cs
Size - 6x4.25"
Accessories - star stencil, Santa die,

Supplies for card 2:
Paper - watercolour paper, copper shimmer cs, white glitter cs
Size - A2
Accessories - TH mica sprays (Winter Frost, Fresh Balsam, Frosted Juniper), TCW tree stencil, SSS stitched slopes die, TH reindeer and joy die

Saturday, 17 February 2024

Santa and Buffalo Check


I love to use the Peace on Earth mood board (see at end of post) to inspire my card for the Design Team.  For this one, I was inspired by the buffalo check in the top right image and the Santa and sleigh in one of the snow globes in the bottom left image.


I had a little scrap of buffalo check wool ribbon that I took off a Christmas floral arrangement.  I wrapped it around a piece of black cs.  Then die cut the Santa sleigh and the sentiment twice each out of white cs and glued them together.  Then glued them on the panel.  I specifically chose that sentiment die as the swirls on the word "be" went well with the swirls on the Santa die.  I taped the buffalo check to the back of the black panel, and added fun foam around it so that it wouldn't make lumps on the card base.

There's lots of other inspiration over at Peace on Earth - a few of the other Design Team members also used the buffalo check.  We'd love to have you join us, whether you're inspired by our mood board or just want to post an "anything Christmas" card.


Supplies:
Paper - white and black cs
Size - 6x4.25"
Accessories - buffalo check wool ribbon, Memory Box "be merry" die, unknown Santa sleigh die, fun foam

Monday, 18 December 2023

Three More Christmas Cards

There are still lots of Christmas challenges I want to link up to this month!

First of all, for Can You Handle the Pressure? "Dry Embossing with a Twist of Holly":

I used one of my very first embossing folders that has a swirly holly design.  It creates an ideal background for an older Penny Black stamp.  I inked it and the sentiment with a Kaleidacolor ink pad in various shades of green.  I popped the stamped panel up on fun foam and added red Stickles to the berries.

Second is a card for My Time to Craft Christmas "Elements Beginning with the Letter S".  I have snowflakes, Santa, and sleigh.

The background is a piece that I created when making a gelli plate print for a card I posted earlier (see this post for the earlier card).  I had a lot of blue acrylic paint left on the snowflake mask - before cleaning off the mask, I pressed it onto a piece of mixed media cs to use up the paint.  I added a die cut Santa and sleigh, and a narrow black border.

Lastly, for Festive Friday "Christmas Festive Food":

The challenge requires at least 3 things from their list - I have Christmas pudding, red, white, and brown.  The image is coloured with coloured pencils, trimmed with a Nordic frame, and bordered with dark red.

Please Grab Our Badge My Time To Craft Christmas!


Supplies for card 1:
Stamps - Penny Black Winter Bough, Make an Impression sentiment
Ink - Kaleidacolor Caribbean Sea
Paper - white cs
Size - A2
Accessories - Sizzix embossing folder, red Stickles, fun foam

Supplies for card 2:
Stamps - Penny Black sentiment
Ink - Versafine Clair Nocturne
Paper - mixed media cs, off white and black cs
Size - 6x3.25"
Accessories - Santa / sleigh die, blue acrylic paint, Memory Box snowflake mask

Supplies for card 3:
Stamps - unknown image, PB sentiment
Ink - black ink
Paper - white and red cs
Size - A2
Accessories - coloured pencils, The Greetery Nordic Frame die, fun foam, glossy accents

Tuesday, 3 October 2023

Another Santa Card and Some "Snowflakes"

Santa is always a great theme for Christmas cards so here's another one, this time for Christmas Cards All Year Round "For a Male" and Jingle Belles "A Christmas Story" (this card has as its sentiment the last line from Twas the Night Before Christmas and of course it has Santa flying away as he does at the end of the story).

I used a technique I learned from Karen Dunbrook of tearing many strips of scrap paper to use as masks, starting at the bottom with the first sponging of ink, and then moving up the card. It creates a beautiful cloudy sky. Once my background was dry, I stamped my images. Then once they were dry, I splattered with a bit of white acrylic paint. I mounted it on the card base and stamped the sentiment.

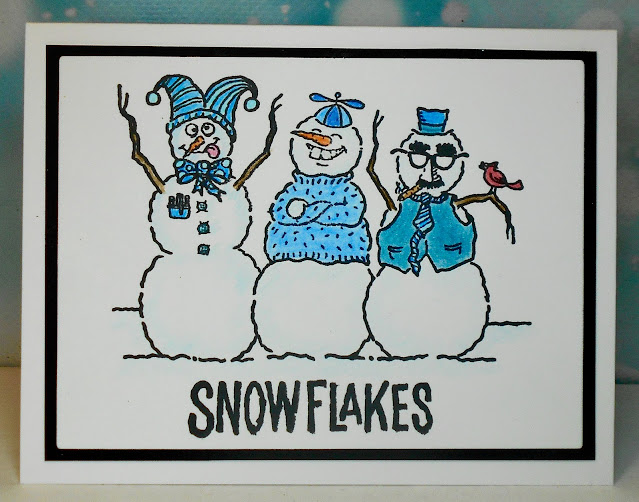
My second card today has some humour to it - a special request from one of my friends who comes to my Christmas card fundraiser sale (what he actually asked for were some "snarky" cards - not my style but this might please him).  It's for ABC Christmas Challenge "S for Snowman and T for Three of a Kind" - I've covered off both of them with my three snowmen all dressed in blue:


I saw this image on some cards my friend Bonnie made and she kindly stamped off a few for me and mailed them to me.   I watercoloured them, keeping them all dressed in blue so that they are more "Three of a Kind" for the challenge.  Then bordered with black cs before adding to the card base.


 Grab our badge!   


Supplies for card 1:
Stamps - Frantic Stamper Santa, Tim Holtz trees, Technique Junkies sentiment
Ink - Versafine Clair Nocturne, various mauve and blue Distress inks
Paper - white cs
Size - 6x4.25"
Accessories - white acrylic paint

Supplies for card 2:
Stamps - Rubber Cottage "Snowflakes"
Ink - Versafine Clair Nocturne
Paper - watercolour paper, off white and black cs
Size - A2
Accessories - watercolour paints

Saturday, 30 September 2023

Spotting Santa

Another two weeks have flown by and it's time for a beautiful new mood board from Peace on Earth.  I was inspired by the top left image (see the mood board at the bottom of my post).


I arranged the animals and the Santa sleigh / moon stamp in my MISTI and stamped and heat embossed them (that way I could sponge my sky and snow hills over them).

I tore strips of paper to mask the snowy hills and die cut a circle to mask the moon, and sponged very lightly above the strips for the ground, with two darker blue inks above the horizon one, and then removed the moon mask and sponged a bit of yellow around the edges.  Any stray ink was easy to wipe off the black embossing.

For a finishing touch I very sprinkled a little bit of Frantage Chunky White embossing powder and heated from underneath to create a light snowfall.

Here's the mood board:

Please head over to Peace on Earth to see more inspiration from the rest of the Design Team and then join us with a card either inspired by the mood board or "anything Christmas". 


Supplies:
Stamps - Lavinia animals, Technique Junkies Santa with moon
Ink - Versafine Clair Nocturne, Memento Summer Sky, Distress Stormy Sky and Chipped Sapphire
Paper - white cs
Size - A2
Accessories - clear embossing powder, Stampendous Frantage Chunky Embossing Powder