A blog devoted to the cards I make in my tiny upstairs space. When my sister stays there, she calls it an "artist's garret". I'm not an artist, but am an enthusiastic cardmaker - hence the title "Cardmaker's Garret".
___________________________________________________________________________________________
Showing posts with label brayered background. Show all posts

Monday, 17 June 2024

A Snarky Cat and a Winter Wonderland

More Christmas cards!  One for Christmas Crafts All Year Round "Dogs and / or Cats" and Christmas Kickstart "Gift":

Stamped, watercoloured, trimmed with a wonky stitched rectangle, bordered in black, put on a kraft card base, and a bit of Fun Flock added to the brim and pom pom of the hat.

Next up for My Time to Craft "Winter" and 52 Christmas Card Throwdown "Winter Wonderland":

I have lots of unused backgrounds in a box and found this one - blue and mauve inks brayered on glossy cs.  I stamped the trees and sentiment with Versamark and heat embossed with white.  Trimmed it and bordered with a glittery cs that blended in well with the colours.

Grab our badge!     


 My Time To Craft!


Supplies for card 1:
Stamps - Tim Holtz
Ink - Versafine Onyx Black
Paper - watercolour paper, black and kraft cs
Size - A2
Accessories - watercolour paints, MFT wonky rectangle die, Fun Flock

Supplies for card 2:
Stamps - Paper Rose winter trees, Serendipity sentiment
Ink - Versamark, blue and mauve inks
Paper - glossy coated cs, blue/mauve glitter cs, white cs
Size - A2
Accessories - white embossing powder

Thursday, 20 April 2023

A Rainy Day Threefer

Vancouver is having such a cold wet spring.  I'm yearning to work in my garden!  But no such luck today.  So I've got cards for some challenges instead.

First up for The Paper Players.  They want to see a craft image on the card.  And for Colorful Options.  They have a beautiful mood board in pastels (see at end of post) that I tried to depict on this card.


A simple stamped and watercoloured card using one of the wonderful Anita Jeram images from Colorado Craft Co.   I love these cute mice painting the flowers!

Next for the 52 Christmas Card Throwdown "Santa" and for My Time to Craft Christmas "Christmas Quote".

I made a circle mask out of masking paper to create the moon. Then I brayered on coated cs using two shades of blue and two of yellow, letting the lighter blue and the lighter yellow meet in the middle.

I stamped the sentiment with StazOn ink as I'd used coated cs. I die cut the Santa and sleigh with black cs, then bordered the panel with black.

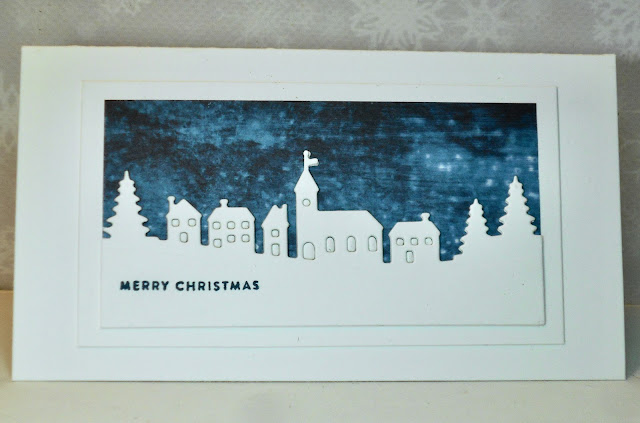
And last but not least, for Inkspirational "Clean and Simple" and ABC Christmas Challenge "H is for Houses".

I had a scrap of dp that looks like a chilly winter night sky. I die cut the village out of white so that it looks like it's all covered in snow, making it look even chillier. Layered it on another piece of white cs and then on a white mini slimline card base.

Challenges:

The Paper Players


Colorful Options


52 Christmas Card Throwdown

My Time to Craft Christmas "Christmas Quote"

My Time To Craft Christmas!

Inkspirational

ABC Christmas Challenge "H is for Houses"


Supplies for card 1:
Stamps - Colorado Craft Co. "Love Art", unknown sentiment stamps
Ink - Versafine Onyx Black
Paper - watercolour paper, black and cream cs
Size - A2
Accessories - watercolour paints

Supplies for card 2:
Stamps - Colorado Craft Co. sentiment
Ink - ArchiStazOn Black; Distress Wild Honey, Scattered Straw, Faded Jeans, Stormy Sky
Paper - coated cs, black and white cs
Size - 5" square
Accessories - Frantic Stamper Santa die, circle die to make moon mask, masking paper

Supplies for card 3:
Stamps - SSS sentiment
Ink - Memento Nautical Blue
Paper - white cs, scrap of dp
Size - 6x3.25"
Accessories - Gina Marie winter village

Sunday, 31 October 2021

Christmas for a Best Friend

Sneaking in under the wire for the Christmas Kickstart Challenge "Make One for a Loved One".  I made this one for my best friend.


I recently did a crafty Zoom call with friends and we worked on brayering.  This was one of my brayered backgrounds.  I stamped the trees and their attached sentiment in Staz-On, added a Tim Holtz "Merry Christmas" peel-off to the top, and bordered in black.  Final touch was gold peel off stars on all the stars in the trees of the stamped image.


Christmas Kickstart Challenge "Make One for a Loved One"


Supplies:
Stamps - Verses "Good Friends are Like Stars" stamp (trees and sentiment all in one)
Ink - Stazon black, various blue and orange Distress inks
Paper - coated cs, white and black cs
Size - A2
Accessories - tiny stick-on gold stars, Tim Holtz Christmas sentiment peel-off

Saturday, 23 May 2020

Layered Stencils

I'm very last minute for the CAS Stencil "Layered Stenciling" challenge!


Christine and I did some physically distanced crafting on Wednesday and she helped me with two new techniques - stenciling with a gelli plate and creating a brayered background, both techniques using Fresco Chalk paints - I like them much better than standard acrylic paints.

First up the stenciled one, using the colours from the Color Throwdown Challenge:


I brayered yellow Fresco Chalk paint onto a gelli plate, laid the swirly flower stencil over it, then pressed copy paper over top, picking up the yellow paint.  I then laid a text stencil over it and sponged with grey Distress ink.

I added it to cs using a sheet of double sided tape, then trimmed it, and bordered with a thin grey border.  I added it to white shimmer card base.

I die cut the flower spray die twice from white cs and once from the white shimmer cs I used for the card base.  I glued the three together with the shimmer layer on top.  Then added a sentiment stamped in grey on the white shimmer cs and trimmed.  And for embellishment, two yellow pearl gemstones on the two largest flowers.


Then I used the technique seen in this video for the background piece in this card:
Using a brayer and a few shades of blue Fresco Chalk paint, I rolled (with a flicking random motion) the colours one at a time on mixed media cs.  I then sponged white paint over a snowflake stencil.  Once it was dry, I stencilled the word Peace over it with Distress Black Soot ink.

I trimmed the panel, added a very thin black cs border, and finished off the sentiment by stamping "on earth" from a TH "peace on earth" sentiment onto black cs and heat embossing it in white.


Love these two techniques, especially the second one.  Thank you, Christine, for all the help with the techniques!


Supplies for card 1:
Stamps - Judith sentiment
Ink - Distress Hickory Smoke
Paper - white copy paper, white and grey cs, white shimmer cs
Size - A2
Accessories - TCW Believe Script and Swirly Garden stencils, PaperArtsy Butter Fresco Chalk paint, Memory Box Honeyblossom Sprig die, yellow pearl gemstones,

Supplies for card 2:
Stamps - Tim Holtz
Ink - Distress Black Soot, ColorBox Frost White
Paper - mixed media cs, white linen and black cs
Size - A2
Accessories - Red Lead peace stencil, snowflake stencil, white and various blue PaperArtsy Fresco Chalk paints, white embossing powder