A blog devoted to the cards I make in my tiny upstairs space. When my sister stays there, she calls it an "artist's garret". I'm not an artist, but am an enthusiastic cardmaker - hence the title "Cardmaker's Garret".
___________________________________________________________________________________________

Saturday 30 September 2023

Spotting Santa

Another two weeks have flown by and it's time for a beautiful new mood board from Peace on Earth.  I was inspired by the top left image (see the mood board at the bottom of my post).


I arranged the animals and the Santa sleigh / moon stamp in my MISTI and stamped and heat embossed them (that way I could sponge my sky and snow hills over them).

I tore strips of paper to mask the snowy hills and die cut a circle to mask the moon, and sponged very lightly above the strips for the ground, with two darker blue inks above the horizon one, and then removed the moon mask and sponged a bit of yellow around the edges.  Any stray ink was easy to wipe off the black embossing.

For a finishing touch I very sprinkled a little bit of Frantage Chunky White embossing powder and heated from underneath to create a light snowfall.

Here's the mood board:

Please head over to Peace on Earth to see more inspiration from the rest of the Design Team and then join us with a card either inspired by the mood board or "anything Christmas". 


Supplies:
Stamps - Lavinia animals, Technique Junkies Santa with moon
Ink - Versafine Clair Nocturne, Memento Summer Sky, Distress Stormy Sky and Chipped Sapphire
Paper - white cs
Size - A2
Accessories - clear embossing powder, Stampendous Frantage Chunky Embossing Powder

Friday 29 September 2023

Stars for Guys, a Winter Sky, and Birthday Horses

I've been on a roll with making cards this week, mostly Christmas, but did have to do a birthday one.  Challenges really help inspire me so thank you to all the challenge organizers out there!

For 52 Christmas Card Throwdown "Use a Stencil" and Cardz 4 Guys "Stars":

I stencilled the arc of stars with silver glitter embossing paste on black cs, then layered the white die cut on top once the paste was dry.  A very simple card to make!

For AAA Cards "Skies, Galaxies, Planet":

I created a wet on wet night sky with two shades of blue watercolour paint on watercolour paper that I first painted with just water. When dry, I splattered with white acrylic paint. I added a die cut of snowy trees (cut from white shimmer cs) and a stamped sentiment, then popped the panel up on fun foam on a matching white shimmer card base.

And last, AAA Birthday "Animals":

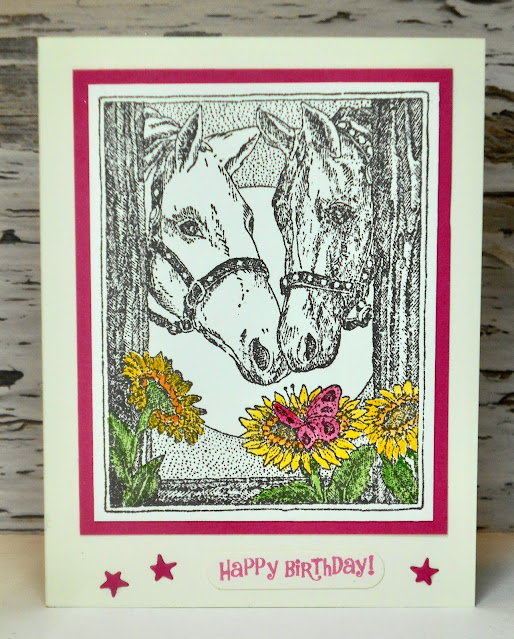
It's for a special friend who loves horses and the colour pink.  And the sunflowers are perfect for her autumn birthday!  Stamped and watercoloured, bordered with pink cs, a pink sentiment, and a few die cut pink stars.

 Cardz 4 Guyz Logo


Supplies for card 1:
Stamps - PB sentiment
Ink - Versafine Clair Nocturne
Paper - white and black cs
Size - A2
Accessories - star stencil, reindeer deer

Supplies for card 2:
Stamps - SSS sentiment
Ink - Ranger Archival Cobalt
Paper - watercolour paper, white shimmer cs
Size - A2
Accessories - watercolour paints, white acrylic paint, tree die, fun foam

Supplies for card 3:
Stamps - Impression Obsession horses, A Muse sentiment
Ink - Versafine Clair Fallen Leaves, Distress Picked Raspberry
Paper - watercolour paper, pink and cream cs
Size - A2
Accessories - watercolour paints, SU tiny label die, tiny star die

Thursday 28 September 2023

Snowflakes with Peace Dove

Our Group of Seven Cardmakers are trying a new-to-me technique with embossing folders "Dry Embossing with Re-inker Watercolouring".  We followed the instructions in this video.  Here's my card:

I used three different blue re-inkers, painting them on mixed media cs in random splotches until the whole piece was covered.  I spritzed with some water to let the colours move and blend a bit.

I went over the debossed (indented) side of the embossing folder with black pigment ink, keeping the ink pad flat and getting a thorough coverage.  I then put the blue painted piece of cs inside the embossing folder with the blue against the black inked side.  I ran it through once and ended up with an area where the black wasn't really strong enough so added more black ink and ran it through again.

I trimmed the panel and added it to the card base.  I stamped and heat embossed my sentiment using one of my blue colours, and trimmed it with a label die.  I die cut the dove twice and glued them together to give it substance, then added it to the card with the body flat on the card and the wings popped up with foam tape.

There are detailed instructions and lots of other examples from the rest of the Group of Seven over at Group of Seven Cardmakers.  We'd love to see any cards you make using this technique but just remember we're not a challenge blog.


Supplies:
Stamps - A Muse sentiment
Ink - Distress Tumbled Glass ink; Distress Tumbled Glass and Faded Jeans re-inkers, SU Brocade Blue re-inker; Versafine Clair Nocturne
Paper - white cs, mixed media cs
Size - A2
Accessories - SSS 3D snowflake embossing folder, Memory Box dove die, Spellbinders label die

Wednesday 27 September 2023

Quick Heat Embossed Cards and a Mixed Media Tag

I made a couple of quick and CAS cards for last minute challenge entries today.

First up for Christmas Craft Creations "Metallics" , Inkspirational "Clean and Simple", and  My Time to Craft Christmas "Joy to the World":


I think gold heat embossing on cream cs is so elegant!  And this was so quick to make - sentiment and image stamped and heat embossed in gold, trimmed into a square, popped up on fun foam on the card base.  I put the sentiment right under the trumpet, thinking that maybe the angel is playing Joy to the World.

Next card, for The Twelve Months of Christmas "Christmas Baubles" and for NBUS as I used a stamp I'd never used before:


It's a large stamp that fills up most of the card and has some solid areas so I stamped it in my MISTI.  I used a beautiful blue metallic ink and heat embossed with a sparkly embossing powder.  Trimmed it, added it to the cardbase, and ran a sentiment strip across at an angle so that I could cover a bit over on the right where the heat embossing didn't cover it very well.

And finally for Sweet Stampin' "Tags":

I had great fun playing with a lot of mixed media products (quite out of my comfort zone) to create some backgrounds using Jennifer McGuire's recent video "Background Magic".

On a large piece of heavy cs, I brayered different shades of blue ink and sprayed with some mica spray, stamped with a snowflakes background stamp in darker blue, stamped a few bits of tiny stars in gold, stamped a few tiny Christmas words in blue and gold, and stenciled some larger stars and snowflakes with grit paste. Then trimmed the panel into a few different pieces.

I cut a tag out of part of it, added a couple of die cut snowflakes, a TH label sticker, and some ribbon printed with snowflakes.

You'll be seeing more cards that use pieces of my background soon.

   My Time To Craft Christmas!

  Grab our badge to display on your blog. 

Sweet Stampin' Challenge Blog


Supplies for card 1:
Stamps - Deep Red angel, PTI sentiment
Ink - ColorBox gold
Paper - cream cs
Size - 4.25" square
Accessories - gold embossing powder, fun foam

Supplies for card 2:
Stamps - Local King ornaments, Mama Elephant sentiment
Ink - Encore Metallic Blue, Versafine Clair Nocturne
Paper - white cs
Size - A2
Accessories - SU Iridescent Ice embossing powder, Mama Elephant sentiment strip die

Supplies for card 3:
Stamps - SSS small sentiments, Impression Obsession snowflakes and stars background stamps
Ink - Versafine Clair Twilight, various blue Distress inks, Delicata gold
Paper - mixed media cs
Size -5.25x3"
Accessories - Distress mica stain Frosted Juniper, TH grit paste, TH star stencil, Carta Bella snowflake stencil, tag die, TH snowflake dies, TH label stick-on, blue snowflake ribbon

Tuesday 26 September 2023

A Day of "Quilting"

We had a ton of rain yesterday so I holed up in the craftroom and pulled out my quilt die and a bunch of scraps of patterned paper that were at least 4" square and ended up with four cards.  It was great fun mixing and matching the patterned paper, the colours of the outer part of the "quilt", and the colours of the card bases.  Here are the four variations:


Making these involved running the die eight times - one for each of the four different patterned papers and one for each of the border colours.  

For each quilt, I cut a square from a sheet of double-sided sookwang tape and stuck it on a square of scrap cs, placed the outline borders on it, and then inset the little patterned pieces.  I did it with fine pointed tweezers - easier than using my fingers!

Added the quilts to the card bases, and then for the first two, I created a tiny tag from an old tag punch for the sentiment stuck it on the centre of the quilt and embellished with a tiny adhesive pearl, and for the last two, I die cut sentiments to match the card bases.

They are going to the following challenges:

Christmas Challenges All Year Round "For a Female" - I have a couple of girlfriends who do quilting so these cards will go to them.

Sweet Stampin' Challenge "Tags" - the ones with the tags on sentiments

My Time to Craft Challenge - "Two or More Patterned Papers"

Rudolph Days "anything Christmas"

Snippets Playground - lots of scraps of patterned paper, white, red, cream, and green cs

Grab our badge!  

My Time To Craft!

Sweet Stampin' Challenge Blog
Player's Badge 


Supplies:
Stamps - SSS comfort & joy
Ink - ColorBox green
Paper - white, cream, red, and green cs; four different patterned papers
Size - 4.75" square
Accessories - Gina Marie quilt die, McGill tag punch, TH joy and noel dies

Saturday 23 September 2023

A Reindeer in a Shaker and a Snowman

Some snowy stuff today.  First of all a reindeer in a snowy shaker for Shopping Our Stash "Shake It Up":


I die cut the snowglobe out of white cs and out of two layers of fun foam. I glued a circle of acetate between the white cs and the top layer of fun foam. I die cut a tree out of a scrap of green smooshed background and the deer out of a scrap of textured gold cs, and tore a scrap of white cs for snowy ground. I glued them all to the navy card base, sprinkled a little bit of Stampendous "Spoonful of Snow" on top and then added the snowglobe to the top of that. The sentiment is die cut from the same scrap of gold as the reindeer.

Since a shaker card looks different every time it's shaken, here's another view with less of the glittery snow in the sky:

My second card is a snowman for ABC Christmas Challenge "S for Snowman" and Sparkles Christmas Challenge "Build Me a Snowman".

I love this snowman because it rains more than it snows here in Vancouver so I love the fact that he has an umbrella!

Watercoloured, trimmed with a stitched rectangle die, popped up on fun foam on an off-white card base.

Grab Our Badge!  Please take a copy of our badge


Supplies for card 1:
Ink - green Distress inks
Paper - navy and white cs, gold textured cs
Size - A2
Accessories - small deer die, snowglobe die, Christmas tree die, Stampendous Spoonful of Snow, fun foam

Supplies for card 2:
Stamps - Serendipity snowman
Ink - Versafine Clair Nocturne
Paper - watercolour paper, off white cs
Size - A2
Accessories - watercolour paints, MFT Wonky Stitched rectangle die, fun foam


Monday 18 September 2023

Dogs and Flowers - Two of My Favourite Things

As most of you know, I love dogs.  And I'm a very keen gardener.  So today has a post featuring each.

For the My Time to Craft Challenge, the theme is dogs and / or cats.  I did a very CAS card that I will use as a Christmas card for a dog-loving friend.

The dog and sentiment are heat embossed with a champagne coloured embossing powder.  It's bordered with red and green glitter cs.

For the Flower Challenge "Use a Die", I went more mixed media.


I created a gelli plate background with acrylic paints, die cut a flower twice and glued them together for dimension, and also die cut a sentiment.  I added gold Stickles to the centres of the flowers.

My Time To Craft!


Supplies for card 1:
Stamps - Technique Junkies Cold Noses
Ink - Versafine Clair Fallen Leaves
Paper - white cs, red and green glitter cs
Size - A2
Accessories - Recollections Champagne embossing powder

Supplies for card 2:
Paper - mixed media cs, white cs
Size - A2
Accessories - acrylic paints, gelli plate, Memory Box Honeysuckle Blossom die, gold Stickles


Saturday 16 September 2023

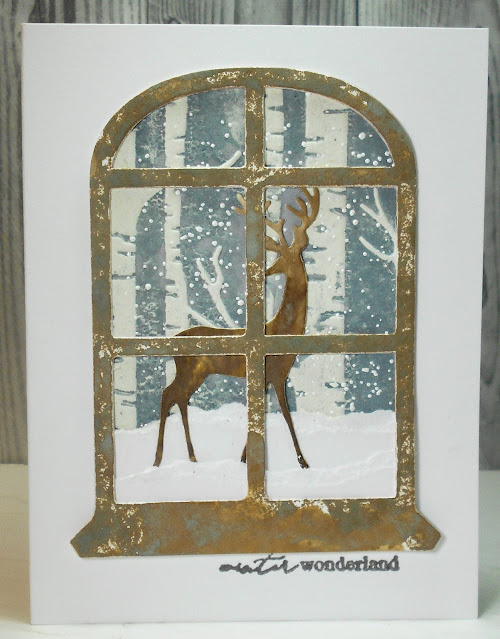
Reindeer Through a Window

As soon as I saw the mood board for the new Peace on Earth challenge, I knew what I wanted to do for my Design Team card.  I was completely inspired by the upper left image (see the mood board at the end of the post).  Here's my card:


I took my birch trees embossing folder and rubbed over the debossing side with Weathered Wood Distress ink and then used a piece of chalk coloured cs to emboss my background.  The Weathered Wood ink transferred really well and the chalk colour of the cs made more natural looking birch trees than stark white cs would have.  I sprinkled some Chunky Frantage white embossing powder on it and heated from underneath to create the falling snow.

I die cut the window out of white cs and then smooshed it into Frayed Burlap Oxide ink and then again into a tiny bit of Ground Espresso.  I left some white spots as I wanted a really rustic looking window.  I die cut a second window and glued the two together for more dimension.

With the leftover Ground Espresso on my craft mat, I smooshed a scrap of white cs and then die cut the reindeer from that.

I tore two strips of white cs for the snowy ground and stuck it to the birch tree background, along with the reindeer.  Then trimmed the background to fit behind the window and glued the window on top of it all.

The stamped sentiment says "winter wonderland" - I think I over-inked it as I didn't get a very clear impression from the stamp.

We'd love to have you join us at Peace on Earth.  There's lots of inspiration from the mood board and the rest of the Design Team, but you can just link up an "anything Christmas" card if you prefer.

   Our Blog Badge

I'm also linking my card up with Can You Handle the Pressure "A Twist of Trees" and with the NBUS Challenge - I'd never used the reindeer die before.  One of my commenters kindly invited me to add my card to The Holly and Ivy Christmas "Anything Goes" Challenge as well.

Please Grab Our Badge  Grab our badge to display on your blog. The Holly and Ivy Christmas Challenge


Supplies:
Stamps - PB sentiment
Ink - Distress Oxide Ground Espresso and Frayed Burlap, Distress Weathered Wood, Versafine Clair Morning Mist
Paper - white and chalk cs
Size - A2
Accessories - Spellbinders window die, TH reindeer die, SU embossing folder, Stampendous Chunky Frantage white embossing powder