A blog devoted to the cards I make in my tiny upstairs space. When my sister stays there, she calls it an "artist's garret". I'm not an artist, but am an enthusiastic cardmaker - hence the title "Cardmaker's Garret".
___________________________________________________________________________________________

Wednesday 31 January 2024

Valentines, Houses, and Berries

Sneaking in under the wire with a Valentine card for Festive Friday "Valentine's Day" (I chose red, hearts, and a love sentiment out of their required elements list) and the Tic Tac Toe challenge (I chose the left hand vertical row of heart, red, and die cut).  I'm adding it to the AAA CAS Valentine challenge as well. 

I found the die cut heart that had text stamped on it in my UFO box. It's leftover from this card made back in 2022. So I decided to turn it into a Valentine for this year.

I dry embossed a strip of hearts across the card base, layered the heart on it, added a die cut sentiment, and a small matching solid red heart to the centre of the big heart.

And also sneaking under the wire with a Christmas card for the Jingle Belles challenge "Something Old ... Something New".  I have a very old window die and some old little snowflake dies combined with some new house dies.

I die cut the window out of cream cs and glued it to a white cardbase. I die cut the snowflakes and houses out of kraft cs and smooshed them into some brown Distress inks smeared on my craft mat. Added them to the card along with a stamped sentiment.

And today I have a Threefer so that I can sneak in under the wire once more.  This time it's for My Time to Craft Christmas "Berries".  I'm also adding it to the ABC Christmas challenge "B is for Berries".

It seemed a great opportunity to use up some berry-covered dp.  I paired it with an image that also has some berries on it.  I coloured the image with watercolour paints and cut my focal image with a circle die.  I cut a slightly larger circle out of a shimmer cs that's the closest colour I had to the stems in the dp and the leaves in the image for a border. 


My Time To Craft Christmas!


Supplies for card 1:
Stamps - Wendy Vecchi script background stamp
Ink - Memento Rhubarb Stalk
Paper - white and dark red cs
Size - A2
Accessories - Memory Box heart dies, Poppy Stamps sentiment die, SU hearts embossing folder

Supplies for card 2:
Stamps - SU cardinal, SSS sentiment
Ink - Versafine Onyx Black, Distress Speckled Egg
Paper - watercolour paper, dp, off white and shimmery light green cs
Size - A2
Accessories - watercolour paints, Spellbinders circle dies

Supplies for card 3:
Stamps - PB sentiment
Ink - Distress Frayed Burlap, Walnut Stain, and Gathered Twigs
Paper - kraft, white, and cream cs
Size - 5.25" square
Accessories - Charlie und Paulschen house dies, PB tiny snowflake dies, Memory Box
window die


Monday 29 January 2024

Winter Wonderland and a Single Snowflake

I chose a lovely winter village scene for Sparkles Christmas Challenge "Winter Wonderland".


The image is coloured with plain old inexpensive watercolour paints - they aren't as vibrant as a lot of the newer watercolour mediums but I think the softness suits the wintery scene. I added glitter to all the rooftops and trees and along the snow lines. I cut the image out with an oval die and bordered with dark silver cs.

Christmas Cards All Year Round has an image of a Christmas sweater with one large gold snowflake on the front of it.  It inspired me to make this card with a gold snowflake.

I started by using gesso to stencil the snowflake on black cs to create a resist for my stamping, then stamped the Christmas script background stamp over it in white. I replaced the snowflake stencil and sponged gold ink through it quite lightly so that some of the white gesso showed through.  I trimmed the panel and popped it up with fun foam on a platinum shimmer card base.

Please take a copy of our badge  Grab our badge!


Supplies for card 1:
Stamps - Art-Kure Castle Combe Village, SU sentiment
Ink - Versafine Onyx Black
Paper - watercolour paper, dark silver and natural cs
Size - A2
Accessories - watercolour paints, SU label punches, Nesties oval dies, dimensionals, glitter

Supplies for card 2:
Stamps - text background stamp
Ink - gold and white ink
Paper - black cs, platinum shimmer cs
Size - 4.75" square
Accessories - snowflake stencil, white gesso, fun foam

Sunday 28 January 2024

Alcohol Inks with Gilding Flakes

The Group of Seven cardmakers are combining alcohol inks and gilding flakes this month.  There are a couple of different methods over on the Group of Seven blog.  Here are the two cards I was most happy with at the end.


I used the technique at the end of this video (around the 16 minute mark).  I built up alcohol inks on Yupo for the first one and glossy cs for the second, and pressed gilding flakes into the sticky parts of the alcohol ink that hadn't quite dried.  On the first card I used gold gilding flakes and on the second, silver.  I die cut hearts and the "love" sentiment from the best sections and created my cards.
Here are close-ups of the hearts:

I did try the other method, using glue on the lines of the alcohol ink cells or blotches but didn't like the results I got, though some of our other members really did.  You can see their cards over on Group of Seven.

I also tried a quick squirt of spray adhesive to attach gilding flakes but wasn't crazy about the results though did turn it into this card:

If you're interested and end up giving this technique a try, we'd love to have you link up your results over at Group of Seven as inspiration for others!


Supplies:
Stamps - SU cherish, SSS love you
Ink - red and pink ink
Paper - Yupo, glossy cs, white cs
Size - 4.75" square (first and third), 6x3.25" (second)
Accessories - various pink and red alcohol inks, gold gilding flakes (first card), silver gilding flakes (second and third), rubbing alcohol, spray adhesive, various heart dies, heart wreath die, love die, SU narrow hearts embossing folder, small label die, square stitched die

Friday 26 January 2024

A Dragonfly and a Bird in a Hat

Colorful Options wants lovely shades of blue, mauve, and green.  I decided they worked well for a dragonfly.


It's stamped in archival ink, watercoloured with Twinkling H2Os, trimmed with a stitched rectangle die, bordered in pale gold glitter cs, and popped up with fun foam on cream cs.

For the Triple B Birds, Blooms, and / or Butterflies challenge, I was inspired by the winter bird in the right hand image of their mood board and the shade of blue in the left hand image.  And Stencil Fun's theme is Birds.


I stamped and watercoloured the image. Then stencilled the bubbles around it, stamped a few bits of a snowflake along the edges, and sponged a bit of colour around the edges to darken them.

  LOVE to have you SHARE our BADGE


Supplies for card 1:
Stamps - Unity Stamp Co. Be the Best set
Ink - Archival Jet Black
Paper - hot press watercolour paper, pale gold glitter cs, cream cs
Size - A2
Accessories - Twinkling H2Os, Lil Inker stitched rectangle, fun foam

Supplies for card 2:
Stamps - PaperArtsy bird and sentiment, Penny Black branch, TH snowflake stamp
Ink - Versafine Clair Nocturne, Distress Speckled Egg
Paper - watercolour paper, green and off-white cs
Size - 5.75" square
Accessories - TH Bubble stencil, watercolour paints, Spellbinders square die

Monday 22 January 2024

A Nuthatch Birthday and an Embossed Birthday

My Time to Craft wants to see something new in our stash.  I love bird stamps, and I feed the birds in my backyard.  One of my favourites of the ones who come to my feeders is the nuthatch so when I saw this nuthatch stamp I had to have it.

It's stamped and watercoloured, with a bit of light text stamping around it.  I bordered it with a bit of mottled sand-coloured cs.  I created another background layer with the sentiment stamped at the bottom of it and some twine wrapped around it.

Seize the Birthday wants wet or dry embossing.  I used embossing paste which I assume counts as a form of wet embossing.  And Inkspirational wants to see stencils.

I sponged various Distress inks through the harlequin stencil onto mixed media cs, cleaned off the stencil, replaced it, and then added clear embossing paste over it. I stamped the butterfly and watercoloured it with the same colours. Then fussy cut it. I popped the background up on fun foam on a rustic card base and added the butterfly and the sentiment.

My Time To Craft!


Supplies for card 1:
Stamps - AALL & Create nuthatch, SU sentiment, text stamp
Ink - Versafine Clair
Paper - watercolour paper, off white cs, mottled tan dp
Size - A2
Accessories - natural twine, watercolour paints

Supplies for card 2:
Stamps - Penny Black butterfly, SU sentiment
Ink - various Distress inks
Paper - mixed media cs, rustic cs
Size - A2
Accessories - Spellbinders tag die, TCW harlequin stencil, Dreamweaver clear embossing paste, fun foam

Saturday 20 January 2024

Mood Board Inspired Wreath

I was completely inspired by the photo on the upper right of the Peace on Earth mood board (see at end of post) to create this card:

The background is from an advertising flyer - it has faint lines that make me think of the wood background in my inspiration photo.  The wreath is composed of lots of die cuts from scraps of cs and dp.  Stickles are added to the centre of the little poinsettia and a few white pearls are added to represent the white flowers in the image.

We'd love to see your cards either inspired by our mood board or an "anything Christmas" card.  There's lots more inspiration from the rest of the Design Team at Peace on Earth.

I'm also adding it the 52 Card Throwdown wreath challenge.


Supplies:
Paper - off white cs, recycled advertising flyer, various scraps of dp and cs
Size - A2
Accessories - various wreath, greenery, and berry sprig dies; gold Stickles, white pearls, Penny Black "joy" die

Thursday 18 January 2024

A Pop of Red and Frosted Windowpanes

The Paper Players have a colour challenge - "Black, White, and a Pop of Colour".  I chose red for my pop of colour.


A very CAS card - stamped the image, coloured the heart with a red marker, trimmed with a wonky stitched die, bordered with red cs, and popped up on fun foam.
 
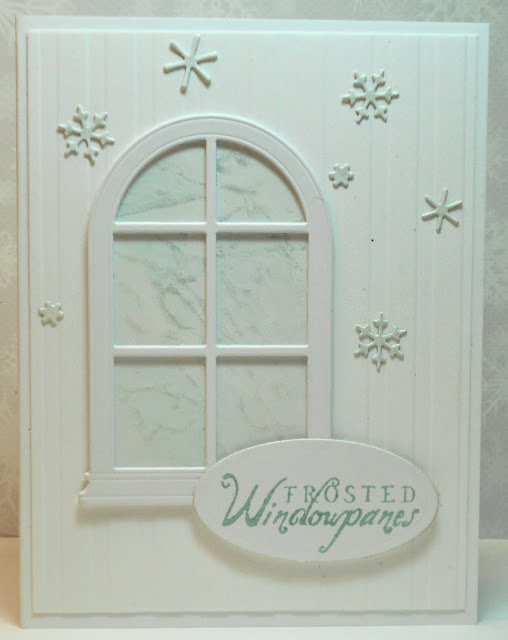
Then for The Sisterhood of Crafters "Icy Cold", I created a windowpane like the ones from my childhood in eastern Canada - we only had single glazed windows and they'd get covered in frosty ice during the frigid cold winter days.
 

I sprinkled very pale blue Magicals on coated cs and spritzed with water and let the colour run.  When dry, I went over some of the "veins" in the colour with Wink of Stella to increase the icy look.  I set it behind a window die, cut twice and glued together for more dimension, added that to a background of cs (embossed with vertical lines), added the sentiment (stamped and then die cut with an oval), and finished with a few small snowflakes die cut out of the leftover "frosty" panel.

It was hard to photograph so here's another view with different lighting that brought out more of the pale blue Magicals:


Remembering those cold eastern winters makes me appreciative of living in the more moderate climate of Vancouver, though we've just had a cold snap of days below freezing followed by quite a big dump of snow!

  Please Grab Our Badge!


Supplies for card 1:
Stamps - Penny Black image, PTI sentimen
Ink - Archival Jet Black
Paper - white and red cs
Size - A2
Accessories - red marker, MFT Wonky stitched rectangle die, fun foam

Supplies for card 2:
Stamps - Impression Obsession sentiment
Ink - Distress Speckled Egg
Paper - white cs, coated cs, pre-embossed white cs
Size - A2
Accessories - small snowflake dies, pale blue Magicals, Wink of Stella, Memory Box window die, Spellbinders oval die

Friday 12 January 2024

A New Stamp and a Blue Thank You

For Penny Black Saturday Challenge "Something New", Sweet Stampin' "What's New?", and Cardz 4 Guyz "Use Something New from Your Stash":

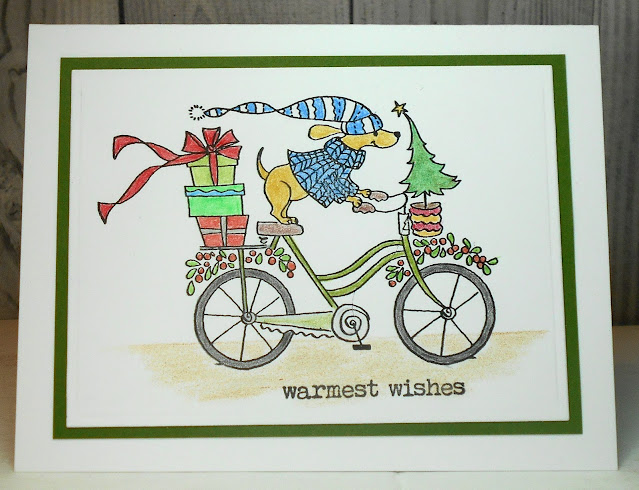
A new Penny Black stamp that will be perfect for my brother-in-law for next Christmas's card as he is an avid cyclist, and he and my sister have a yellow lab.  The image is coloured with coloured pencils and bordered with green cs.  

While I had the stamp out, I did a second colour variation as I have a good friend who cycles everywhere so might as well get her Christmas card made now too!!  I bordered this one with a piece of smooshed oxide background I had in my UFO box.

On a totally different theme, a thank you card for the Color Hues challenge "Light Blue and Navy":

I started with a gelli plate print done in light blues, did some pale grey stencilling over it, stamped a pale sentiment and navy blue flowers over all that, and added a dark grey die cut sentiment and border.

  Sweet Stampin' Challenge Blog

Cardz 4 Guyz Logo


Supplies for card 1:
Stamps - Penny Black
Ink - Versafine Onyx Black
Paper - white and green cs, white and smooshed background
Size - A2
Accessories - coloured pencils

Supplies for card 2:
Stamps - Tim Holtz flowers
Ink - various blue and grey Distress inks
Paper - white and dark grey cs
Size - 4.5" square
Accessories - gelli plate, stencils, small thank you die cut