A blog devoted to the cards I make in my tiny upstairs space. When my sister stays there, she calls it an "artist's garret". I'm not an artist, but am an enthusiastic cardmaker - hence the title "Cardmaker's Garret".
___________________________________________________________________________________________
Showing posts with label Tim Holtz. Show all posts

Thursday, 5 December 2024

Watercoloured Winter, Peaceful Ornament, and Grungy Birthday

Two more Christmas cards and one birthday card today!  

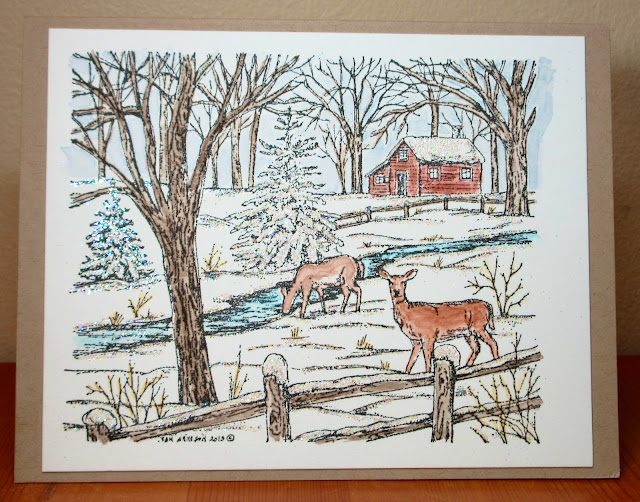
First, for ABC Christmas Challenge "W is for Watercolouring", Stamping Sensations "Winter", and Four Seasons "Winter" (the top left image on their mood board inspired me to pull out an old stamp that has a rustic wooden cabin as part of it).


The image is stamped, watercoloured, and added to a kraft cardbase.  Then I went over the snow lines, the snow on the fences, trees, and roof with a quickie glue pen and added glitter.  I put the sentiment inside as I didn't want to cover up any of the lovely image.

Next up for Addicted to CAS "Ornament":


A friend and I regularly go for tea at a little French bakery / coffee shop and the pastries are served on gold cardboard holders that I carefully clean and recycle to make large ornaments for cards. In this case, I dripped a couple of shades of red alcohol inks on the round part of the pastry holder and spritzed with rubbing alcohol to get it to run and cover the round part. When dry, I added a dove die cut from white glitter cs and a branch cut from green shimmer cs. I embellished with three little stick-on gold glitter circles and some matching gold glitter strips for the ornament's hanger. I let it all take centre stage on a plain white card base with just an added stamped and heat embossed sentiment. 

A male friend has a birthday coming up so I had my usual struggle to make a masculine card.  I'm linking it up with Sweet Stampin' "It's our Birthday" - they are celebrating the 15th year of their challenge.  And also Seize the Birthday "Masculine".

I found the stencilled piece in my unused background box - it was very intensely orange and I didn't like it, so I watered down some gesso and painted over it to lighten it up.  I stamped the Tim Holtz image in black and edged around it with Tea Dye Distress ink.  Then cut a rectangle out of the stencilled piece and layered it over the stamped image as a frame.  Added a birthday sentiment to the top of the frame.

  Please grab our logo 

  Sweet Stampin' Challenge Blog


Supplies for card 1:
Stamps - Northwoods
Ink - Versafine Onyx Black
Paper - watercolour paper, kraft cs
Size - A2
Accessories - watercolour paints, quickie glue pen, glitter

Supplies for card 2:
Stamps - A Muse sentiment
Ink - ColorBox Gold, red alcohol inks
Paper - white cs, white glitter cs, green shimmer cs
Size - 4.75" square
Accessories - Impression Obsession dove die, recycled pastry holder, gold embossing powder, Anita's Glitterations gold strips and dots

Supplies for card 3:
Stamps - Tim Holtz man, unknown sentiment
Ink - various orange Distress inks, Distress Tea Dye, Versfine Onyx Black
Paper - white cs
Size - A2
Accessories - Spellbinders rectangle die, clock stencil, gesso

Sunday, 25 August 2024

Reindeer with Blue Background

I'm honoured to be invited to be a Guest Designer at Rudolph Days.  It's an "anything Christmas goes" challenge that runs from the 25th to the end of each month.  Here's my card:


I created the background by lightly smooshing a piece of mixed media cardstock with Distress Weathered Wood and Stormy Sky.  Then with Stormy Sky, I stencilled the snowflake band from the Tim Holtz Holiday Knit stencil across the top.  I put the panel in my MISTI and stamped the reindeer, trees, and sentiments in black, and then sponged a bit of ground / shadowing under the deer and trees.  For the snow, I sprinkled Frantage Chunky White embossing powder over the panel and heated it from underneath so that it wouldn't blow off.

I'd love to see what you create for Rudolph Days!


Supplies:
Stamps - Tim Holtz
Ink - Versafine Onyx Black, Distress Weathered Wood and Stormy Sky
Paper - mixed media cs, off white cs
Size - A2
Accessories - Tim Holtz Holiday Knit stencil, Stampendous Frantage Chunky White embossing powder

Saturday, 14 May 2022

Daredevil and Birds

Cutting it fine to get cards posted for two challenges today.

First up Cardz 4 Guyz wants "D is for .....".  I went with "D is for Daredevil" with this card:

I created the background by sprinkling green, blue, and turquoise Brushos over mixed media cs and spritzing with water. When dry, I stamped bits of text and mixed media stamps on it in grey.

I stamped and heat embossed the image and sentiment in black, trimmed the panel, bordered in dark grey, and added it to a cream cardbase.

Next up, for the Double D Challenge "Birds / Nests / Birdhouses", I have both birds and a birdhouse:

 
I stamped on watercolour paper, painted, bordered in red, used a dark green card base, and went over the branches with a Quickie glue pen and added some glitter.
 
 
Cardz 4 Guyz


Supplies for card 1:
Stamps - Tim Holtz tightrope walker and quote, various unknown text and mixed media stamps
Ink - Versafine Onyx Black, Distress Hickory Smoke
Paper - cream and dark grey cs, mixed media cs
Size - A2
Accessories - green, blue, and turquoise Brushos, clear embossing powder

Supplies for card 2:
Stamps - Magenta, Make an Impression sentiment
Ink - Versafine Onyx Black
Paper - watercolour paper, red and dark green cs
Size - A2
Accessories - watercolour paints, glitter

Saturday, 6 July 2019

A Tree for the Sparkles Challenge

I'm behind on my Christmas cards that I need for my November sale so really must get going - and the various Christmas card challenges are a huge help.

Today I'm doing the Sparkles Christmas Challenge "Include a Tree".


I created a background of various green alcohol inks on Yupo.  Trimmed it down to leave a border from the white card base.

I die cut the Tim Holtz tree twice, once from white and once from gold cs.  I glued the outline to the background and then had the fun of getting all the little gold pieces into the right spots - good thing I love jigsaw puzzles.  The sentiment is cut out of the same gold.  The panel is popped up on fun foam for dimension.

Thanks for coming by on a July day to look at a Christmas card!


Supplies:
Ink - various green alcohol inks
Paper - white and gold cs
Size - A2
Accessories - Tim Holtz tree and joy dies, fun foam


Sunday, 24 December 2017

A Very Last Minute Card

Here it is Christmas Eve and I need one final Christmas card for this year (to hand deliver, of course). 

Both the Merry Christmas Challenge and the Christmas Cards All Year Round Challenge have "anything goes" right now so I'll link up there. 

And also over at CAS Mix Up it's anything goes as long as there is stamping and at least two other of their optional elements.  I have stamping, spraying, heat embossing, and die cutting.

And at SCS, the Mixability challenge is Silent Night - "all is calm, all is bright" - use cool calm colours or all warm bright colours on a holiday card.  I went with calm and cool - blue, green, and brown.


The background is sprayed with a blue spray - not sure what brand as the piece was in my UFO box. Then I die cut the tree line, rubbed Versamark over it all and heat embossed with verdigris embossing powder that gives a great mottled look. I added two die cut reindeer and a sentiment.

Merry Christmas to all my blog friends and followers.  Thank you to you all for dropping in to look and to leave comments - it is so appreciated, and so encouraging!


Supplies:
Stamps - Make an Impression sentiment
Ink - Memento Rich Cocoa, Versamark
Paper - white and brown cs
Size - A2
Accessories - Impression Obsession reindeer dies, Tim Holtz tree line die, Ranger Verdigris embossing powder, blue spray


Monday, 6 November 2017

Gilding Flakes Tag

My wonderful friend, Loll Thompson (Stamping with Loll), is running her Christmas Tag event again this year.  Today is the first day.


And she's invited me to be one of her Guest Designers.  I'm thrilled!

The guidelines for the challenge are that it must be a mixed media Christmas tag (any style / any size) which includes stamping, plus two mixed media elements (techniques or products).

I decided to make a tag using gilding flakes for the background.

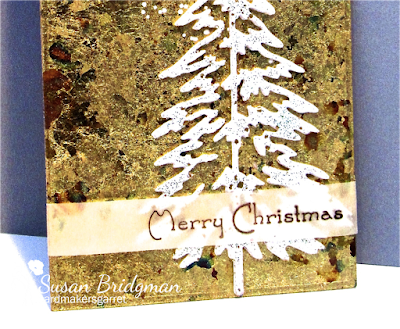
For the base, I covered a piece of cardstock a bit bigger than my tag die with Sook Wang double sided tape, then added the gilding flakes and burnished them.  I die cut the tag.

I cut three of the Tim Holtz tree die and glued them together for substance, then went over the top layer with Versamark and heat embossed it with white embossing powder.  I decided I wanted a bit of sparkle and colour in it, so added more Versamark and this time, heat embossed with Frantage Shabby Green Embossing Enamel (it is mainly white with a bit of green, and a bit of gold in it).  I then glued it to the tag.

I stamped the sentiment with Staz On Ganache on a narrow strip of pale gold vellum, wrapping it around the tag.


To add a bit more interest to the top of the tag, I sprinkled Frantage Chunky White Embossing Enamel on either side of the tree top and heated it from underneath so that it wouldn't blow off.

A bit of gold cord with coloured flecks in it finished off the tag.

Here's a close-up photo of the Frantage and the gold cord:


It was incredibly difficult to photograph.  If I got the details of the Frantage "snow" and the sentiment stamping, I lost the beautiful shine of the gilding flakes.  So the above photo does not do justice to the gilding flakes.  Here's one that shows the shine:


Be sure to drop by Stamping with Loll every day from today until November 17 to see Loll's twelve tags and those by the other daily Guest Designers.  It will hopefully inspire you to create a Christmas tag of your own to link up!


Supplies:
Stamps - A Muse sentiment
Ink - Staz On Ganache, Versamark
Paper - white cs, pale gold vellum
Size - 5.25"x3"
Accessories - Tim Holtz tree die, Die-namics tag die, Cosmic Shimmer Verdigris gilding flakes, white embossing powder, Stampendous Frantage Chunky White Embossing Enamel and Shabby Green Embossing Enamel, gold flecked cord


Thursday, 15 June 2017

Texture and Shine for CAS Mix Up

It's time to remind you about June's CAS Mix Up challenge:


You only have until June 24th to link up an entry!  There is some wonderful new inspiration for you over at CAS Mix Up from the Design Team and our June Guest Designer, Marianne of Marianne's Cards 'n Stuff.

I made a snowy Christmas card (see here) for the June 1st CAS Mix Up post, so thought that my reminder card should be more in keeping with June since it is almost summer!


I sponged colour with various Distress Oxide inks through my new Tim Holtz stencil onto mixed media cs, then cleaned my stencil so as not to contaminate my paste.  I replaced the stencil over the image and then used Dreamweaver Translucent embossing paste - the colour shows through perfectly and it has a wonderful sheen to it.  Here's a close-up that gives a better idea of the embossing paste:


I layered it over a die cut stitched rectangle, popped that up on fun foam, and added a stamped and heat embossed sentiment.

Looking forward to seeing your entries - please remember to keep them CAS (clean and simple) and include stamping, embossing paste or gel, and at least one other option from the list on the right side of the CAS Mix Up blog.

I'm also linking up to this month's Flower Challenge where "anything goes".


Supplies:
Stamps - SU sentiment
Ink - ColorBox Frost White for the sentiment, various Oxide inks to colour the image
Paper - cream, black, and mixed media cs
Size - A2
Accessories - Tim Holtz Floral stencil, Dreamweaver Translucent embossing paste, Lil Inker stitched rectangle die, fun foam, white embossing powder


Sunday, 4 June 2017

A Tree for Happy Little Stampers

Hello All,

Time for another Christmas Card Challenge at Happy Little Stampers.   For June, the optional twist is "tree".


I went with the optional twist:


I had a beautiful piece of a gelli plate background in my UFO box that I made with my friend, Christine's help.  I don't own a gelli plate so enjoy occasionally playing with hers.  If I remember correctly, it's a combination of blue acrylic paint, white gesso, and a snowflake stencil (if you look closely, you can faintly see the snowflakes!) on mixed media cs.  (Christine, let me know if I missed something!)

I die cut the Tim Holtz tree and words twice and glued them together for more substance.  I glued it all to the background, popped the panel up on fun foam, and added some blue sequins.

Come and join us at Happy Little Stampers anytime before the end of June!  There's a chance you will win a prize!


Sadly this is my last month on their Christmas challenge Design Team.  My life has gotten increasingly busy and I need to let a few things go.  But I've enjoyed my past two years, making Christmas cards each month for their challenges!  Thank you so much everyone!


Supplies:

Paper - white and mixed media cs
Size - A2
Accessories -Tim Holtz tree and word dies, blue sequins, blue acrylic paint, gesso, unknown snowflake stencil


Thursday, 2 February 2017

Watercoloured Love

February's CAS Watercolour challenge is, very appropriately, "love".


This does not have to be a Valentine - it can be any card with a theme of love.  But I chose to go with a Valentine card.  And I chose to try last month's CAS Watercolour winner's "water stamping technique".  Heather Telford made this beautiful snowflake card by painting on the stamp with a paintbrush and water, stamping it, and then sprinkling brushos on the wet impression of the image.  Here's my heart done the same way:


As Heather pointed out in her blog post, it's tricky to get the right amount of water so I did a couple of practice attempts and then did this one and was pretty happy with the results.

I used two shades of red brushos on watercolour paper.  I left it to dry, then brushed off any stray bits of brushos, and stamped my sentiment.  I backed it with fun foam and then popped it up on a layer of red cs that has very subtle gold shimmer in it.  I added three gold sequins for embellishment.

Please come and visit us at CAS Watercolour to see the rest of the beautiful cards by the Design Team and our Guest Designer, Michelle Lupton.  You have until February 24th to link up your card - please make sure it includes some kind of watercolouring, relates to the theme of "love", and is clean and simple.

I'm also taking my card over to Darnell's playhouse for her NBUS ("never before used stuff") challenge as I'd never used either the heart or the sentiment stamp before.


Supplies:
Stamps - Tim Holtz Heartfelt stamp set
Ink - Archival Jet Black
Paper - white cs, red cs with slight gold shimmer, watercolour paper
Size - A2
Accessories - brilliant red and scarlet brushos, gold sequins, fun foam


Saturday, 7 January 2017

Something Old, Something New...

A couple of SCS challenges sparked today's card:

Ways to Use It WT617 = Something Old, Something New....
Free for All F4A359 = "I'm Dye-ing" - use a die on your card


Here's the card:


For the Ways to Use It challenge, I have:
something old = the sentiment stamp
something new = new Ranger Archival Library Green ink pad
something borrowed = the tree die that I borrowed from Loll Thompson
something blue = blue alcohol ink

The background is blue and green alcohol ink smooshed on Yupo. The tree die that I borrowed from Loll before Christmas is fabulous for layering over interesting backgrounds. I might end up buying it as I like it so much and really should return it to Loll!

I'm also linking up to CAS Mix Up where the January challenge is "stamping + liquid colours + your choice from their list of options". My liquid colour is the alcohol ink and my choice is the die cut. Go to CAS Mix Up here if you want to join in.


Supplies:
Stamps - Impression Obsession sentiment
Ink - Ranger Archival Library Green, blue and green alcohol inks
Paper - white cs, Yupo
Size - A2
Accessories - Tim Holtz tree die, fun foam


Saturday, 3 December 2016

Masculine Christmas for Merry Monday

This week's Merry Monday challenge is to create a masculine card, something I always struggle with.

I have a male friend who is an architect and I thought of the Tim Holtz Christmas tree stamp that is done like an architectural drawing.


I created the background first. I spritzed a large piece of mixed media cs and swiped various Distress stains across it, blending them a bit where the touched. I cut a background piece from the part with lots of blue for sky and added falling snow with embossing paste and a stencil. Then I stamped the Tim Holtz Christmas tree on it. I stamped it again and die cut the tree part and layered it over the one stamped on the background.

The star and ornaments were stamped, coloured, and die cut separately and added over the stamped image.

It's bordered in black and mounted on a cream card base.  Here's hoping he'll like it!


I think this card I made the other day for one of the Christmas card challenges on SCS ("relaxation - a cozy cabin, a fireplace, etc.") would work as a masculine card too:


It's stamped on watercolour paper, painted with Peerless watercolours, bordered in black, and mounted on fun foam. I added glitter wherever there was snow. I'm hoping the man I send it too won't mind a bit of sparkle!  The sentiment is on the inside - I couldn't figure out a good spot for it on the front of the card.

Hoping to see some ideas for masculine Christmas cards from the rest of you!


Supplies:
Stamps - Tim Holtz (tree card), Old Island Stamp Co. (cabin card)
Ink - Ranger Archival Jet Black
Paper - mixed media, black, and cream cs (tree card); black and white cs, watercolour paper (cabin card)
Size - A2
Accessories - various Distress stains, Tim Holtz dies, Dreamweaver embossing paste, Simon Says Stamp Falling Snow stencil (tree card);  Peerless watercolours, Quickie glue pen, glitter, fun foam (cabin card)


Wednesday, 23 November 2016

Inspired by Salvador Dali

This week's SCS CAS Challenge is "Hello Dali!" - to be inspired by a work by Salvador Dali.  When I first saw the challenge, I was going to pass over it as I only have time to make Christmas cards right now, but out of curiousity, I googled Salvadore Dali and Christmas and learned that he had designed some avant-garde Christmas cards.   Who knew?

I was inspired by the upper half this image that I found on this website:


So inspired in fact that I made two cards.  Here's the first one:


I sponged a background with various Distress inks trying to get the colours close to the Dali, but not quite as dark. I flicked a bit of water on it to get some texture.

I stamped the trees and sentiment in the darkest green ink I have (I didn't want them to be black). I added a bit of white on the upper edges of some of the branches with my white gel pen, but I think I need a new one as I wasn't getting much white. Then I sprinkled chunky white embossing enamel over the upper two thirds and heated from underneath.  I popped the panel up on fun foam.

Here's the second card:


For this card, I sponged a background with various Distress inks, stamped my sentiment in black (I didn't get a perfect impression but decided it suited the background), and stamped a few small snowflakes and heat embossed them.

I die cut the Tim Holtz pine tree once out of a flecked dark green cs and twice out of white cs. I glued the two white ones together and then glued the green one on top, slightly offset to let the white show as if it were snow on the branches.

These were really fun to make and a bit of a stretch for my imagination and creativity which is always a good thing to do!


Supplies for the first card:
Stamps - Tim Holtz trees, Impression Obsession sentiment
Ink - Memento Northern Pine, various Distress inks
Paper - white and mixed media cs
Size - A2
Accessories - gold stick-on stars, Frantage chunky white embossing enamel, white gel pen, fun foam

Supplies for the second card:
Stamps - Northwoods sentiment, small snowflake stamps
Ink - Ranger Jet Black, ColorBox white, various Distress inks
Paper - Gina K white cs, dark green flecked cs
Size - A2
Accessories - Tim Holtz pine tree die, white embossing powder