A blog devoted to the cards I make in my tiny upstairs space. When my sister stays there, she calls it an "artist's garret". I'm not an artist, but am an enthusiastic cardmaker - hence the title "Cardmaker's Garret".
___________________________________________________________________________________________
Showing posts with label ornament. Show all posts

Saturday, 6 September 2025

Aqua and Silver

As soon as I saw the Peace on Earth mood board (see at end of post), I was drawn to the bottom right image of the aqua-coloured ornaments with some silver in the background.  Here's my card:

I die cut the ornament three times, once out of aqua glitter cs and twice out of scrap cs.  I glued them together, threaded both aqua bakers twine and silver cord through the hole, then glued it to a silver matte card base.  I die cut the sentiment and glued it to the card base.

We'd love to have you join us with either a card inspired by the mood board or an "anything Christmas" card.  There's lots more inspiration from the Design Team over at Peace on Earth.  Here's our mood board:


Supplies:
Paper - silver matte cs, aqua glitter cs
Size - A2
Accessories - ornament die, Essentials by Ellen sentiment die, aqua bakers twine, silver cord

Thursday, 15 May 2025

Glittered Ornament and Jingle Bells

First up, a very CAS card.  My Time to Craft Christmas wants to see glitter.  I used a technique I saw on SCS for using up glitter.  It's also for the Try It On Tuesday Challenge to keep it simple.

I covered a piece of packing tape with a Christmas glitter blend I have (but had never used!). Added a top layer of tape and die cut the ornament. I "hung" it on my centre panel and popped that panel up on fun foam on the card base, and added a sentiment.

I used some of my hammered cs - it adds some nice texture to a very CAS card.  Since I've had it for a couple of years but haven't used any of it yet (and had never used the Christmas glitter mix that I've had for at least 10 years!!!), I'm linking it up at the NBUS Challenge and the Neglected Stuff Challenge.

Now on to my second card for today.  The Jingle Belles Challenge is asking for jingle bells, the ABC Christmas Challenge is "j for jingle bells", and the Double D Challenge wants us to use designer paper.


I die cut the bells twice and glued them together for more dimension.  Added them to some starry designer paper.  Stamped and fussy cut the sentiment and added it.  

    GRAB OUR BADGE!

 My Time To Craft Christmas!
Grab our badge to display on your blog.  PLEASE HELP SPREAD THE WORD! Pop this on your blog to find us fast!


Supplies for card 1:
Stamps - Penny Black sentiment
Ink - ColorBox Gold
Paper - white hammered cs
Size - A2
Accessories - Spellbinders ornament die and long rectangle die, Christmas glitter mix, packing tape, gold thread, gold embossing powder, sentiment strip die, fun foam

Supplies for card 2:
Stamps - Dylusions sentiment
Ink - Versafine Onyx black
Paper - white and gold cs, decorative paper
Size - A2
Accessories - Lil Inker bell dies

Thursday, 5 December 2024

Watercoloured Winter, Peaceful Ornament, and Grungy Birthday

Two more Christmas cards and one birthday card today!  

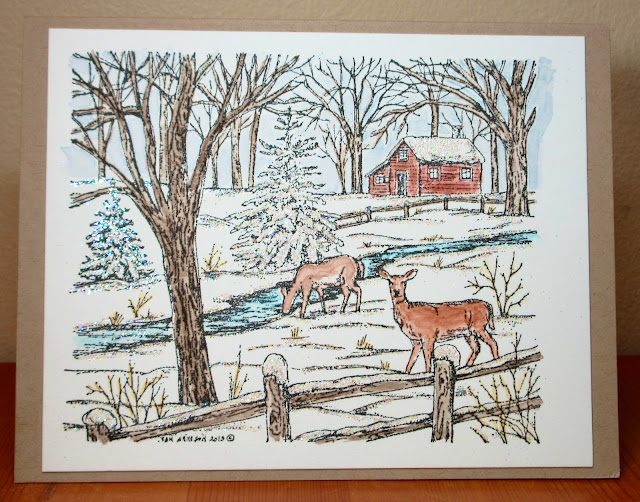
First, for ABC Christmas Challenge "W is for Watercolouring", Stamping Sensations "Winter", and Four Seasons "Winter" (the top left image on their mood board inspired me to pull out an old stamp that has a rustic wooden cabin as part of it).


The image is stamped, watercoloured, and added to a kraft cardbase.  Then I went over the snow lines, the snow on the fences, trees, and roof with a quickie glue pen and added glitter.  I put the sentiment inside as I didn't want to cover up any of the lovely image.

Next up for Addicted to CAS "Ornament":


A friend and I regularly go for tea at a little French bakery / coffee shop and the pastries are served on gold cardboard holders that I carefully clean and recycle to make large ornaments for cards. In this case, I dripped a couple of shades of red alcohol inks on the round part of the pastry holder and spritzed with rubbing alcohol to get it to run and cover the round part. When dry, I added a dove die cut from white glitter cs and a branch cut from green shimmer cs. I embellished with three little stick-on gold glitter circles and some matching gold glitter strips for the ornament's hanger. I let it all take centre stage on a plain white card base with just an added stamped and heat embossed sentiment. 

A male friend has a birthday coming up so I had my usual struggle to make a masculine card.  I'm linking it up with Sweet Stampin' "It's our Birthday" - they are celebrating the 15th year of their challenge.  And also Seize the Birthday "Masculine".

I found the stencilled piece in my unused background box - it was very intensely orange and I didn't like it, so I watered down some gesso and painted over it to lighten it up.  I stamped the Tim Holtz image in black and edged around it with Tea Dye Distress ink.  Then cut a rectangle out of the stencilled piece and layered it over the stamped image as a frame.  Added a birthday sentiment to the top of the frame.

  Please grab our logo 

  Sweet Stampin' Challenge Blog


Supplies for card 1:
Stamps - Northwoods
Ink - Versafine Onyx Black
Paper - watercolour paper, kraft cs
Size - A2
Accessories - watercolour paints, quickie glue pen, glitter

Supplies for card 2:
Stamps - A Muse sentiment
Ink - ColorBox Gold, red alcohol inks
Paper - white cs, white glitter cs, green shimmer cs
Size - 4.75" square
Accessories - Impression Obsession dove die, recycled pastry holder, gold embossing powder, Anita's Glitterations gold strips and dots

Supplies for card 3:
Stamps - Tim Holtz man, unknown sentiment
Ink - various orange Distress inks, Distress Tea Dye, Versfine Onyx Black
Paper - white cs
Size - A2
Accessories - Spellbinders rectangle die, clock stencil, gesso

Thursday, 31 October 2024

A Tiny Snowman and A Recycled Ornament

Christmas Cards All Year Round wants snowmen.

I stamped the image and sentiment onto the centre of a piece of watercolour paper, and used watercolour paints to colour it.  Then I placed it in a snowflake frame embossing folder and ran it through my Cuttlebug.  It came out partly embossed normally and partly letterpress.  I really like the look so am going to check for more stamps that will fit in that centre section.


My other card today is for 52 Christmas Card Throwdown's recycling challenge.  A friend and I regularly go out for tea and pastries at a lovely little French cafe.  I always save the foil cardboard thingies that the pastries come on as they look exactly like a Christmas ornament.  So that is the recycled item on my card.

I die cut the holly out of some smooshed green leftovers and the word joy out of some red glitter cs and glued both to the gold "ornament".  Because the foil is so slippery, the glue oozed out from under it in a lot of places.  There was no way to get it off so I sprinkled fine glitter all over the sticky sections.  It looks better in real life - quite sparkly - but in the photo it looks kind of splotchy.  I added red Stickles to the berries on the holly, and wrapped red twine around the top and through a hole I punched in the top of the ornament and through the card base.

Grab our badge!  


Supplies for card 1:
Stamps - Penny Black
Ink - Versafine Onyx Black
Paper - watercolour paper, off white cs
Size - A2
Accessories - Ultimate Crafts Snowflake Frame embossing folder, watercolour paints

Supplies for card 2:
Paper - white cs, leftover smooshed green scrap
Size - 4.75" square
Accessories - holly die, Joy die, red Stickles, red metallic twine

Friday, 26 April 2024

Rainy Day Christmas

Vancouver is having a chilly rainy spell so what better time to work on Christmas cards?

Christmas Craft Creations wants Non-Traditional Colours so I went with blue and violet for the background for this card.


I sprinkled the blue and violet Magicals on watercolour paper, spritzed with water and let the colours run.  When dry I trimmed the panel with a deckle edged rectangle die, popped it up on fun foam on a white shimmer card base, and added the die cut ornament and sentiment, cut out of the same white shimmer cs.

52 Christmas Card Throwdown wants "Old Fashioned Christmas".  I used a never inked up Tim Holtz stamp so I'm linking up at the NBUS Challenge.

Stamped with a bit of colouring with coloured pencils, bordered in black, and added to a white mini slimline card base.

Then The 12 Months of Christmas wants Christmas Candy.  And it's time for the Rudolph Days Challenge too - any Christmas card made between the 25th and the end of the month.

Stamped and watercoloured, with metallic gold paint used on the ornaments and ribbon.  It was trimmed with a rectangle die, then I used the SSS thin frame die to cut a thin rectangle out of it.  I painted the thin rectangle frame with the same metallic gold paint I'd used on the image, let it dry, and then inserted it back into the gap.  Put it all on fun foam onto the card base.


Supplies for card 1:
Paper - watercolour paper, white shimmer cs
Size - A2
Accessories - blue and violet Magicals, Spellbinders deckled edge rectangle die, Memory Box snowflake ornament die, Spellbinders Joy die, fun foam

Supplies for card 2:
Stamps - Tim Holtz
Ink - Versafine Onyx Black
Paper - white and black cs
Size - 6x3.25"
Accessories - coloured pencils

Supplies for card 3:
Stamps - Stampendous candy canes, unknown joy
Ink - Versafine Onyx Black
Paper - off white cs, watercolour paper
Size - A2
Accessories - watercolour paints, gold metallic paint, SSS thin frames die, Spellbinders rectangle die, fun foam

Monday, 8 January 2024

Christmas Decorations, a Tiny Snowman, and Sympathy


Christmas Craft Creations wants to see Christmas Decorations on our cards.  Here's mine:

To create the background for the ornament, I followed the instructions for the first technique in this video - it's basically a smooshing technique with alcohol inks.  Once dry, I die cut the inner part of this bauble and the sentiment. I die cut the snowflake border out of white shimmer cs, put the ornament together, and added it to a mint blue card base with a bit of gold cord to hang it from the top of the card.

Next up, for the Inspired By "Snowman" challenge, I went with a very tiny snowman and the lovely shade of blue of the snowman's coat in the image.

I trimmed a leftover scrap from a gelli print with a deckle rectangle die, added it to my card base, stamped a sentiment, and topped it with a die cut that includes a very tiny snowman.

For a totally different theme, My Time to Craft wants to see sympathy cards.

I masked an oval on my focal panel and shaded with a lighter grey (Memento London Fog) and a darker grey (Vivid Cobblestone). I stamped the image and sentiment in the darker grey, bordered with grey cs, and popped up with fun foam on the card base.

 My Time To Craft!


Supplies for card 1:
Paper - coated cs, white shimmer cs, mint blue cs
Size - A2
Accessories - green and turquoise alchol inks, gold mixative, Memory Box snowflake ornament die, TH joy die, gold cord

Supplies for card 2:
Stamps - Rubber Soul sentiment
Ink - various Distress blues for the gelli print, Distress Broken China
Paper - scrap from a gelli print
Size - A2
Accessories - Spellbinders deckle rectangle die, unknown tiny snow scene die   

Supplies for card 3:
Stamps - SU World of Dreams, unknown sentiment
Ink - Memento London Fog, Vivid Cobblestone
Paper - white and grey cs
Size - A2
Accessories - Spellbinders oval die, masking paper, fun foam

Thursday, 3 August 2023

A Swedish Christmas Ornament, a Fussy Cut Dove, and a Blue Hydrangea

Last minute again for a few challenges!

ABC Christmas Challenge "O for Ornament":


I love my Swedish Dala horse dies. These stylized horses have been symbols of strength and courage in Sweden for hundreds of years and little handcrafted wooden versions are sold as gifts, as Christmas decorations, etc.

The background is my new 3D pine embossing folder - it didn't come out with much dimension as I'm having a hard time figuring out the sandwich to use for it in my Cuttlebug.

I added a die cut green pine branch to hang the ornament from. I die cut the ornament three times and glued them together to give some dimension to it.

Next up is 52 Christmas Card Throwdown "Fussy Cutting":

I did the embossing folder stamping technique for the background (see this tutorial on SCS). Then stamped and heat embossed the dove and fussy cut it. I popped it up on foam tape on the background, and bordered with navy cs.

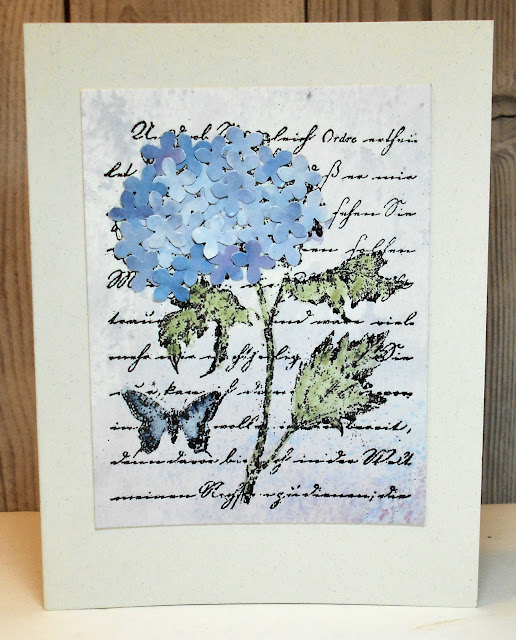
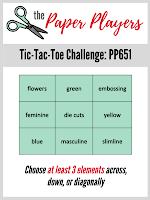
And one non-Christmas card just to prove that I do make some non-Christmas cards!  For the Paper Players Tic-Tac-Toe challenge - I picked flowers, feminine, and blue from the left hand vertical row:


I found a muted background in my box of previously made backgrounds (probably smooshed Distress inks) and stamped the image on it, then watercoloured the leaves and butterfly. For the hydrangea petals, I sprinkled blue brushos on coated cs and spritzed with water. When dry, I punched out many petals with the old Martha Stewart hydrangea punch and glued them on the flower.


Supplies for card 1:
Stamps - Rubber Soul sentiment
Ink - Memento Northern Pine
Paper - white, dark green, and cream cs
Size - A2
Accessories - Charlie und Paulchen Skandi-Pferdchen dies, Sizzix branch die, Sizzix embossing folder, green ribbon

Supplies for card 2:
Stamps - unknown dove stamp
Ink - various blue Distress inks
Paper - white and navy cs
Size - 4.75" square
Accessories - Cuttlebug snowflake embossing folder, clear embossing powder, foam tape

Supplies for card 3:
Stamps - Inkadinkado hydrangea collage
Ink - Versafine Clair Nocturne
Paper - mixed media, rustic, and coated cs
Size - A2
Accessories - blue Brushos, Martha Stewart hydrangea punch, watercolour paints