A blog devoted to the cards I make in my tiny upstairs space. When my sister stays there, she calls it an "artist's garret". I'm not an artist, but am an enthusiastic cardmaker - hence the title "Cardmaker's Garret".
___________________________________________________________________________________________
Showing posts with label CAS Stencil. Show all posts

Saturday, 23 May 2020

Layered Stencils

I'm very last minute for the CAS Stencil "Layered Stenciling" challenge!


Christine and I did some physically distanced crafting on Wednesday and she helped me with two new techniques - stenciling with a gelli plate and creating a brayered background, both techniques using Fresco Chalk paints - I like them much better than standard acrylic paints.

First up the stenciled one, using the colours from the Color Throwdown Challenge:


I brayered yellow Fresco Chalk paint onto a gelli plate, laid the swirly flower stencil over it, then pressed copy paper over top, picking up the yellow paint.  I then laid a text stencil over it and sponged with grey Distress ink.

I added it to cs using a sheet of double sided tape, then trimmed it, and bordered with a thin grey border.  I added it to white shimmer card base.

I die cut the flower spray die twice from white cs and once from the white shimmer cs I used for the card base.  I glued the three together with the shimmer layer on top.  Then added a sentiment stamped in grey on the white shimmer cs and trimmed.  And for embellishment, two yellow pearl gemstones on the two largest flowers.


Then I used the technique seen in this video for the background piece in this card:
Using a brayer and a few shades of blue Fresco Chalk paint, I rolled (with a flicking random motion) the colours one at a time on mixed media cs.  I then sponged white paint over a snowflake stencil.  Once it was dry, I stencilled the word Peace over it with Distress Black Soot ink.

I trimmed the panel, added a very thin black cs border, and finished off the sentiment by stamping "on earth" from a TH "peace on earth" sentiment onto black cs and heat embossing it in white.


Love these two techniques, especially the second one.  Thank you, Christine, for all the help with the techniques!


Supplies for card 1:
Stamps - Judith sentiment
Ink - Distress Hickory Smoke
Paper - white copy paper, white and grey cs, white shimmer cs
Size - A2
Accessories - TCW Believe Script and Swirly Garden stencils, PaperArtsy Butter Fresco Chalk paint, Memory Box Honeyblossom Sprig die, yellow pearl gemstones,

Supplies for card 2:
Stamps - Tim Holtz
Ink - Distress Black Soot, ColorBox Frost White
Paper - mixed media cs, white linen and black cs
Size - A2
Accessories - Red Lead peace stencil, snowflake stencil, white and various blue PaperArtsy Fresco Chalk paints, white embossing powder


Thursday, 23 January 2020

A New Star Stencil


Sneaking in under the wire for the CAS Stencil Challenge "Use a New Stencil".

I love stars as a theme and I seem to end up buying more stencils, dies, and stamps that have stars than any reasonable human being needs.  I recently bought the Hero Arts Stars Pattern stencil so pulled it out for this card.  It was inspired by two of this week's SCS challenges, the Technique Lover's Challenge "Paint Swiping" and the CAS "Inspirational" challenge.


For the paint swiped technique, I followed the SCS tutorial here.  I added dabs of two Distress paints across the centre of my mixed media panel and then took a baby wipe, scrunched it up, and swiped some of the paint blobs upwards and some downwards.  Then I added a couple of dabs of an opalescent blue paint and repeated with the baby wipe.

Then I stamped and heat embossed the inspirational sentiment, before stencilling the silver glitter paste stars around it. I had some silver glitter cs that matched perfectly so bordered it with that and then popped it up on fun foam for some dimension.

I really like the effect of the paint swiping and will use it again for backgrounds.


Supplies:
Stamps - Stampabilities sentiment
Ink - Versafine Onyx Black
Paper - mixed media cs, white cs, silver glitter c
Size - A2
Accessories - Hero Arts stars stencil, Distress Paint (Faded Jeans, Tumbled Glass), Art Alchemy Opal Magic Blue acrylic paint, Bo Bunny silver glitter paste, Ranger Polysparkle embossing powder, fun foam

Saturday, 16 November 2019

Blue Monochrome

Today's card is my reminder to you to join us at CAS Watercolour!


My card for the original challenge post was in red, so thought for this one, I'd go to my favourite colour, blue.


I took a stencil and used a few shades of mini Distress inks on the stencil, spritzed with water, and created a stencil monoprint.  Love the blend of the shades of blue!

I did a sentiment strip in a matching blue on vellum and attached it under a pierced frame die cut (cut twice and stacked for dimension).  I added a few blue sequins for a bit of bling, still in the monochromatic colour scheme.

In real life, the sentiment shows up more but somehow it doesn't in my photo.  Here's a close-up to show it better and to also show the lovely blend of blues:

 
You have until November 24th to link up over at CAS Watercolour.  There's lovely inspiration from the rest of the Design Team and this month's fabulous Guest Designer, Birgit (Rapport fran ett skrivbord).  

Please note that there will not be a CAS Watercolour challenge in December as the Design Team is taking a break over the holidays.  We'll be back January 3rd with the first of next year's challenges.

I'm also linking the card up with our sister challenge, CAS Stencil as they are asking for a stencil monoprint.


Supplies:
Stamps - The Artful Stamper sentiment
Ink - mini Distress inks (Tumbled Glass, Salty Ocean, Broken China), Memento Bahama Blue
Paper - white and mixed media cs, vellum
Size - 4.75" square
Accessories - Memory Box Texture Flourish stencil, blue sequins, MFT pierced square frame dies, fun foam

Thursday, 24 October 2019

The Other Two CAS Challenges

Sneaking in under the wire with cards for the other two CAS challenges run by Loll and Bonnie.

First up, CAS Stencil "Patterned Paper":


The idea is to stencil over patterned paper - a great way to use up some of our stash.  I pulled out a piece of snowy patterned paper that looks like this:


I turned it into this card:


I took the mini Tim Holtz snowflake stencil and went over it with Snowflake Paste.  When dry, I framed it with SU glitter cs, and die cut my sentiment from the glitter cs and from navy blue cs - layered them together to have a bit of navy shadow to help set off the sentiment.  I added glitter dome embellishments to the centre of each snowflake and over the "i" of winter.

Here's a close-up of the centre panel:


There is sparkle in the paste but my camera isn't picking it up.

Then there is CAS Mix Up "Foiling":


I only recently got a foiling machine so I made this card that will go to one of my sisters who, like me, loves blue.


I foiled the flower, using the foiling transfer gel on the stamp, then adding the blue foil to the stamped image, and running it through the laminator.  Unfortunately the camera won't pick up the shine of the foil.

I added some text stamping and some sponged stenciling with a scrap of drywall tape over top, avoiding the foiled flower.

I die cut the panel, stamped the sentiment on vellum, added the panel to the card base with fun foam for dimension.

Phew, got them posted in time to link up!


Supplies for card 1:
Paper - ivory cardstock, SU glitter cs, scrap of patterned paper, scrap of navy cs
Size - 6x4.25"
Accessories - Tim Holtz mini snowflakes stencil, Arlene's Snow Glitter Paste, SSS winter die, glitter dome embellishments

Supplies for card 2:
Stamps - Magenta wildflower stamp, SU sentiment, unknown text stamp
Ink - Distress Oxide Tumbled Glass and Mermaid Lagoon
Paper - white and blue cs
Size - A2
Accessories - Deco Foiling Transfer Gel, blue foil, dry wall tape, Sizzix label die, fun foam


Monday, 6 May 2019

Birthday Texture

A card for the Seize the Birthday challenge "Texture" and the CAS Stencil Challenge "Stenciling over a Coloured Background".


The background was made by sprinkling Bister and Brusho powders on coated cs and misting them thoroughly to get pale colours.

I coloured through a flower stencil with daubers and Distress ink, and then went over just the flowers with glass bead gel.

A quick sentiment, a few sequins, a glitter cs mat, and a white card base finished it off.


Supplies:
Stamps - Hero Arts sentiment
Ink - various green and purple Distress inks
Paper - white cs, coated cs, blue glitter cs
Size - A2
Accessories - blue Bister, tiny bit of purple Brusho, flower stencil, glass bead gel, blue and purple sequins


Thursday, 18 April 2019

Embossing Paste Wall

This is my last post with this current design of my blog - I will miss the beautiful blue header that Loll Thompson found for me when she created my blog but it's time for a new look and I really love the image she came up with for the new header.  So don't be surprised next time you visit me to see it looking a bit different!

Now on to today's card.  I created the background using embossing paste through a brick wall stencil:


One of my favourite things to do is make Christmas wreaths for my cards.  I used the old Martha Stewart pine branch punch to punch lots of branches out of various scraps of dp that were mostly green but with bits of white on them to give a bit of a frosted look. I glued them to a thin circle that I cut using two Spellbinders circle dies.

For the background, I used a brick stencil with white embossing paste (it was an old jar of Dreamweaver paste that had dried out a bit so I ended up with quite a rough texture that seemed to suit the bricks).  I added a small stamped sentiment to it. Then I "hung" the wreath on it with ribbon, mounted it on a red cardbase, and finished by adding red gemstones to represent the berries on the wreath

It's going over to three challenges:

The April CAS Stencil challenge is:


The ABC Christmas Challenge is "H for Hang It Up and / or I for Intricate".  I "hung up" my wreath with ribbon.

And because I used scraps of dp, it's going over to the Pixie's Snippets Playground.


Supplies:
Stamps - Rubber Soul Joy
Ink - SU Real Red
Paper - white and red cs, scraps of dp
Size - 5.25" square
Accessories - Martha Stewart pine branch punch, ribbon, red gemstones, MFT brick wall stencil, Dreamweaver whit embossing paste, Spellbinders circle die


Saturday, 23 March 2019

Twofer Balloons and Ghosted Snowflakes

I've been lying low with a nasty cold but finally today I felt more energetic and got three cards made so that I can squeak in under the wire for a couple of challenges!

First up, Darnell's Twofer Challenge - one that truly is a challenge for me!


I could only think of two stamps I have with a balloon and one of them only works for Christmas, so had to go with the other.  Here's the Twofer:


The one on the left is the full stamp - the girl and the balloon are a famous Banksy image, and are one single stamp.  I used a simple "love you" sentiment - it will be a Valentine card.


For the second card, I stamped the bear, then used just the balloon part of the Banksy image, stamping it multiple times in different colours, having all the strings converge at the bear's hand.  I coloured the bear with coloured pencils and trimmed the image with a stitched circle and used a contrasting colour for the card base.


For both cards, I popped up the focal panels on fun foam and went over the balloons with Glossy Accents.


Next up is this card:

Right back to my comfort zone of blue and white, and Christmas cards!!

I smooshed a piece of mixed media cs with a couple of blue Distress inks, and then laid a snowflake stencil over it and removed some of the colour with a baby wipe - the "ghosting" technique.  I added a reindeer die cut from white glitter cs and a sentiment using a Tim Holtz rub-on.  I popped the panel up on fun foam and added a few small die cut white glitter snowflakes around the card base.

It's going over to the following challenges:


Thanks for hanging in for such a long post!!


Supplies for 1st card:
Stamps - Viva Las Vegas "Banksy Girl with a Balloon", PTI sentiment
Ink - Memento Tuxedo Black and Rhubarb Stalk
Paper - white cs
Size - A2
Accessories - Lil Inker stitched rectangle die, Glossy Accents, fun foam

Supplies for 2nd card:
Stamps - Viva Las Vegas "Banksy Girl with a Balloon", AE bear, Lawn Fawn sentiment
Ink - Memento Tuxedo Black, Rich Cocoa, and various colours for the balloons
Paper - white and mottled brown/beige cs
Size - 4.75" square
Accessories - coloured pencils, Lil Inker stitched circle die, Glossy Accents, fun foam

Supplies for 3rd card:
Ink - blue Distress inks
Paper - mixed media and white cs, SU white glitter cs
Size - A2
Accessories - PaperArtsy snowflake stencil, Cheery Lynn snowflake dies, unknown reindeer die, fun foam


Sunday, 10 February 2019

Stenciled Bister Hearts

The CAS Stencil challenge for February is:


I needed to make some Valentine cards for a friend so thought I'd use a heart stencil and red Bister powder.


Using mixed media cs, I sprinkled the Bister through the hearts and then spritzed with water.  After it dried, I framed it with dark red cs with a large heart die cut in the centre.  I trimmed the red cs with a stitched rectangle die and added it to a cream card base.  I die cut the sentiment out of the same cream card base.


So as not to waste all that lovely Bister colour left behind on the stencil, I flipped it over onto another piece of mixed media cs and got the negative print (or a "stencil monoprint").  I then created this card with the result:


I'd cut out the entwined hearts for an earlier project and was left with this piece with the negative heart so I used it to frame a section of my negative heart print.  I added a few red glitter die cut hearts (left over from yet a different project), stamped my sentiment, and popped the panel up on fun foam.

I felt quite virtuous making two cards out of one stencil / Bister session, and also using up lots of leftover bits on the second card.  I'm taking the second card over to Pixies' Craft Workshop "Snippets" challenge.


Supplies for the 1st card:
Ink - red Bister powdered ink
Paper - cream, red, mixed media cs
Size - A2
Accessories - TCW hearts stencil, Poppy Stamps sentiment die, large heart die, MFT Wonky Stitched rectangle die
 
Supplies for the 2nd card:
Stamps - PTI sentiment
Ink - Memento Lady Bug, red Bister powdered ink
Paper - red glitter, cream, mixed media cs
Size - 4.75" square
Accessories - TCW hearts stencil, SU heart die, mini hearts die, fun foam


Thursday, 24 January 2019

Twofer Birds

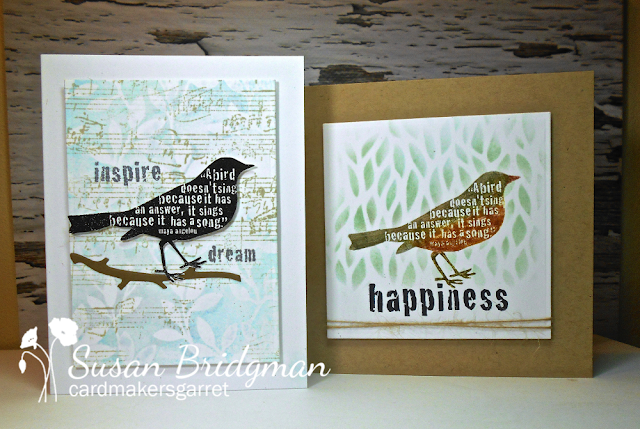
I love birds as a theme for cards so had to squeeze in some time today to make cards for Darnell's Twofer Card Challenge:


Here's the Twofer photo:


I really love that bird stamp with the wonderful quote on its body.  The card on the left is a thank you card for my sister who has really inspired me to follow some of my passions.  The one on the right is a birthday card for a close friend who does bird watching.  The sentiments for the occasions are on the inside because I wanted to use the word stamps that came with the bird stamp.

First up:


I started with a piece of background I made at Loll Thompson's house using Jennifer Maguire's Distress ink monoprint technique (see video here).  It uses blue Distress ink with a leafy background stamp - this is the monoprint version (or what I think of as the negative version).  It came out a bit patchy so I decided to add some layering with the music background stamp and two of the words that came with the bird stamp.

The bird is stamped, heat embossed, and fussy cut, with its legs glued to the die cut branch and its body popped up with dimensional tape.  The whole panel is popped up on fun foam.

And the second card:


I put the bird stamp in my MISTI and coloured it with Distress markers, repeating until I was happy with the results.  Then I put the "happiness" stamp in the MISTI and got it close to the bird's feet to ground the bird.

I placed a leafy stencil over it and used a finger dauber to sponge around the bird with pale blue and pale green.

After I trimmed the panel into a square, I decided I needed something below the "happiness" stamp as I'd kept the stencil sponging above it.  So I wrapped twine around the bottom.  And then had an "ah ha" moment that it would be perfect on a kraft base - popped up on fun foam of course for some dimension.

I'm also adding it to Loll Thompson's new CAS Stencil Challenge:


Thanks for stopping by!


Supplies for card 1:
Stamps - Fiskars "For the Birds" set, Impression Obsession music background, unknown leaf background stamp
Ink - various Distress blue inks, Adirondack Lake Mist, Vivid Cobblestone, Versafine Onyx Black
Paper - white and brown cs
Size - A2
Accessories - Sizzix branch die, clear embossing powder, foam tape, fun foam

Supplies for card 2:
Stamps - Fiskars "For the Birds" set
Ink - Memento Sky Blue, Distress Bundled Sage, Archival Jet Black
Paper - white cs
Size - 5.25" square
Accessories - Distress markers, Dina Wakely Little Birdies Leaf stencil, twine, fun foam


Wednesday, 23 January 2019

A Night Sky and Stenciled Holly

Yesterday was a horrible rainy day and I got to spend some of it in my craft room and got pieces made for several cards.  This evening I put two cards together.

The first one is for the 52 Christmas Card Throwdown challenge:


I have a sentiment stamp of the second line of "Silent Night" - it seemed the perfect place to start when planning my card.


I made a night sky background by sponging four colours of Distress Inks, then flicking some drops of water onto it.  I die cut the little landscape and two small stars and a small Christmas star.  Put it all together with a stitched border and popped the panel up on fun foam.


Then I wanted to do another card for Loll Thompson's new CAS Stencil challenge - an easy challenge to start with:


And, since I was in Christmas card mode, I chose a holly stencil and created this:


I sponged with Distress inks, then trimmed with an inverted scallop die, and bordered in red glitter cs cut with the next size up of inverted scallop die.  I embellished with red glitter domes and heat embossed the sentiment in sparkly red embossing powder.

Two more for the Christmas card stash!


Supplies for Card 1:
Stamps - Rubber Soul sentiment
Ink - Versafine Onyx Black;  Distress Black Soot, Chipped Sapphire, Seedless Preserves, and Dusty Concord
Paper - white and gold cs
Size - 4.75" square
Accessories - Memory Box Country Landscape and Star of Wonder dies, Simon Says Stamp mini stars die, Lil Inkers stitched square die, fun foam

Supplies for Card 2:
Stamps - Hero Arts sentiment
Ink - ColorBox Chianti; Distress Evergreen Bough, Pine Needles, and Brushed Corduroy
Paper - red glitter and white cs
Size - A2
Accessories - Tim Holtz holly stencil, Spellbinders inverted scallop dies, red glitter domes, Old Island Red Dragon embossing powder