A blog devoted to the cards I make in my tiny upstairs space. When my sister stays there, she calls it an "artist's garret". I'm not an artist, but am an enthusiastic cardmaker - hence the title "Cardmaker's Garret".
___________________________________________________________________________________________

Wednesday 31 March 2021

Learn about Butterflies Day

The Day of the Month Card Club wants butterflies for "Learn About Butterflies Day".


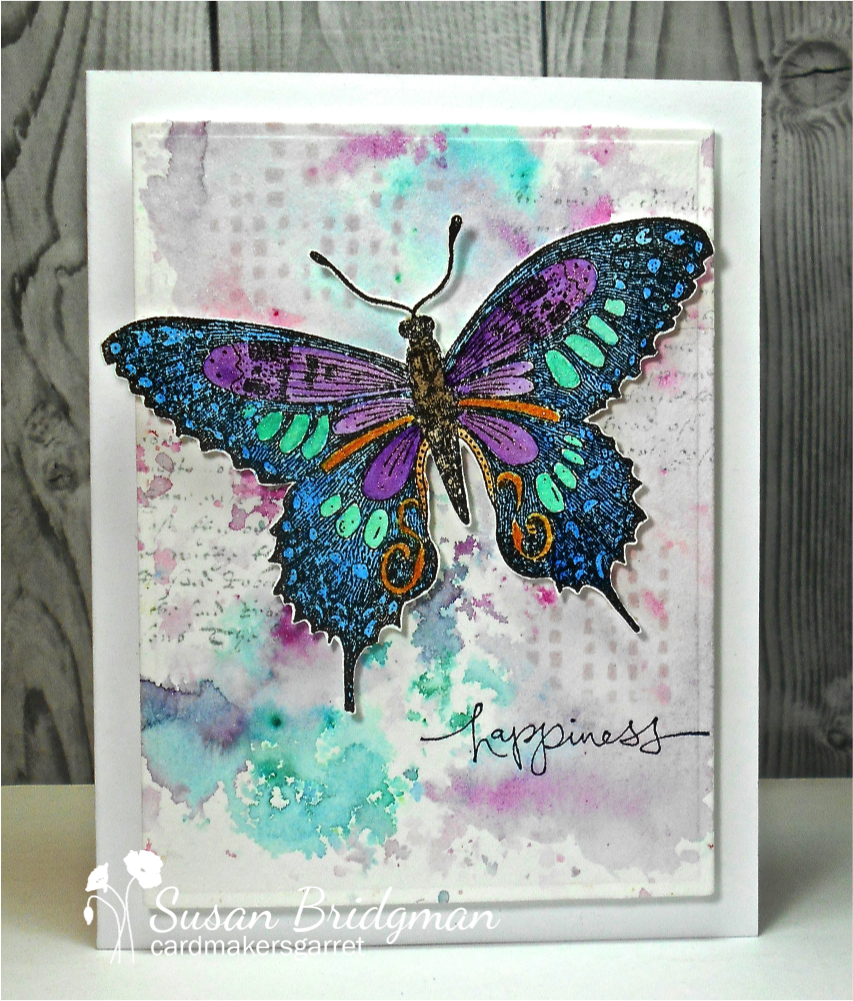
I made a quick smooshed background with various oxide inks and then stenciled a bit of texture over it with grey ink. I stamped, watercoloured, and fussy cut the butterfly, using the colours from the image on the challenge thread. I glued the butterfly body to the background and popped the wings up with foam tape. The background is mounted on the card base with fun foam.


Day of the Month Card Club "Learn about Butterflies Day" 


Supplies:
Stamps - Penny Black butterfly, SU sentiment
Ink - various Distress Oxide inks, Memento London Fog, Archival Jet Black
Paper - mixed media and white cs
Size - A2
Accessories - TCW Tile Texture stencil, watercolour paints, fun foam, foam tape

Monday 29 March 2021

An Inspired Window with a Wreath

I was looking at the SCS Inspiration Challenge on the weekend and saw an image that immediately inspired this card:


The inspiration was from a Pinterest page for a company called HomeBNC.  Here's the photo that inspired me:

Here are the steps for creating my card:
 

I took a piece of wood grain cs and lightly rubbed Frayed Burlap Distress ink over it to make the wood grain show up more.

I die cut the window twice and glued them together for more dimension and painted patches of Hickory Smoke Distress ink on the top one to give it a more rustic aged look.

I created the wreath by die cutting a thin circle and punch many pine branches with the old Martha Stewart punch out of various dps that were mostly green. I glued them to the circle, added it to the window, and added a few white pearl embellishments.

I finished with a vertical sentiment stamped in Hickory Smoke on a narrow strip edged with more Hickory Smoke ink.


As well as the SCS challenge, I'm adding it to:

52 Christmas Card Throwdown - Wood Background


Supplies:
Stamps - Rosie's Roadshow sentiment
Ink - Distress Frayed Burlap and Hickory Smoke
Paper - wood grain and white cs, various green dps
Size - 6.25x3.25"
Accessories - Martha Stewart pine branch punch, window die, pearl embellishments

Saturday 27 March 2021

Die Cuts and Scraps of Perfect Pearls

Never wanting to waste any beautiful bits of background, I created this card:


A while back, I made some backgrounds using the smooshing technique with Perfect Pearls.  See the third card on this post for more details.

I had just enough of the background piece used on that third card to die cut a background for the landscape / reindeer die (out of the part of it that showed the lovely shimmer) and then enough of the more solid dark area to die cut the letters for merry christmas.

The image is popped up on fun foam and the letters are painstakingly glued down one at a time!

Off to these challenges:

Jingle Belles - Use Die Cuts - I used them for the whole card.

Snippets Pixie's Playground - I used the snippets of leftover background and a snippet of white cs.

Rudolph Days - Anything Goes

NBUS Challenge - Never Before Used Stuff - I'd never used any of the dies I used on the card.


Supplies:
Paper - white cs, black watercolour paper
Size - A2
Accessories - Blue Interference Perfect Pearls, unknown reindeer / landscape die, lower case merry christmas die, fun foam

Tuesday 23 March 2021

F is for Frosty Friends

Another Christmas card today:


I used one of my never-before-used Penny Black stamps. The image is watercoloured and then I added fun flock to the pompom and brim of the hat.  This one is popped up straight onto fun foam onto a kraft card base.  I kept all the colouring in kraft tones and red for the CAS Christmas challenge.

I made a second version while all the supplies were out, added in a wee bit of green, and bordered it with red cs before popping it up on fun foam:


Does the image look better with or without the red border?

Off to these challenges:

CAS Christmas


The Paper Players


Christmas Cards All Year Round - "Something that Starts with E or F" - mine is "frosty friends" 

NBUS Challenge - I used a never-before-used stamp.


Supplies:
Stamps - Penny Black
Ink - Versafine Onyx Black
Paper - watercolour paper, kraft and red cs
Size - A2
Accessories - watercolour paints, fun flock, fun foam

Saturday 20 March 2021

Die Cut Printed Holly


A card for a bunch of challenges:


I created the background using the technique in this month's CAS Mix Up challenge.  Instructions can be found in this video.

I die cut the long branch of holly, then watercoloured it with different shades of Zig Watercolour markers, spritzed with water, and pressed onto watercolour paper a couple of times.  I then dried my die cut and added it as the focal image.  Stamped the sentiment (it didn't come out that well as my ink was dry), popped the panel up on fun foam on a pale green shimmer card base, and added some gemstones for berries.

Off to these challenges:

CAS Mix Up Watercolour Challenge


52 Christmas Card Throwdown 


Christmas Kickstart Challenge 


 Jingle Belles "Going Green - Holiday Foliage"

Casology


Supplies:
Stamps - A Muse sentiment
Ink - Memento Cottage Ivy
Paper - watercolour paper, pale green shimmer cs
Size - 6.25x3.5"
Accessories - Memory Box Holly Vine die, fun foam, red gemstones, Zig watercolour markers

Thursday 18 March 2021

Black and White with an Inchie


Sadly I needed to make a sympathy card for a friend whose father passed away, and the current AAA CAS Card Challenge "One Inchie and Optional Twist of Black and White" prompted an idea for it.

Very quick to make - stamped the inchie on a scrap of white cs that was already die cut into a square, stamped the flourish and sentiment on the main panel, bordered it with black, and popped the inchie up on foam tape.


AAA Card Challenge


Supplies:
Stamps - SU sentiment, Autumn Leaves flourish, Inkadinkado inchie
Ink - Versafine Clair Nocturne
Paper - white cs
Size - A2
Accessories - foam tape

Tuesday 16 March 2021

Art Deco Flowers

Do you ever finish a card and wish you'd done something differently?    This is one of those that I like for some things but wish I'd done something else with the background.

I wanted to use my long neglected Distress stains so followed this tutorial on watercolouring with them.  It's harder than it looks. 

I used three shades of blues and mauves for the flowers and two shades of green for the stems and leaves. Once I was done pulling the colours out, I felt I'd lost too much definition in the flowers so I went over the outline again with the stains and restamped - that is the joy of working in the MISTI!

The sentiments are part of the stamp and I did them at the end by going over them with the dew drop size Memento Tuxedo Black.

I trimmed my panel and sponged the edges, blending together Bundled Sage and Iced Spruce.  A bit of black splatter finished it off. I mounted the panel on fun foam for dimension.  In hindsight, I wish I'd done lighter sponging and used the shades of green I used for the stems.  Or left the sponging off altogether and just done a bit of splattering.


I'm linking it up with:

We Love Chocolate Baroque - "I Love..." - what do you love when you are creating.  I love trying new techniques, I love using Distress products, I love the Art Deco style of these Chocolate Baroque flowers, I love flowers as a theme for my cards.

The Paper Players - "A Colour Challenge"


Thank you for stopping by!


Supplies:
Stamps - Chocolate Baroque Wish Flower
Ink - Memento Tuxedo Black, Distress Iced Spruce and Bundled Sage
Paper - watercolour paper, cream cs
Size - 4.75x6.5"
Accessories - Distress Stains - Bundled Sage, Peeled Paint, Seedless Preserves, Faded Jeans, Milled Lavender

Monday 15 March 2021

Kraft Tag, Red Poinsettias

Mid month already so time to remind you to enter the March CAS Christmas challenge.  Loll is asking for kraft, red, and white as your colour theme.  Here's my reminder card:


I started by getting out a couple of shades of red Glimmer Mist sprays and spraying them on white cs.  When it was dry, I die cut the poinsettias and layered them together.  I added them to a kraft corrugated tag, tied some red and white baker's twine to the top, and layered it on the card base.  I heat embossed the sentiment on a scrap of kraft cs and added red gemstones to both the sentiment strip and the poinsettias.


Head over to CAS Christmas to see more inspiration from the Design Team and this month's fabulous Guest Designer, Gundi (papierelle).  Please come and join us - and help us celebrate our third birthday.  Because of this milestone, there will be prizes this month!!


Supplies:
Stamps - Rubber Soul sentiment
Ink - ColorBox white
Paper - white and kraft cs, corrugated kraft tag
Size - A2
Accessories - Dee's Distinctively poinsettia dies, red and white baker's twine, red gemstones, Tattered Angels Glimmer Mist (Black Cherry and Oriental Poppy), white embossing powder

Sunday 14 March 2021

Embossing Folder for a Friend

Just Us Girls want us to use an embossing folder on our cards this week.  I haven't done anything innovative or fancy with mine, just used it as a major design element and a frame for the sentiment.


I stamped and heat embossed the sentiment first so that I could make sure I got the embossing folder nicely centred over it before running it through my Cuttlebug.   Then I trimmed the panel, popped it up on fun foam, and embellished the embossed flowers with royal blue gemstones that matched the ink really well.


Just Us Girls challenge


Supplies:
Stamps - Kay Foley sentiment
Ink - Distress Oxide Blueprint Sketc
Paper - white cs
Size - 6x4.25"
Accessories - Crafts Too embossing folder, clear embossing powder, royal blue gemstones

Wednesday 10 March 2021

Horse, Foal, and Three Shades of Green

For one of my sister's birthday at the end of the month:


I really love a recent Eileen Godwin technique for creating a geometric background with stencilling over it.  See her video here for instructions.

I used three different green Distress inks and sponged them away from a straight edged spreader, turning the spreader each time for a different angle.  Once it was dry, I laid a leaf stencil over it and stencilled with one of the greens.  And once that was dry, I put it in my MISTI and stamped the Lavinia horse and foal image and the sentiment.  Trimmed the panel, bordered with black, and popped up on fun foam.

I'm linking it up with the following challenges:

Seize the Birthday "Three Shades of Green"

Less is More "Baby"

Just Us Girls "Animals"


Supplies:
Stamps - Lavinia horse and foal, SSS sentiment
Ink - Versafine Clair Nocturne;  Distress Mowed Lawn, Peeled Paint, Shabby Shutters
Paper - white and black cs
Size - A2
Accessories - homemade leaf stencil, fun foam

Saturday 6 March 2021

Purple Petunias

The Flower Challenge is asking for "Shades of Purple" and that immediately made me think of a pot of petunias I had growing on my patio last summer.  So I pulled out an older petunia stamp.


I stamped it, watercoloured it, splattered with some black watered down ink, bordered in black, added a sentiment strip on black, and popped the panel up on fun foam.


The Flower Challenge "Shades of Purple"


Supplies:
Stamps - Rubbernecker petunias, Memory Box sentiment
Ink - Archival Jet Black, ColorBox white
Paper - white and black cs, watercolour paper
Size - A2
Accessories - watercolour paints, white embossing powder, fun foam

Wednesday 3 March 2021

A Horse Thinking of You

Cardz 4 Guyz want a "thinking of you" card and Addicted to CAS want an animal on the card.  So I combined the two.


My background was created by smooshing with various blue oxide inks. The die cut was layered on top. A very quick and easy CAS card!

Cardz for Guyz  "Thinking of You"

Addicted to CAS  "Code Word - Animal"


Supplies:
Stamps - unknown sentiment
Ink - various blue oxide inks, Memento Tuxedo Black
Paper - white cs, watercolour cs
Size - A2
Accessories - Starlitt Studio die

Kraft with White Birch and Red Cardinals

Hello All - Loll is hosting the March CAS Christmas Challenge and she's picked a colour challenge for a bit of a change from our usual theme challenge. 

Here's my card:

It's a colour scheme I love for Christmas cards.


I started by die cutting the birch trees.  I was going to leave them stark white but they looked so unnatural that I had to sponge on a little bit of grey.  I die cut them twice and stacked them together as they are so flimsy otherwise.  Likewise I die cut the cardinals twice.

I splattered some white spray on a piece on a piece of kraft cs, then assembled my scene.  Added a white heat embossed sentiment on the same red cs I used for the cardinals and also added a border of it.

I was going to leave it there but it needed something more so I also added a thin white border.

There's lots more inspiration over at CAS Christmas from the Design Team and this month's fabulous Guest Designer, Gundi (papierelle).  Please come and join us - and help us celebrate our third birthday.  Because of this milestone, there will be prizes this month!!


Supplies:
Stamps - SU sentiment
Ink - ColorBox white, Distress Hickory Smoke
Paper - white, red, and kraft cs
Size - A2
Accessories - Impression Obsession birch trees die, Memory Box cardinal dies, Hero Arts Unicorn White spray, white embossing powder, narrow rectangle die