A blog devoted to the cards I make in my tiny upstairs space. When my sister stays there, she calls it an "artist's garret". I'm not an artist, but am an enthusiastic cardmaker - hence the title "Cardmaker's Garret".
___________________________________________________________________________________________

Monday 29 July 2019

Ribbon and Peg Stamps

The 52 Christmas Card Throwdown has a stash challenge to use ribbon (something I have much too much of).


I used a scrap of ribbon to make a bow for this card:


I got out my much-neglected peg stamps of pine springs, holly stems, tiny poinsettia, and berry cluster. I drew a light pencil circle for a guide and then stamped around it in four colours. I cut the finished image with a circle die, popped it up on fun foam, and added a sentiment and the bow. 

It was pretty quick to make so might have to do a few more for my Christmas stash!


Supplies:
Stamps - Rubber Stamp Tapestry peg stamps, Paper Smooches sentiment
Ink - Memento Northern Pine, Cottage Ivy, Lady Bug, Rhubarb Stalk
Paper - white and red cs
Size - 4.75" square
Accessories - Spellbinders circle die, red and green ribbon, fun foam


Wednesday 24 July 2019

Lifted Snowflakes

A very last minute card for CAS Mix Up "Alcohol Ink Lift".


I bought the Alcohol Lift Ink a while ago but haven't used it much.  So was glad to use it for this card.


I started by dropping various blue alcohol inks onto Yupo.  As it was drying I rubbed a bit of turquoise foil onto the tacky parts of the AI - you can sort of see it in the photo.

When dry, I arranged three snowflake stamps in my MISTI and used the Alcohol Lift Ink to stamp them onto the Yupo.  I didn't get perfect impressions of the snowflakes but I quite like it.  I stamped the ink I'd lifted onto a piece of white cardstock and will create a card with those positive coloured impressions some time soon.

I trimmed the panel, popped it up on fun foam on an icy blue shimmer card base that matches the colour of the lifted snowflakes , and used the same cardstock to die cut the sentiment.

That's it for today!


Supplies:
Stamps - Tim Holtz snowflake stamps
Ink - various blue alcohol inks, Ranger Alcohol Lift ink
Paper - shimmery ice blue cs, Yupo
Size - A2
Accessories - Tattered Lace sentiment die, Ranger turquoise foil, fun foam


Tuesday 23 July 2019

Flower Garden Twofer

Sneaking in under the wire for this month's Twofer Challenge "Garden".


I used a stamp that looks like one of my flower beds - a bit overgrown and chaotic!


Here's the first card, a thank you card:

I stamped and heat embossed the image in white on kraft cs and then coloured the poppies with a white coloured pencil.  I cut the image into three even sections and carefully spaced them on a linen card base.  Finished off by adding a sentiment die cut from a snippet of kraft cs.

The second one is a birthday card:


This time I stamped the image in black archival ink on watercolour paper and watercoloured the poppies in red.  I trimmed the panel and added strips of red cs to the two ends so that it would be perfectly centred on the cream card base.  I popped it up on fun foam for some dimension and added a drop of black enamel to the centre of each poppy.

Thanks, Darnell, for a great theme - perfect for me as I'm a passionate gardener!


Supplies for card one:
Stamps - IndigoBlu flowers
Ink - ColorBox white
Paper - cream linen cs, kraft cs
Size - 6x4.25"
Accessories - white embossing powder, Tattered Lace sentiment die

Supplies for card two:
Stamps - IndigoBlu flowers, PTI sentiment
Ink - Archival Jet Black
Paper - watercolour paper, cream and red cs
Size - 6.25x3.5"
Accessories - watercolour paints, fun foam, black enamel liquid dots


Monday 22 July 2019

Pastel Flowers, Masculine Christmas

A couple of cards from me today to get into challenges before they close.

First up for The Flower Challenge "Pretty Pastels".

I went with a pastel pink rose:


I stamped the collage-style image of the rose and watercoloured it, including a light wash over the script background. I popped it up on fun foam on a white background embossed with a border of flowers.

Next up is The Male Room "Christmas in July".


And The Paper Players are asking for a Clean and Simple Masculine card.


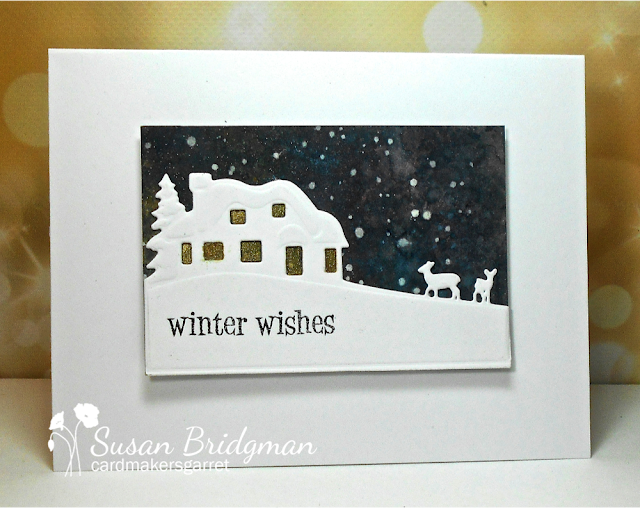
I figured a galaxy background is quite a masculine thing:


I created the galaxy background using Distress Oxide inks and a shimmer spray. When dry, I splattered with watered-down white acrylic paint.

I die cut the house, added the sentiment, and taped it to the galaxy background. I filled in the windows with a gold gel pen. The panel is popped up on fun foam for dimension.


I hope everyone is enjoying July and that it's cooled down for those of you in areas having heat waves!


Supplies for the first card:
Stamps - Stamplorations
Ink - Archival Jet Black
Paper - white cs, watercolour paper
Size - 6x4.25"
Accessories - Gansai Tambi watercolour paints, Crafts Too embossing folder, fun foam

Supplies for the second card:
Stamps - Penny Black sentiment
Ink - Memento Tuxedo Black, various Distress Oxide inks
Paper - white cs, mixed media cs
Size - A2
Accessories - clear shimmer spray, AE house/deer die, white acrylic paint, gold gel pen, fun foam


Thursday 18 July 2019

Red, Green, and Brown with a Bird

I have a card today inspired by a couple of the Christmas challenges that I like to do.


Stamped the robin image as if he was standing on the holly, watercoloured, splattered, bordered with black, and popped up on fun foam - one of my favourite types of cards to make!

It's being linked up at:

52 Christmas Card Throwdown's July Color Challenge.


And Christmas Kickstart's "Festive Things with Wings".


Thank you, challenge people, for inspiring me to get my Christmas cards done early!


Supplies:
Stamps - Sheena Douglass Bird and Holly, Wordsworth sentiment
Ink - Archival Jet Black
Paper - watercolour paper, cream and black cs
Size - A2
Accessories - Gansai Tambi watercolour paints, fun foam


Wednesday 17 July 2019

Snowflake Triptych

Reminder time for CAS Christmas!


Having stepped out of my snowflake card comfort zone with my first card (I went with white and cream), I am back to what I think snowflake cards should be (white and blue).


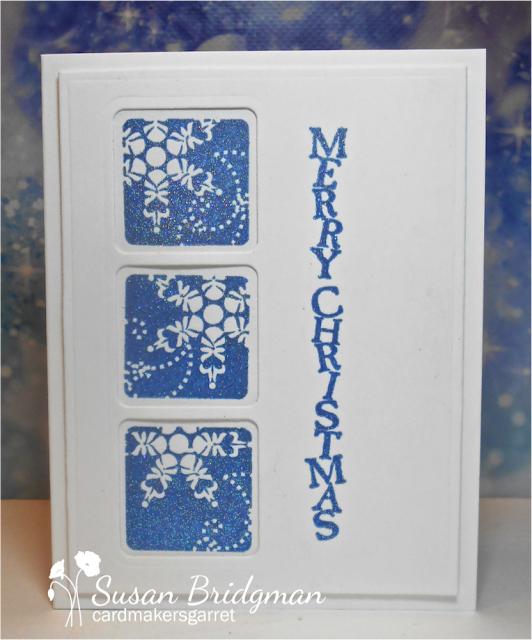
I stamped and heat embossed the three snowflake stamps on a scrap of cs and did the same with the sentiment on my top layer of cs, out of which I cut the PTI Take Three die.  I set the snowflakes behind the top layer and added to a white card base.

The embossing powder is SU's Dazzling Diamonds - one of the best for sparkle.  Here's a close-up photo with the light at a different angle to catch some of the sparkle:


Please come and join us at CAS Christmas and show us your snowflake cards.  You have until July 24th to link up.  There's lots of inspiration from the Design Team and this month's fabulous Guest Designer, Jane (Onions and Paper).


Supplies:
Stamps - PTI Take Three Winter, Impression Obsession sentiment
Ink - Encore Metallic Blue
Paper - white cs
Size - A2
Accessories - SU Dazzling Diamonds embossing powder, PTI Take Three die


Tuesday 16 July 2019

Bonnie's Bouquet

My reminder card for CAS Watercolour is also a birthday card for my dear friend, Bonnie Klass - the co-founder of the CAS challenges (and one of our DT members), as well as being someone I've known on line for several years and finally got to meet this May at the Eat, Sleep, Craft, Repeat Retreat (see the photos on the retreat button at the top of my post).


July's theme for CAS Watercolour is "Bouquet".


I realized when planning my cards for this challenge that I have a lot of stamps of bouquets of flowers!  So hard to choose the ones to use (though the fact that it needs to be a CAS card with white space limited it a bit).  Peonies are one of my favourite flowers so went with a bouquet of them for this one:


I stamped the image and sentiment on watercolour paper, painted it with my Gansai Tambi watercolour paints, trimmed it with a stitched rectangle, popped it up on a dark pink shimmer card base, and embellished with a few shimmery flower sequins.

We'd love you to join us at CAS Watercolour before July 24th.  Please be sure your card is clean and simple, and depicts a bouquet of flowers - we don't want just a stem of flowers, nor a line of flowers - it needs to be a bouquet.  There's lots of inspiration from the rest of the Design Team and July's Guest Designer, Leslie (Running with Scissors).

Here's wishing you a very Happy Birthday, Bonnie, and many more to come!


Supplies:
Stamps - Penny Black bouquet, Savvy Stamps sentiment
Ink - Archival Jet Black
Paper - watercolour paper, dark pink shimmer cs
Size - A2
Accessories - Gansai Tambi watercolour paints, tiny flower sequins, Lil Inkers stitched rectangle die, fun foam


Friday 12 July 2019

Bright Summer Flowers

This month's Penny Black challenge is "Summer Colours" - they want bright and cheerful pretty summer colours.  What better than a bouquet of beautiful summer flowers?


I coloured the image with watercolour pencils by using a wet paintbrush to pull the colour off the tips of the pencils.  It's a technique that Darnell had us do at the May retreat I was on with her and several other stampers.

I trimmed the panel and wrapped a strip of vellum on which I heat embossed the sentiment around it.  I then popped the panel up on fun foam.  I added yellow and black pearls to the centres of the flowers.

It's going off to a dear friend who is a very keen flower gardener and whose birthday is this month.


Supplies:
Stamps - Penny Black bouquet, SU sentiment
Ink - Archival Jet Black, Versafine Onyx Black
Paper - watercolour paper, cream cs, vellum
Size - A2
Accessories - watercolour pencils, clear embossing powder, fun foam, yellow and black pearls


Wednesday 10 July 2019

Rainy Day Card-making

It's raining so my plans to garden have been squashed.  But a good time to get some cards made!

Here's one for the Less is More "Celebrations" challenge, using their suggestion that we get some cards done for the December holidays.


I always need a few Hanukkah cards so made one of those.


There is a SCS tutorial for making the paper star here.  I used a lovely double-sided decorative paper I've had in my stash for ages.  I topped it with a silver glitter die cut Star of David and added it to a plain white card base with a heat embossed sentiment.

I might make a couple more to use up more dp!!


Supplies:
Stamps - SU sentiment
Ink - ColorBox silver
Paper - white cs, patterned paper, silver glitter cs
Size - A2
Accessories - silver embossing powder, SSS Star of David die


Monday 8 July 2019

Less is More Celebrations

A Christmas card for Less is More's "Celebrations" challenge.


The background was an experiment using some photo paper with Oxide inks and a baby wipe. I smooshed with various shades of blue Oxide inks, drying between layers. When I was finished and the piece was completely dry, I wiped off the chalkiness of the Oxide inks and was left with a lovely glossy background, similar to the Polished Stone technique done with alcohol inks.

I die cut my front panel with a reindeer die I hadn't yet used, added a sentiment, and popped it all up on fun foam.

A nice quick design to use over a variety of background pieces!


Supplies:
Stamps - Make an Impression sentiment
Ink - Tsukineko Kaleidacolor Blue, various blue Oxide inks
Paper - white cs, photo paper
Size - A2
Accessories - Memory Box reindeer die, Lil Inker stitched rectangle die, fun foam, baby wipe


Saturday 6 July 2019

A Tree for the Sparkles Challenge

I'm behind on my Christmas cards that I need for my November sale so really must get going - and the various Christmas card challenges are a huge help.

Today I'm doing the Sparkles Christmas Challenge "Include a Tree".


I created a background of various green alcohol inks on Yupo.  Trimmed it down to leave a border from the white card base.

I die cut the Tim Holtz tree twice, once from white and once from gold cs.  I glued the outline to the background and then had the fun of getting all the little gold pieces into the right spots - good thing I love jigsaw puzzles.  The sentiment is cut out of the same gold.  The panel is popped up on fun foam for dimension.

Thanks for coming by on a July day to look at a Christmas card!


Supplies:
Ink - various green alcohol inks
Paper - white and gold cs
Size - A2
Accessories - Tim Holtz tree and joy dies, fun foam


Thursday 4 July 2019

For a Wedding

Addicted to CAS's challenge is "Wedding".  Perfect as I need a card for a friend's daughter's wedding in August!


I went with gold and white and hearts:


I made a very CAS shaker card using gold glitter in the shaker and a gold embossed sentiment.

I die cut the entwined hearts out of my top layer, placed acetate on the backside and then glued the hearts back in place on the acetate. I added foam tape all around the opening, put in lots of chunky gold glitter pieces, and then added it to the card base.

Thanks for stopping by!


Supplies:
Stamps - Memory Box sentiment
Ink - ColorBox gold
Paper - white cs
Size - 4.75" square
Accessories - gold embossing powder, entwined heart die, gold glitter shaker filler, acetate, fun foam


Wednesday 3 July 2019

Winter Snowflake

It is quite warm in Vancouver today as I write this post so it seems very strange to be thinking about snowflakes!  But that is the July challenge for CAS Christmas.  Bonnie is hosting it and I think she chose it because it's much hotter where she lives so maybe the thought of snow helps to keep her cool!


I enjoyed making my card but did not enjoy photographing it - I had to try several times to deal with the shimmery cream cs and the pearlescent embossing paste.  Here's the best I could do:


I used a really old Dreamweaver snowflake stencil that I haven't touched in years.  I taped it down on white cs and used the Dreamweaver Pearlescent paste through it.  I had some creamy shimmer cs that matches it really well so die cut the two sentiments and created the card base from it.

When the paste was dry, I trimmed it with a stitched square die, then played around with the placement of the two sentiments for ages - having "winter" on the top and "snow" on the bottom makes more sense linguistically, but just didn't look right stylistically!  I finally glued them on and popped the panel up on fun foam on the card base.

Here's a close-up to show you the lovely sparkle of the Pearlescent paste and the shimmer of the cardstock - so happy I had something that matched so well!


Please come and join us with your clean and simple cards featuring a snowflake or two (or more).  There's lots of inspiration over at CAS Christmas from the rest of the Design Team and July's Guest Designer, Jane (Onions and Paper).


Supplies:
Paper - white cs, cream shimmer cs
Size - 5.25" square
Accessories - Dreamweaver snowflake stencil, Dreamweaver Pearlescent paste, Simon Says Stamp "snow" and "winter" dies, Lil Inker stitched square die, fun foam


Tuesday 2 July 2019

Blueberry Bouquet

Special Event

HAPPY BIRTHDAY, DARNELL!!
Please join us in celebrating Darnell's Birthday!!


One more part to this special event.
The team has made special cards for Darnell's birthday,
along with our Guest Designer Leslie,
and several Featured Designers (friends from the retreat).

During our retreat, Darnell (Dolly to us) was up early one morning
and decided she wanted some frozen blueberries.
Somehow she spilled almost the whole, Costco-sized bag of
blueberries all over the floor.

Bonnie snapped these pictures.
See the swipe of blueberries on the right photo??  We couldn't find a broom so we grabbed
a large piece of card stock to pick up the berries.  As they thawed, the blueberry juice
"smooshed" on the cardstock in a lovely design that looked perfect for card making.

Well, without Dolly knowing, we kept that piece of blueberry smoosh and cut it up.
Each Designer has used one piece in making Dolly's birthday cards. :)

The theme for this month is "Bouquet of Flowers".  Please make sure that your card depicts a bouquet of flowers - a single branch or stem does not count as a bouquet, nor does a flower garden.  It can be just a bouquet or it can be in a vase.


Here's what I created with my piece of blueberry smooshed cs:


I used my Inktense watercolour pencils to colour the image. They give me more control for the fine lines of the bouquet's wrapping paper and also to keep some texture on the cat's fur.  I added a simple vertical sentiment and popped the panel up on fun foam.

You have until July 24th to enter a card featuring a bouquet - please be sure it is a bouquet and not just an image of flowers.  There's lots more inspiration over at CAS Watercolour - the cards made by the Design Team and by our talented Guest Designer, Leslie (Running with Scissors).


Supplies:
Stamps - Penny Black cat, Rosie's Roadshow sentiment
Ink - Memento Tuxedo Black
Paper - white cs, including the piece with some blueberry stain on it
Size - 5.25" square
Accessories - Inktense watercolour pencils, fun foam