A blog devoted to the cards I make in my tiny upstairs space. When my sister stays there, she calls it an "artist's garret". I'm not an artist, but am an enthusiastic cardmaker - hence the title "Cardmaker's Garret".
___________________________________________________________________________________________
Showing posts with label owl. Show all posts

Saturday, 15 February 2025

Owl and Forest

Peace on Earth's new mood board has a beautiful image of a Snowy Owl so I was inspired to pull out a very old stamp and create this card.


In my first attempt, I stamped and heat embossed the owl in silver and then tried to stamp the trees around it but it just came out looking messy so I discarded it and started again.  

I stamped and heat embossed the owl in silver on a small piece of white cs and trimmed it with a small rectangle die.  On a larger piece of white cs I stamped the snowy trees by tapping the stamp with two shades of green Distress ink.  I trimmed that panel with a square die and added it to my card base.  I popped the owl up on fun foam.  And stamped and heat embossed a sentiment in silver and trimmed with a stitched banner die.  It's not quite what I'd envisioned making but I feel I captured the owl and the snowy trees from the mood board.

We'd love to see what our mood board inspires you to make.  Head over to Peace on Earth for more inspiration from the rest of the Design Team.


Supplies:
Stamps - Inkadinkado owl, Deep Red trees, Penny Black sentiment
Ink - ColorBox silver, Distress Pine Needles and Evergreen Bough
Paper - white cs
Size - 4.5" square
Accessories - silver embossing powder, rectangle and square dies, stitched banner die, fun foam

Tuesday, 13 August 2024

Birthday Pony, Encouraging Pony, and Scrappy Owl

Three cards today!  I've been totally indulging myself in the Summer Olympics for the last 10 days but am now back in the craft room (when it's not too hot to be upstairs).  Two cooler cloudy days brought on a burst of creativity!

First up for my sister's 70th birthday and for the AAA Birthday Challenge "Critters" and the Seize the Birthday Challenge "Cute Critters":

Like me, my sister loves horses so I had to put a horse on her birthday card.  The image and the word "happy" are stamped and heat embossed in gold. I die cut "70th", then rubbed gold ink on it and heat embossed it with the same gold embossing powder. I die cut it twice more and glued them together to create lots of dimension. The panel is trimmed with a square die and popped up on fun foam on gold holographic star paper.

While I had the pony stamps at hand, I made a card for one of the therapeutic riding instructors I volunteer with who is leaving us to go off to grad school.  I'm linking it up with the My Time to Craft Challenge "Back to School".

I inked the tree up in green, the pony and rider in brown, and the sentiments in black, and bordered the focal panel with green and brown.

These stamps are made from images by the cartoonist, Thelwell, who did the funniest cartoons of children and ponies - all with very naughty ponies!

One final card.  For Jingle Belles "Holiday Leftovers" (use up scraps) and Snippets.

I used up some little scraps of white and green cs, and a small scrap of dp.  Stamped and watercoloured the image, trimmed with a deckle rectangle die, trimmed one of the green scraps with the next size up of deckle die, and then trimmed the scraps of dp and green cs with plain rectangle dies.

 
My Time To Craft!


Supplies for card 1:
Stamps - Isobel Craft Collection pony, Chocolate Baroque happy
Ink - ColorBox gold
Paper - white cs, Hot off the Press gold holographic star dp
Size - 5.25" square
Accessories - Ranger Princess Gold embossing powder, Spellbinders square dies, unknown 70th die

Supplies for card 2:
Stamps - Isobel Craft Collection
Ink - Memento Cottage Ivy, Archival Potting Soil, Versafine Clair Nocturne
Paper - white, green, dark brown, medium brown cs; mixed media cs
Size - A2

Supplies for card 3:
Stamps - Penny Black
Ink - Versafine Onyx Black
Paper - watercolour paper, green and off white cs
Size - A2
Accessories - watercolour paints, Spellbinders rectangle and deckled rectangle dies


Friday, 5 April 2024

Spring Bluebells and Two Christmas Cards

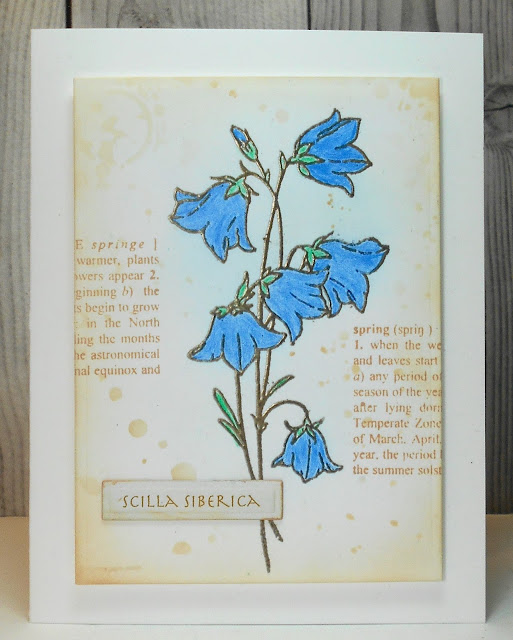
Since it's spring, I'll start with a spring card.  Shopping our Stash Challenge is asking for Spring or Easter, and the Four Seasons Challenge wants Spring.  And since the bluebells are a Penny Black stamp, I'm linking it up to the Penny Black Saturday Challenge.

The Scilla are starting to bloom in my garden so this seemed the perfect stamp.  I stamped  and heat embossed in gold, then coloured with coloured pencils.  With Tea Dye ink to give a vintage feel, I stamped the definition of spring in a couple of places, sponged  around the edges, and stencilled some splatters.  Then stamped the flower name and cut it with a narrow label die and added it to the top.  The panel is popped up on fun foam for some dimension.

Moving on to working on my Christmas card stash.  Double D wants to see Cute Little Animals and Jingle Belles want us to be inspired by one of the cookies in this image:

I saw the cookie on the left near the bottom with the tangle of lights and thought of the stamp I have with a cute little dog all tangle up in Christmas lights.

I watercoloured the image and went over the lights with Glossy Accents. I trimmed with an old Spellbinders label tag, and bordered with green and added to a red card base. And I found the perfect sentiment that refers to lights! 

And finally Christmas Craft Creations wants to see Designer Paper on our cards.  I love colour coordinating DP with the colours I use in my focal image. 

The image is stamped and coloured with coloured pencils and popped up on fun foam for some dimension.

Grab Our Badge! Please Grab Our Badge ...or Hedgie

GRAB OUR BADGE!   


Supplies for card 1:
Stamps - Penny Black Scilla, Purple Onion spring definition
Ink - ColorBox gold, Distress Oxide Tea Dye
Paper - white cs
Size - A2
Accessories - gold embossing powder, coloured pencils, splatter stencil

Supplies for card 2:
Stamps - Penny Black dog, SSS sentiment
Ink - Versafine Onyx Black
Paper - watercolour paper, red and green cs
Size - 4.75" square
Accessories - watercolour paints, Glossy Accents, Spellbinders label dies

Supplies for card 3:
Stamps - Penny Black sentiment, unknown owl stamp
Ink - Versafine Clair Nocturne
Paper - white cs, dp
Size - 4.75" square
Accessories - coloured pencils, fun foam


Sunday, 25 February 2024

Kraft with a Christmas Tree, a Jolly Owl, and Forget-Me-Nots

Sparkles Christmas Challenge wants to see "kraft card". And the Christmas Kickstart Challenge is "Out on a Limb" - something you find on a limb of a tree.  I have created a snowy effect on all the limbs of my tree.

In keeping with the rustic look of kraft, I wrapped a piece of burlap around my top layer of kraft (which I'd trimmed with a wonky stitched rectangle die) and topped it with a Christmas tree die cut once out of green cs and once out of white, layered so that the white shows as if it were snow on the tree branches.  I embellished the tree with a few tiny die cut stars.

Jingle Belles challenge is "Text Me" - I picked the option of having the sentiment be the star. Stamping Sensations wants "Animals, Birds, and Creatures" - I have an owl.

I stamped the owl / sentiment (they are all on one stamp), coloured everything but the crown with coloured pencils, and coloured the crown with a gold glitter gel pen. Trimmed the panel with a square hemstitch die, added it to a red card base, and embellished with three tiny red gemstones on the holly sprig.

Just to balance out the Christmas cards, here's a non-Christmas one.  Festive Friday is celebrating International Women's Day.  I made a birthday card for a close girlfriend who loves blue and flowers.  It uses three things from the challenge list - blue, white, and a bouquet.

Stamped, coloured with coloured pencils, die cut with a stitched rectangle die, and bordered with blue cs. The sentiment is on a vellum strip wrapped around the focal panel.

Please take a copy of our badge


Supplies for card 1:
Stamps - TH sentiment
Ink - Memento Tuxedo Black
Paper - kraft, green, and white cs
Size - A2
Accessories - Christmas tree die, tiny star die, burlap, wonky stitched rectangle die

Supplies for card 2:
Stamps - Crafty Individuals
Ink - Versafine Onyx black
Paper - bristol and red cs
Size - 5.25" square
Accessories - coloured pencils, gold glitter gel pen, Spellbinders square hemstitch die, small red gemstones

Supplies for card 3:
Stamps - Memory Box sentiment, Penny Black forget-me-nots collag
Ink - Versafine Onyx black
Paper - white and blue cs, vellum
Size - A2
Accessories - coloured pencils, Lil Inker stitched rectangle die

Thursday, 26 January 2023

One Tree and a Recycled Owl

Christmas Cards All Year Round wants one of something or a tree.  I decided to do one tree.

I inked up the tree stamp with green Distress mini inkpads, spritzed lightly with water, and stamped on watercolour paper. When dry, I stamped the stars and sentiment. I popped that panel up on fun foam on gold shimmer cs and added that to a red shimmer card base.

My second card is one I made to welcome home one of my closest friends who has been away for two months.  She gets back January 31st - can't wait to see her!  It times perfectly with the Inkspirational challenge "Welcome".  My friend loves owls and she is also really adamant about recycling and reusing as much as possible.  I received the most beautiful owl card at Christmas so decided I'd recycle it into this card for her.  The card also has stars on it and my friend runs Southlands Therapeutic Riding Society, more commonly known as STARS, the program where I volunteer a few days a week, so an owl plus stars just couldn't be passed up!


I used a square die to cut out the main image of the owl and to cut out a piece of silver mirror cs that matches the shiny silver leaves and stars in the image. I also die cut some tiny silver stars from the same cs.

I stamped and heat embossed the sentiment on the bottom of the card, attached the mirror cs at an angle, layered the owl image over it, and glued on the silver stars in random places around the edge.

p.s. Cards with mirror cs on them are so hard to photograph - apologies for the reflections in the angled silver sections!

Christmas Cards All Year Round - "A Partridge in a Pear Tree - use one of something or a tree"

Inkspirational Challenge - "New and / or Welcome"


Supplies for Card 1:
Stamps - Art Impressions tree, PTI sentiment, SU star cluster
Ink - Distress Iced Spruce and Evergreen Bough, Delicata Golden Glitz, Memento Rhubarb Stalk
Paper - watercolour paper, gold and red shimmer cs
Size - A2
Accessories - fun foam

Supplies for Card 2:
Stamps - SSS sentiment
Ink - ColorBox silver
Paper - white cs, silver mirror cs
Size - 4.75" square
Accessories - commercial Christmas card, Spellbinders square dies, silver detail embossing powder, tiny star die


Wednesday, 6 January 2021

A Vintage Owl

I'm honoured to be the January Guest Designer over at Day of the Month Card Club Challenge.  The theme is "National Bird Day".  I used a brand new stamp and made a Christmas card with it.

I stamped the owl in my MISTI, using Distress ... on watercolour paper, then used a wet paintbrush to drag some of the colour out of the stamping.  I used a dark red marker on the berries and stamped the sentiment in dark red.  Some sponging and splattering around the edge of the panel gave it a vintage look.  I matted with dark red cs and popped it up on fun foam on a rustic cs card base.

Please come and join us at The Day of the Month Card Club Challenge.  The only requirement is to use the theme of National Bird Day and link up your card by January 31st.


Supplies:
Stamps - Crafty Individuals, Rubber Soul sentiment
Ink - Memento Rhubarb Stalk;  Distress Oxide Antique Linen and
Paper - watercolour paper, dark red cs, rustic cream cs
Size - A2
Accessories - dark red marker, fun foam


Sunday, 13 September 2020

A Thank You Card

Hello All,

You might have noticed I've been really absent from blogland lately, both posting and commenting.  Some of you already know this, but for my other followers, I thought I'd explain as I feel badly for not having done any commenting lately.  I had a heart attack in August and spent a week in the cardiac unit of the hospital.  I've been home for almost two weeks but have spent that time resting - a bit of reading, a bit of TV, and a lot of dozing.  I'm finally starting to feel a bit of energy for other things.  But forgive me if I still don't do much commenting - I figure it's enough of an accomplishment to make a card and post it for now.


One of my friends who has been making me dinners and keeping me company since I got home from the hospital loves owls so this card is for her.

I don't remember who made the owl stamp as I stamped it a while ago at a friend's house. It was sitting in my UFO box and this was the perfect opportunity to get it out. I watercoloured it using regular watercolours for the owl and a pearlescent one for the background around the owl, and then fussy cut it.

The background is a stencil embossed with a pearlescent paste. Popped it up on foam tape and added a die cut sentiment and matching border.

I'm adding it to the Color Throwdown Challenge:


Looking forward to getting more cards made and more posts written!


Supplies:
Stamps - Firecracker owl
Ink - Ranger Potting Soil
Paper - white and red cs, watercolour paper
Size - A2
Accessories - watercolour paints, Tim Holtz stencil, Dreamweaver Pearlescent paste, thank you die

Thursday, 28 February 2019

Recycled Owl

The 52 Christmas Card Throwdown challenge wants:


I've saved quite a few of the store-bought cards I've received over the years and I do love recycling parts of them.  It's how I got into card-making in the first place!  I had received so many beautiful cards that I couldn't bear to toss in the recycling bin so I made them into new cards and bought one ink pad and one Merry Christmas stamp and it all snowballed from there!

This card is for a friend who loves owls - I make her an owl-themed Christmas card every year so I'd saved the image on this one specially for her (I only have so many festive owl stamps!).


I trimmed the owl image with an inverted scallop die, cut a mat using a blue-silver shimmer cs and the next largest inverted scallop die, layered it on off-white cs that I stamped with the sentiment, and then used a gold shimmer card base.

I need to do more of this as I have lots of lovely store-bought cards I can use.


Supplies:
Stamps - Rosie's Roadshow sentiment
Ink - Vivid Cobblestone
Paper - gold and blue-silver shimmer cs, off-white cs, owl image cut from commercial greeting card
Size - A2
Accessories - Nesties inverted scallop dies


Friday, 27 April 2018

Upcycling for Earth Day

I love the current Jingle Belles Christmas card challenge:

The challenge is called Peace on Earth Day - create a card using recycled elements.

I always save some of the commercial Christmas cards I receive if I think there are sections I can upcycle. I have a friend who loves owls and who is very big on recycling so receiving a card with an owl on it is perfect for turning into a card for her!  I used two different commercial Christmas cards I received last year to create this card:


I fussy cut the owl in his warm sweater and hat off of one card. And I trimmed down another card to use the beautiful night sky section, using deckle scissors for the bottom edge to cut a snow bank.

I die cut a branch and smooshed it in a couple of green inks. And die cut the word "merry". I attached the night sky piece to my card base, added the branch, the owl, and the word "merry", and then stamped "Christmas" underneath it.


Supplies:
Stamps - Penny Black Christmas
Ink - Vivid Inky Blue, various green Distress inks
Paper - blue background and owl upcycled from a commercial Christmas card, white cs
Size - A2
Accessories - Tim Holtz branch die, Tim Holtz merry die


Saturday, 14 May 2016

A Snowy Owl

Before I show the next peace dove cards for my friend, I thought I'd post this card I did for this week's SCS Ways to Use It challenge "The Owl and the Pussycat".  In honour of Edward Lear, we were to use an owl or a cat on our card.  I'm behind on my self-imposed monthly Christmas card quota so went with a winter owl image.


I used a scrap of watercolour paper that I'd smeared with an dark blue inkpad. I stamped the image in white and heat embossed in white, then sprinkled with Shabby Blue Frantage and heated from underneath. The Shabby Blue is a mix of white, pale blue, and gold embossing powder.

I framed it with a pierced frame die and popped it up on fun foam.

I'm also adding it to the CAS Mix Up challenge - stamping, heat embossing, and at least one other element of your choice - I have the stamp, the heat embossing of both the white ep on the owl and the Frantage around the owl, and for my other elements, a die cut frame and an ink smeared background.


Supplies:
Stamps: Inkadinkado
Paper: white cs, watercolour paper
Paper Size: A2
Ink: Vivid Inky Blue, Hero Arts Snow White
Accessories: white embossing powder, Stampendous Frantage Shabby Blue embossing enamel, MFT pierced rectangle frame die, fun foam

Friday, 4 December 2015

"Jump Start" Backgrounds

Today over at Splitcoasstampers, Dini posted an interesting Mix-Ability challenge to start out a crafting session by making a bunch of backgrounds.  Then, if you like them, turn them into something shareable.  The challenge is called "Jump Start, Share Art".

I put some blue and silver Inka Gold on my craft sheet and spritzed it with some water and some homemade silver spray.   I smooshed pieces of watercolour paper and mixed media cs into it, spritzing in between each piece as needed.  I used way too much Inka Gold as I had enough on my craft sheet to make many background pieces.


But since I sold all of my Christmas cards at my fundraiser sale last weekend, I need to make a bunch more Christmas cards to send out myself!  So I decided these backgrounds would be perfect with simple black images stamped on them - a quick way to make lots of cards.  

Because the backgrounds were quite warped from the wet smooshing process and also a bit textured with lumpy bits of Inka Gold, I used the MISTI to stamp the images in Versafine Onyx Black - it's wonderful to have to option of restamping for a better image. I heat embossed with detail black powder.


Then I trimmed and mounted the images in various ways.  Here are some finished cards:


And a close-up of the owl one:


Thanks for stopping by!

Supplies:
Stamps - Inkadinkado, Deep Red
Ink - Versfine Onyx Black
Accessories - silver and blue Inka Gold, homemade silver spray, Ranger detail black embossing powder, Bo Bunny silver glitter paste, Tim Holtz stencil, foam tape,  silver star sequins, MFT pierced frame die, SU sentiment punch