A blog devoted to the cards I make in my tiny upstairs space. When my sister stays there, she calls it an "artist's garret". I'm not an artist, but am an enthusiastic cardmaker - hence the title "Cardmaker's Garret".
___________________________________________________________________________________________
Showing posts with label splash watercolour. Show all posts

Thursday, 8 August 2019

A Challenge Card and an Improved Card

I'm on birthday cards today, a brief break from Christmas cards.

Seize the Birthday wants "Flowers" as its topping.


And The Flower Challenge is "Use Your Favourite Flower".


I used a new flower stamp that I love because it is an agapanthus, definitely a favourite flower because it is blue!


I put the stamp in the MISTI and inked up with various mini Distress inkpads and markers, spritzing with water, and stamping onto watercolour paper until I was happy with the results.

I trimmed the panel with a stitched rectangle die, added a vertical sentiment, and bordered in navy blue cs.

It will go off to my cousin in England who grows the most amazing agapanthus!


On to a second birthday card.  I made this card a couple of years ago:


See this post here for the details.  I was not totally happy with it and never sent it but my friend who is an artist has her birthday coming up so I pulled it out again and revamped it a little bit:


I re-stamped the image and added some watercolour paints to the jar, the brushes, and the tips of the brushes.  Then fussy cut it and glued it on top of the original stamped image.  A simple fix but it made all the difference - I am so much happier with the card now!


Supplies for card 1:
Stamps - Penny Black agapanthus, Rosie's Roadshow sentiment
Ink - various mini Distress inkpads and markers
Paper - watercolour paper, white and navy cs
Size - A2
Accessories - Lil Inker stitched rectangle die, blue pearls

Supplies for card 2: 
See this post here


Sunday, 16 September 2018

Sparkling Tree

Reminder time for CAS Watercolour where the September challenge is "Tree":


For my original Design Team card, I watercoloured the trees.  For this one, I created a watercolour background using Loll Thompson's "splash watercolour" technique (see her video here).


I used three shades of blue Distress Oxide inks to create the background, putting one at a time onto my craft mat and spritzing with water, splashing my mixed media cs into it and then drying with my heat gun.

Once I was happy with the results, I stamped the Penny Black tree and sentiment onto it, trimmed it down, and popped it up on fun foam.  Then I painstakingly added a clear gemstone to every single little circle in the image.  Here's a close-up to show all those gemstones (though the photo doesn't do it justice - the sparkle in real life is quite impressive!) and the lovely blend of splashed blues:


You have until September 24th to join us at CAS Watercolour.  Be sure to follow the theme of "tree" and keep your card clean and simple.  There's lots of inspiration from the Design Team and our wonderful Guest Designer, Ros (Mikey's Mom).


Supplies:
Stamps - Penny Black "Twinkling", PTI sentiment
Ink - Archival Jet Black; Distress Oxide Faded Jeans, Chipped Sapphire, and Weathered Wood
Paper - mixed media and white cs
Size - 4.75x6.25"
Accessories - clear gemstones, fun foam


Monday, 16 July 2018

Splashed Wildflowers


Mid-month already so I'm here with a reminder card for CAS Watercolour.


I took a piece of mixed media cs and used Loll Thompson's splash watercolouring technique (see her video).  I started with Distress Oxide Peeled Paint and splashed it on the lower half of the cs.  Then I used a bunch of other colours, one at a time, drying after each, to colour the upper half of the cs.

I die cut the three wildflowers out of my piece, getting the stems at the bottom and the flowers at the top.  Then die cut them again out of scrap cs and layered them for more substance.

I glued a stitched frame to the card base, stamped a sentiment, tied the bunch of wildflowers with a piece of twine, and then glued them down.

Here's a close-up:


The splash technique is so much fun - just be sure to dry between layers so that you get the nice splashed colour effect.  You have until July 24th to link up your card.  Head on over to CAS Watercolour to see what the rest of the Design Team and our Guest Designer (Marcia of Marcia K Designs) created.

I'm also adding it to the July CAS Mix Up challenge - Colour your Die Cuts - as I coloured my die cut with splashed ink.  I have stamping, die cutting, oxide ink splashing, and twine.


Thanks for stopping by today!


Supplies:
Stamps - Technique Tuesday sentiment
Ink - Ranger Archival Jet Black, Distress Oxide - Peeled Paint, Wild Honey, Broken China, Wilted Violet, Seedless Preserves, and Worn Lipstick
Paper - mixed media and white cs
Size - A2
Accessories - Tim Holtz wildflower dies, twine, Lil Inker stitched rectangle die


Monday, 2 July 2018

Splashed Gears

2018 is flying by!  We're halfway through the year already!  There's a new challenge over at CAS Watercolour for the month of July:


The last time I was at Loll's house, I used one of her new dies and cut it out of mixed media cs.  It was sitting on my desk looking up at me, all boring and plain white, and just seemed to cry out for some splashing.  It was much more appealing once splashed and turned into this card:


I splashed both sections in light colours of Distress Oxide inks, and then splashed the inner section in some darker colours.

I glued the die cut onto the card and added a die cut sentiment on top - I think it will work really well as a masculine birthday card.

Splash watercolouring is a really fun technique and quite addictive.  Head on over to CAS Watercolour where there is a great instructional video by Loll Thompson to get you started and lots of inspiration by the Design Team and this month's Guest Designer, Marcia (Marcia K Designs).  You have until June 24th to link up a card - please be sure to keep your card clean and simple, and use some element created with splash watercolouring.


Supplies:
Ink - Distress Oxide Fossilized Amber, Antique Linen, and Vintage Photo
Paper - mixed media and white cs
Size - 4.75" square
Accessories - Ali Express gears die, Tattered Lace sentiment die


Wednesday, 22 November 2017

Another Christmas Tag

My good friend, Loll, is running her annual Twelve Tags of Christmas


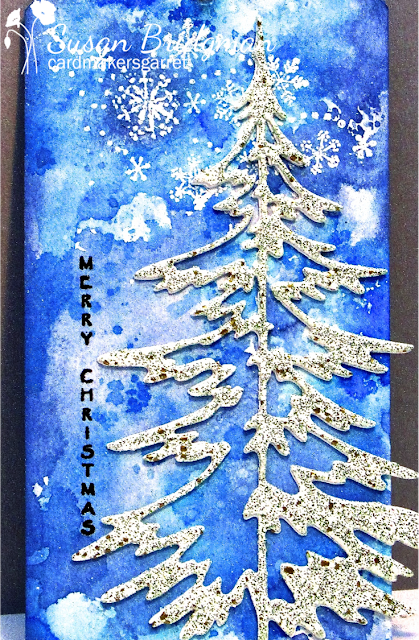
I've made a second tag for the challenge, and unlike my first one (see here), this one is back to my favourite colour scheme of blue and white.

I used the splash watercolour technique with various blue Distress inks to colour the tag.  Then I stamped the little snowflake flurry across the top and heat embossed in white; and stamped and heat embossed the sentiment.

I die cut the tree twice and glued them together.  I patted Versamark all over it and heat embossed with Frantage Shabby Green embossing enamel.   Here's a close-up showing the sparkle of the Frantage:


There are just a couple more days to link up a tag at Loll's Twelve Tags of Christmas - the linky closes at the end of the day on November 24th.


Supplies:
Stamps - Rubber Soul snowflake flurry, Rosie's Roadshow sentiment
Ink - Versamark, ColorBox white, Versafine Onyx Black, various blue Distress inks
Paper - pre-cut tag, white cs
Size - 5.25x2.5"
Accessories - Tim Holtz tree die, clear and white embossing powder, Stampendous Frantage Shabby Green embossing enamel, seam binding


Wednesday, 15 November 2017

Birds with Glittered Santa Hats

Mid-month already so time to remind you to enter CAS Mix Up before November 24th!


Glitter and Christmas cards go hand-in-hand for me so I've gone with another Christmas card:


I stamped the birds on watercolour paper and painted everything except their hats with Gansai Tambi paints.  Then I fussy cut them.

I took another piece of watercolour paper and used Loll's Splash Watercolour technique (see video here) with two colours of Distress inks.  When dry, I die cut the pine branch and glued it to a piece of linen cs.  I stamped the sentiment and then trimmed it.  I popped it up on fun foam on the matching cardbase.

I put double sided tape on the birds' feet and foam tape on their hats and heads, and stuck them down.  I went over the main part of the hats first with my Quickie glue pen and added red glitter.  Then went over the brims and pompoms with Dazzling Diamonds glitter.

I scribbled a bit of glue randomly on the pine branch and added some more Dazzling Diamonds.

Glitter is so hard to photograph so here's a close-up:


CAS Mix Up is so much fun!  Just be sure to keep the card clean and simple, include some stamping, some glitter, and at least one other option from the list on the challenge site.  My other options are watercolouring, fussy cutting, splash watercolour, and die cutting.


Supplies:
Stamps - Penny Black birds, Make an Impression sentiment
Ink - Archival Jet Black, Distress Evergreen Bough, Distress Iced Spruce
Paper - white linen cs, watercolour paper
Size - A2
Accessories - Impression Obsession pine branch die, Gansai Tambi watercolour paints, Glitter Ritz red glitter, SU Dazzling Diamonds glitter, Quickie glue pen, foam tape, fun foam


Monday, 30 October 2017

A Card for a Painter

The wonderful Karen Dunbrook (of the Snippets blog) is hosting this week's Technique Lovers' Challenge at Splitcoaststampers - "Splash Watercolour".   She's included the video tutorial (see here) by the equally wonderful Loll Thompson (of Stamping with Loll) on how to do the technique.

I first learned it from Loll using regular Distress inks but it is equally fabulous but slightly different with Distress Oxide inks as I used here.


I made the card with a particular friend in mind - when she retired she decided to learn to paint using oil paints. She took several classes and has become really good - so good that I've bought two of her paintings for my house. I wanted to capture her favourite colours so used the three colours of Oxide inks closest to them for my Splash Watercolour background.

As Karen says in the challenge, it creates a perfect background for stamping on. I put the stamps in my MISTI so that I could restamp a couple of times to get a good dark impression.

To finish it off, I die cut the panel and some black cardstock with the layering rectangle dies and mounted it on a piece of fun foam.

Karen's SCS challenge inspired Loll to run a mini challenge over at her blog (with a small prize for the winner).  Loll's challenge is open for one week only, whereas the SCS challenges have no deadlines.  If you make a card, be sure to link up in both places!


Supplies:
Stamps - Viva Las Vegas jar of brushes, Impression Obsession sentiment
Ink - Ranger Archival Jet Black, Distress Oxide (Cracked Pistachio, Fossilized Amber, and Broken China)
Paper - watercolour paper, white and black cs
Size - A2
Accessories - fun foam, Spellbinders layering rectangle dies