A blog devoted to the cards I make in my tiny upstairs space. When my sister stays there, she calls it an "artist's garret". I'm not an artist, but am an enthusiastic cardmaker - hence the title "Cardmaker's Garret".
___________________________________________________________________________________________

Tuesday 28 February 2023

Group of Seven Cardmakers - Debossed Inky Resist

This month our crafty zoom group (the Group of Seven Cardmakers) tried out a technique called Debossed Inky Resist.  It was based on a video Julia found on Splitcoaststampers:

Video:  Debossed Inky Resist (Anna-Karin Evaldsson via SplitcoastStampers)
 
Here's my card:
 

Following the instructions in the video, I lightly rubbed Versamark over the raised design side of the embossing folder.  Then placed watercolour paper inside the embossing folder and ran it through my Cuttlebug.  I sprinkled with white embossing powder and heat set.  The Versamark and embossing powder created a resist for the next step of smooshing with Distress inks.  I used Picked Raspberry, Tattered Rose, Victorian Velvet, and a little bit of Bundled Sage, tapped onto my craft mat and spritzed with water.  I then smooshed the embossed panel into it until I was happy with the results.  I then repeated with the same colours in Distress Oxide inks to get a little bit of additional texture.

I finished the card with a die cut poppy (a layer of scrap cs and a top layer of cream shimmer cs) and a sentiment banner.  Added the panel to a cream card base.
 
It was a fun technique that gave nice artsy results.  I went on to make a few more backgrounds with different embossing folders and experimenting with using both the raised pattern side as in this card and with using the opposite side of the embossing folder which gives a raised ink smooshed pattern.  I'll be posting them once I've turned them into cards. 

Head on over to Group of Seven Cardmakers to see what the rest of our group made using this technique.


Supplies:
Stamps - Savvy Stamps sentiment
Ink - Distress and Distress Oxide Picked Raspberry, Tattered Rose, Victorian Velvet, Bundled Sage
Paper - watercolour paper, cream shimmer cs, cream cs
Size - A2
Accessories - stitched banner die, Penny Black poppies die

Monday 27 February 2023

A Bauble with Snowflakes and a Large Dove

Sneaking in under the wire for some challenges.  Christmas Kickstart Challenge wants Baubles, My Time to Craft Christmas wants Snowflakes, Shopping our Stash wants things starting with the letter "B" (I've got baubles and blue alcohol inks), and NBUS wants never before used stuff (the bauble die and the Snowfall Grit Paste).

I dropped various blue alcohol ink, silver and white mixatives, and rubbing alcohol onto a piece of glossy photo paper and let it move around. Once dry, I die cut the sentiment, the ornament, and the thin frame from the piece.

I created a background panel with Snowfall Grit Paste and a snowflake stencil. Then put it all together.


And to make it into another challenge at the last minute, I've got a second card today.  This one is for Christmas Cards All Year Round "Two of Something or a Dove" (I've got a large dove on this card).  It's also for the ABC Christmas Challenge "D is for Die Cuts" (nothing but die cuts on this card).

Everything is die cut out of shimmer cs for this card - white for the sentiment, dove, and snowflakes, and a scrap of green for the olive branch.  And all added to a blue shimmer card base.

Challenges:

Christmas Kickstart Challenge "Baubles"

Shopping Our Stash "Things Starting with the Letter B"

Grab Our Badge!

My Time to Craft Christmas "Snowflakes"

My Time To Craft Christmas!
Christmas Cards All Year Round "Two of Something or a Dove"


ABC Christmas Challenge "D is for Die Cuts"


Rudolph Days - anything Christmas 

NBUS - never before used stuff


Supplies for card 1:
Paper - white cs, photo paper
Size - A2
Accessories - blue alcohol inks, silver and white mixatives, rubbing alcohol, snowflakes stencil, Snowfall Grit Paste, ornament die, sentiment die, thin frame die, ribbon

Supplies for card 2:
Paper - shimmer cs - white, dark blue, green
Size - A2
Accessories - MFT dove and sentiment dies, Gina Marie snowflake dies

Saturday 25 February 2023

Birds Start with "B"

Shopping our Stash challenge wants something starting with "B" and the Double D challenge wants "birds" on a card.  This duo of challenges plus the one year anniversary of the war in Ukraine inspired this card:


Thinking of the Ukrainian flag and noticing the yellow bird with a blue eye in the Double D inspiration board, I used blue and yellow Brushos to create the background - sprinkled the Brushos on coated cs, spritzed with water and let the colours move, taking care to stop them mixing together too much.  Once dry, I stamped the dove with black Staz-on.  I trimmed the panel and popped it up on fun foam on an off-white card base.  The sentiment is a Tim Holtz metallic sticker.

Holding the brave determined people of Ukraine in my heart and mind.

Challenges:

Double D "Birds"


Shopping our Stash "Something Starting with B" - I have both a bird and the colour blue.

Grab Our Badge!


Supplies:
Stamps - Magenta Dove
Ink - Staz On Jet Black
Paper - off white cs, coated cs
Size - A2
Accessories - blue and yellow Brushos, Tim Holtz metallic sticker, fun foam

Thursday 23 February 2023

Masculine Christmas and Roses with a Heart

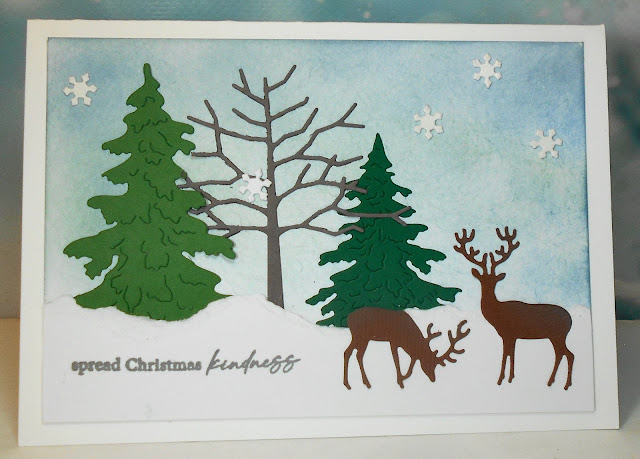
The 52 Christmas Card Throwdown wants to see a masculine card.  I had a pile of scraps of coloured cs on my desk so thought I'd do something that I could also enter into the Snippets challenge.


I die cut the trees, reindeer, and tiny snowflakes. I sponged a wintery sky and tore a strip of white cs for the snowy ground. Then glued all the pieces onto the sky panel to create my winter scene.
 

My other card uses a new flower stamp I bought at a second hand craft sale and unfortunately I don't know who makes it.  It's for The Flower Challenge "use your latest flower stamp or die".

It's stamped and watercoloured, with a die cut sentiment laid over it, and matching red strips of cs on the top and bottom.

Challenges:

52 Christmas Card Throwdown

Snippets Challenge

Player's Badge

The Flower Challenge


Supplies for card 1:
Stamps - Penny Black sentiment
Ink - Archival Hickory Smoke, Distress Oxide Stormy Sky and Faded Jeans
Paper - white, green, grey, brown cs
Size - 6x4.25"
Accessories - Impression Obsession reindeer dies, Memory Box Twiggy Tree die, evergreen tree dies, tiny snowflake die

Supplies for card 2:
Stamps - unknown heart / roses stamp
Ink - Versafine Clair Nocturne
Paper - watercolour paper, off white and red cs
Size - A2
Accessories - watercolour paints, Creative Expressions sentiment die


Monday 20 February 2023

Embossing Folder on a Valentine and a Christmas Card

Can You Handle the Pressure challenge wants to see hearts used with an embossing folder and the Once Upon a Time challenge wants something based on the book "My Heart".  To go with the book, my card has big hearts and little hearts, some that are open, some that are closed (filled in).


I used the hearts border embossing folder across the middle of my focal panel and stamped and heat embossed the sentiment at the bottom. I die cut the cluster of hearts out of silver glitter cs and glued the outline on top and randomly added some of the inside hearts back into their spots, and added two of the inside hearts at random places at the top of the focal panel. Popped the panel up on fun foam for more dimension.

My second card is for Jingle Belles "use an embossing folder".

I sprinkled blue Brushos on coated cs and spritzed with water. When dry, I ran it through a snowflakes embossing folder and then sanded the colour off the tops of the snowflakes. It gave me a great variegated effect.

I die cut the image and sentiment twice - once out of dark silver glitter cs and once out of white cs - and glued them together for more dimension. Added them to the background and bordered it with more of the glitter cs.

Challenges:

Can You Handle the Pressure? "Hearts"

Once Upon a Time "My Heart" 

Jingle Belles "Embossing Folders"


Supplies for card 1:
Stamps - Impression Obsession sentiment
Ink - ColorBox Silver
Paper - white cs, silver glitter cs
Size - A2
Accessories - silver embossing powder, SU hearts embossing folder, SSS cluster of hearts die, fun foam

Supplies for card 2:
Paper - white cs, dark silver glitter cs, coated cs
Size - A2
Accessories - blue Brushos, TH merry die, unknown reindeer / tree die, Sizzix snowflakes embossing folder


Saturday 18 February 2023

Pup with Red and White Stocking

Inspired by the red and white in the mood board at Peace on Earth:


I stamped and coloured the pup, colouring his stocking in the red and white of the candy canes and other stripes of the mood board.  I added some orangey patches to the dog to make her resemble my dog (an orange roan English Cocker Spaniel).  In keeping with the red and white, I chose a piece of dp to border the image.

There's lots more inspiration from the other members of the Peace on Earth Design Team.  Here's the mood board should it inspire you.  If not, "anything Christmas goes".

And here's a photo of me and my sweet Tessa.  We occasionally go out to visit seniors' homes and this was taken on one of those visits.


Supplies:
Stamps - Penny Black
Ink - Versafine Clair Nocturne
Paper - white cs, dp
Size - A2
Accessories - coloured pencils

Friday 17 February 2023

Two More Valentines

Two more Valentine cards from me.  The first one has the centre horizontal line from the Tic Tac Toe challenge - stencil, pink, and heart.  And also has Stencil Fun's theme of hearts, Colorful Options challenge to use pink, Inkspirational "Use Stencils", and The Sisterhood of Crafters' theme of hearts.

I created a stencil monoprint for the background - basically a negative version of stenciling.  I sprinkled pink Brushos on a stencil of little hearts, spritzed with water, and flipped it over onto a piece of mixed media cs.  I trimmed it down and popped the panel up on fun foam on the card base, and added a white heart and a sentiment die cut out of the trimmed off section of the stencil panel.

The second card is for Cardz for Guyz - a Valentine for a Guy:

 
Stamped, watercoloured, a bit of splattering, a black border, and fun foam for some dimension.


Supplies for card 1:
Stamps -
Ink -
Paper -
Size -
Accessories -

Supplies for card 2:
Stamps -
Ink -
Paper -
Size -

Monday 13 February 2023

Two Cards with Birds - One a Valentine, One a Notecard

Tic Tac Toe challenge has lots of options for Valentine cards - I chose the left vertical column (see below) of heart, red, stitching.  A friend always asks me to make several Valentine cards each year, and one of them always has to have a bird on it.  Here's this year's one:

I stamped the bird and then die cut it with a stitched heart die.  I stamped and heat embossed the sentiment in white on red cs and die cut it with a banner die with tiny heart cutouts at each end.  I had some red glitter hearts left from a previous project so glued a few of them on the card.

My second bird card is for the AAA Card Challenge "Teal and Gold".

I used turquoise and teal alcohol inks on yupo and rubbed some gold foil on the sections that remained a bit sticky. Then die cut my birds from the yupo and some scrap cs, and glued them together for more dimension.

I made a background of stencilled branches with white embossing paste, die cut a frame, and mounted it all on the card base.

Challenges:

Tic Tac Toe


AAA Cards Challenge


Supplies for card 1:
Stamps - Impression Obsession sentiment, Carabelle bird
Ink - Versafine Clair Nocturne, ColorBox white
Paper - white and red cs, red glitter cs
Size - A2
Accessories - white embossing powder, banner die with hearts, Frantic Stamper Inc. stitched heart die, tiny hearts die

Supplies for card 2:
Ink - two tones of turquoise and teal alcohol inks
Paper - white cs, yupo
Size - A2
Accessories - gold foil, TCW branch stencil, embossing paste, Impression Obsession frame die

Friday 10 February 2023

A Valentine for a Best Friend and a Swirly Heart Valentine

Festive Friday is celebrating Galentine's Day.  The challenge involves picking three things from their list.  I chose friendship sentiment, hearts, and ribbon.


My best friend came over the other day for dinner and brought me a pack of Valentine paper napkins as a hostess gift.  So I decided to use one to make a card for her.  I peeled off the top layer of the napkin and attached it to cs with ModPodge.  The sentiment is heat embossed, die cut and wrapped around the napkin panel with pink ribbon.  I added the panel to the card base and framed it with a pierced rectangle frame die.

This same girlfriend also orders a few Valentine cards from me each year.  This is one of them.  It's going off to Shopping our Stash challenge "Love is in the Air" as I've had these dies for ages and they needed to be used!


A very CAS card! I sprinkled pink and red brushos on mixed media cs and spritzed with water. When dry, I die cut the heart and the sentiment, and added them to a cream card base.


Festive Friday "Galentine's Day"


Shopping our Stash "Love is the Air"

Grab Our Badge!


Supplies for card 1:
Stamps - Printworks sentiment
Ink - Versafine Clair Nocturne
Paper - paper napkin, off-white cs
Size - A2
Accessories - ModPodge, clear embossing powder, MFT Pierced Rectangle Frame die, Spellbinders label die, pink ribbon

Supplies for card 2:
Paper - mixed media and cream cs
Size - A2
Accessories - red and pink brushos, heart die (?), Poppy Stamps sentiment die

Wednesday 8 February 2023

A Valentine and a Two Hares

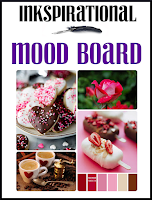
First up today is a Valentine for Inkspirational which has a lovely mood board full of hearts, pinks, and reds. 


I sponged various shades of pink on my background and then used one of the darker pinks over a heart stencil. I added the die cut hearts and sentiment to the background, bordered it with the same pink glitter cs as the die cuts, and popped the panel up on fun foam.  The pink glitter cs makes me think of the little round decorations on the cookies in the upper left image on the mood board (see below).  I grew up in England calling those decorations "hundreds and thousands" but I've since learned that the correct name for them in the baking world is nonpareils.  What do you call them?

My other card is for the Tic Tac Toe challenge.  I chose their right hand, vertical column that calls for stencil, circle, ink blending.


First I laid my stencil over my cs and then die cut a circle out of scrap paper and laid it over top of the stencil and then blended Speckled Egg and Antique Linen through the stencil.  Removed the stencil and the scrap circle and was left with a nice circle background.  I stamped the berry branch over the top and the two hares at the bottom.  I had a couple of smudges that I didn't like so added Tim Holtz clippings stickers over them and added a "missing you" stamped sentiment, popped the panel up on the card base with fun foam, and finished by going over the berries with a pearl pen.  

It's going to my cousin in England and I've written a note in the card about all my memories of our last visit together.  She is more like a sister than a cousin and before Covid, we'd seen each other every year either here or there.  We really miss each other - hopefully some time this year I'll be going over to England to see her!


Inkspirational

Tic Tac Toe


Supplies for card 1:
Ink - various pink Distress inks
Paper - white cs, pink glitter cs
Size - A2
Accessories - various pink Distress inks

Supplies for card 2:
Stamps - Lavinia Berry Wreath and Wild Hares, TH sentiment
Ink - Versafine Clair Nocturne, Distress Oxide Antique Linen and Speckled Egg
Paper - white cs
Size - 5" square
Accessories - Lavinia berry stencil, TH clippings stickers, Pearl Pen

Monday 6 February 2023

Metallic Snippets Stars and Embossed Sympathy

Christmas Craft Creations is asking for "Snippets" - a card that uses up some scraps.  I have a very hard time tossing out any bits of gold or silver shimmer or glitter cs so I have a whole little box of tiny pieces.  What better to use them for than stars?


I die cut a whole bunch of stars in various sizes and out of various shades of gold cs. I took a narrow strip of cream cs (another snippet left over from something else), stamped and heat embossed the sentiment "Oh starry night", and glued on the various die cut stars. I added the panel to a mini slimline card base.

My second card is a sympathy card.  The Can You Handle the Pressure challenge is asking for dry embossing just on the borders.

I coloured the flower with Tombow markers.  I trimmed the panel and carefully placed the embossing folder on the left edge and bottom edge first so that it didn't hit the flower or sentiment and ran it through, and then placed it on the upper right corner and ran it through.  I really like the result I got.  I popped the panel up on fun foam and added a stick-on pearl to the centre of the flower.

Christmas Craft Creations

Can You Handle the Pressure?

Please Grab Our Badge 


Supplies for card 1:
Stamps - unknown sentiment
Ink - ColorBox Gold
Paper - cream cs, corrugated card, gold, bronze, and copper cs
Size - 6x3.25"
Accessories - gold embossing powder, various star dies

Supplies for card 2:
Stamps - SU Love and Sympathy flower, unknown sentiment
Ink - Versafine Clair Nocturne
Paper - white cs
Size - A2
Accessories - Tombow markers, Craft Concepts embossing folder, fun foam, stick on pearl