A blog devoted to the cards I make in my tiny upstairs space. When my sister stays there, she calls it an "artist's garret". I'm not an artist, but am an enthusiastic cardmaker - hence the title "Cardmaker's Garret".
___________________________________________________________________________________________
Showing posts with label rabbits. Show all posts

Wednesday, 8 April 2026

Easter Bunnies and Christmas Train

An Easter card for AAA Card Challenge "E is for....", Inkspirational Challenge "E is for....", and Sweet Stamping "Spring or Easter".

I stencilled a swirly leafy background with light shades of Distress green inks. Then stamped the text and mushrooms in light brown and the bunnies and sentiment in dark brown. I popped the panel up on fun foam.
 
I went with a Christmas card for Cut It Up "For Babies or Kids".
I stamped all the images, coloured them with alcohol markers, and die cut them with the matching dies. Added them to my focal panel (die cut with a pierced rectangle die) and drew a black line under the train and added a sentiment below. Added a layer of green cs to border it and show through the pierced dots.

  Help yourself to our badge  Sweet Stampin' Challenge Blog    
Grab My Button


Supplies for card 1:
Stamps - Lavinia, SU sentiment
Ink - various Distress greens and browns
Paper - white cs
Size - A2
Accessories - Lavinia stencil, stitched sentiment banner die, fun foam

Supplies for card 2:
Stamps - unknown sentiment
Ink -  Memento Tuxedo Black
Paper - white and green cs
Size - A2
Accessories - Sunny Studio "Holiday Express" dies, alcohol markers, Sizzix pierced dot rectangle die


Monday, 14 April 2025

Easter Bunnies and Christmas Snowflakes

Cards for two of the big holidays today!

First up an Easter card for Addicted to CAS ("Bunny"), Shopping our Stash ("Hippity Hop"), and Inspired By ("Bunnies").

I die cut the brick wall and layered it over a piece of cs sponged in various red and brown Distress inks. The bunnies are cut from a leftover piece of light brown smooshed cs, and layered for more substance. I went over their ears with a pink coloured pencil and sponged a bit more brown around the edges. Trimmed the panel with a stitched rectangle die.

And then of course, keeping on top of my Christmas card making, this one is for Festive Friday's Earth Day challenge.  For my three things from their list, I chose earthy colours, wooden elements (the snowflakes), and recycled elements (the corrugated panel is part of a Tim Horton's coffee cup sleeve).  Jingle Belles is also having a World Earth Day challenge to use some recyling (again,I used part of a coffee cup sleeve).  It's also for 52 Christmas Card Throwdown ("Kraft and White"), My Time to Craft ( "Rectangle Shaped Cards" - I've got a rectangular card base, and two rectangular panels), Neglected Stuff (I've had the tin of wooden snowflakes for years and never use them), and Word Power (my large sentiment is the big focus of the card).


I trimmed down a Tim Hortons corrugated coffee cup holder and randomly brushed a bit of white paint on it.  I stamped the sentiment on a white panel and added the corrugated panel next to it, then added the white panel to a kraft card base.  I glued three wooden snowflakes to it.

 Grab Our Badge!

   PLEASE HELP SPREAD THE WORD! Please share our Blog Badge

My Time To Craft!


Supplies for card 1:
Stamps - SU sentiment
Ink - various brown and red Distress inks
Paper - white linen cs
Size - A2
Accessories - Charlie and Paulchen bunny dies, pink colour pencil, The Greetery brick wall die

Supplies for card:
Stamps - Magenta sentiment
Ink - Distress Gathered Twigs
Paper - kraft and white cs, Tim Hortons corrugated coffee cup holder
Size - A2
Accessories - wooden snowflakes, white acrylic paint


Wednesday, 8 February 2023

A Valentine and a Two Hares

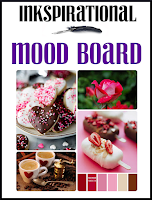
First up today is a Valentine for Inkspirational which has a lovely mood board full of hearts, pinks, and reds. 


I sponged various shades of pink on my background and then used one of the darker pinks over a heart stencil. I added the die cut hearts and sentiment to the background, bordered it with the same pink glitter cs as the die cuts, and popped the panel up on fun foam.  The pink glitter cs makes me think of the little round decorations on the cookies in the upper left image on the mood board (see below).  I grew up in England calling those decorations "hundreds and thousands" but I've since learned that the correct name for them in the baking world is nonpareils.  What do you call them?

My other card is for the Tic Tac Toe challenge.  I chose their right hand, vertical column that calls for stencil, circle, ink blending.


First I laid my stencil over my cs and then die cut a circle out of scrap paper and laid it over top of the stencil and then blended Speckled Egg and Antique Linen through the stencil.  Removed the stencil and the scrap circle and was left with a nice circle background.  I stamped the berry branch over the top and the two hares at the bottom.  I had a couple of smudges that I didn't like so added Tim Holtz clippings stickers over them and added a "missing you" stamped sentiment, popped the panel up on the card base with fun foam, and finished by going over the berries with a pearl pen.  

It's going to my cousin in England and I've written a note in the card about all my memories of our last visit together.  She is more like a sister than a cousin and before Covid, we'd seen each other every year either here or there.  We really miss each other - hopefully some time this year I'll be going over to England to see her!


Inkspirational
Tic Tac Toe


Supplies for card 1:
Ink - various pink Distress inks
Paper - white cs, pink glitter cs
Size - A2
Accessories - various pink Distress inks

Supplies for card 2:
Stamps - Lavinia Berry Wreath and Wild Hares, TH sentiment
Ink - Versafine Clair Nocturne, Distress Oxide Antique Linen and Speckled Egg
Paper - white cs
Size - 5" square
Accessories - Lavinia berry stencil, TH clippings stickers, Pearl Pen

Wednesday, 6 May 2020

A Christmas Card with a Smile and a Wedding Card with a Splat


Two cards today.

First up for the Paper Players "Make You Smile" challenge and for Darnell's NBUS (Never Before Used Stuff) challenge.


I used a new stamp that I hadn't inked up yet - it certainly makes me smile seeing the naughty horse stealing the snowman's nose.


Stamped, watercoloured, trimmed, popped up on fun foam on a red card base - love the simplicity, love the mailability!


And today's second card, for Less is More "Scribbles, Drips, and / or Splats".


I need a wedding card and the people are quite artsy so thought this might work for them.


Using silver ink, I stenciled the small hearts and bits of grunge splats and dribbles on the white panel. I die cut the heart from silver glitter cs and also two narrow strips to border both sides of the panel. The sentiment is stamped in silver and heat embossed. The whole panel is popped up on fun foam.

They will be having a very small family wedding given the limitations imposed by Covid-19 so many of us who were invited won't be able to attend it - such a shame for a couple's special day!


Supplies for card 1:
Stamps - Craft Emotions horse and snowman, Penny Black sentiment
Ink - Archival Jet Black
Paper - watercolour paper, red cardstock
Size - A2
Accessories - watercolour paints, fun foam

Supplies for card 2:
Stamps - Memory Box sentiment
Ink - Delicata Silvery Shimmer
Paper - silver glitter and white cs
Size - A2
Accessories - SU heart die, TCW Confetti stencil, clear embossing powder, fun foam