A blog devoted to the cards I make in my tiny upstairs space. When my sister stays there, she calls it an "artist's garret". I'm not an artist, but am an enthusiastic cardmaker - hence the title "Cardmaker's Garret".
___________________________________________________________________________________________
Showing posts with label Group of Seven. Show all posts

Saturday, 28 June 2025

Sympathy Card Using Generation Stamping with a Very Old Stamp

I'm part of the Group of Seven design team but shamefully failed to get my card done in time for their newest post.  I do have a good excuse - my sister and brother-in-law were visiting and we did a lot of work around my house and garden.  I had to make the most of the help while I had it.  My wonderful brother-in-law is the ultimate handyman and excellent gardener, and my sister is an amazing organizer and de-clutterer (though she refused to help me organize my craft room.

They've left now so I have crafty time again.  Sadly my dear friends just had to let their very old beloved black lab go so I decided to use this month's Group of Seven technique of "generation stamping" to make a sympathy card for them.

I created a background with the letterpress technique of rubbing black ink over the raised part of the paw print embossing folder and then running it through my Cuttlebug.

The focal panel is the dog stamp inked up once and then stamped three times in a row going off the edge of the panel as if it was the dog gently fading out of life.

I'm also adding the card to Stamping Sensations "Our Furry Friends", Can You Handle the Pressure? (Dog or Cat - I used my embossing folder for the letterpress technique), and The Neglected Stuff Challenge (this Stampin' Up set is many years old and I rarely use it).

For more ideas on using the generation stamping technique, head over to Group of Seven and feel free to give it a try and post your results.

Group of Seven Badge  Please grab our logo Please Grab Our Badge

 PLEASE HELP SPREAD THE WORD!


Supplies:
Stamps - Stampin' Up
Ink - Versafine Onyx Black, Distress Black Soot
Paper - white cs
Size - A2
Accessories - unknown paw print embossing folder

Wednesday, 28 May 2025

Batik with Holly

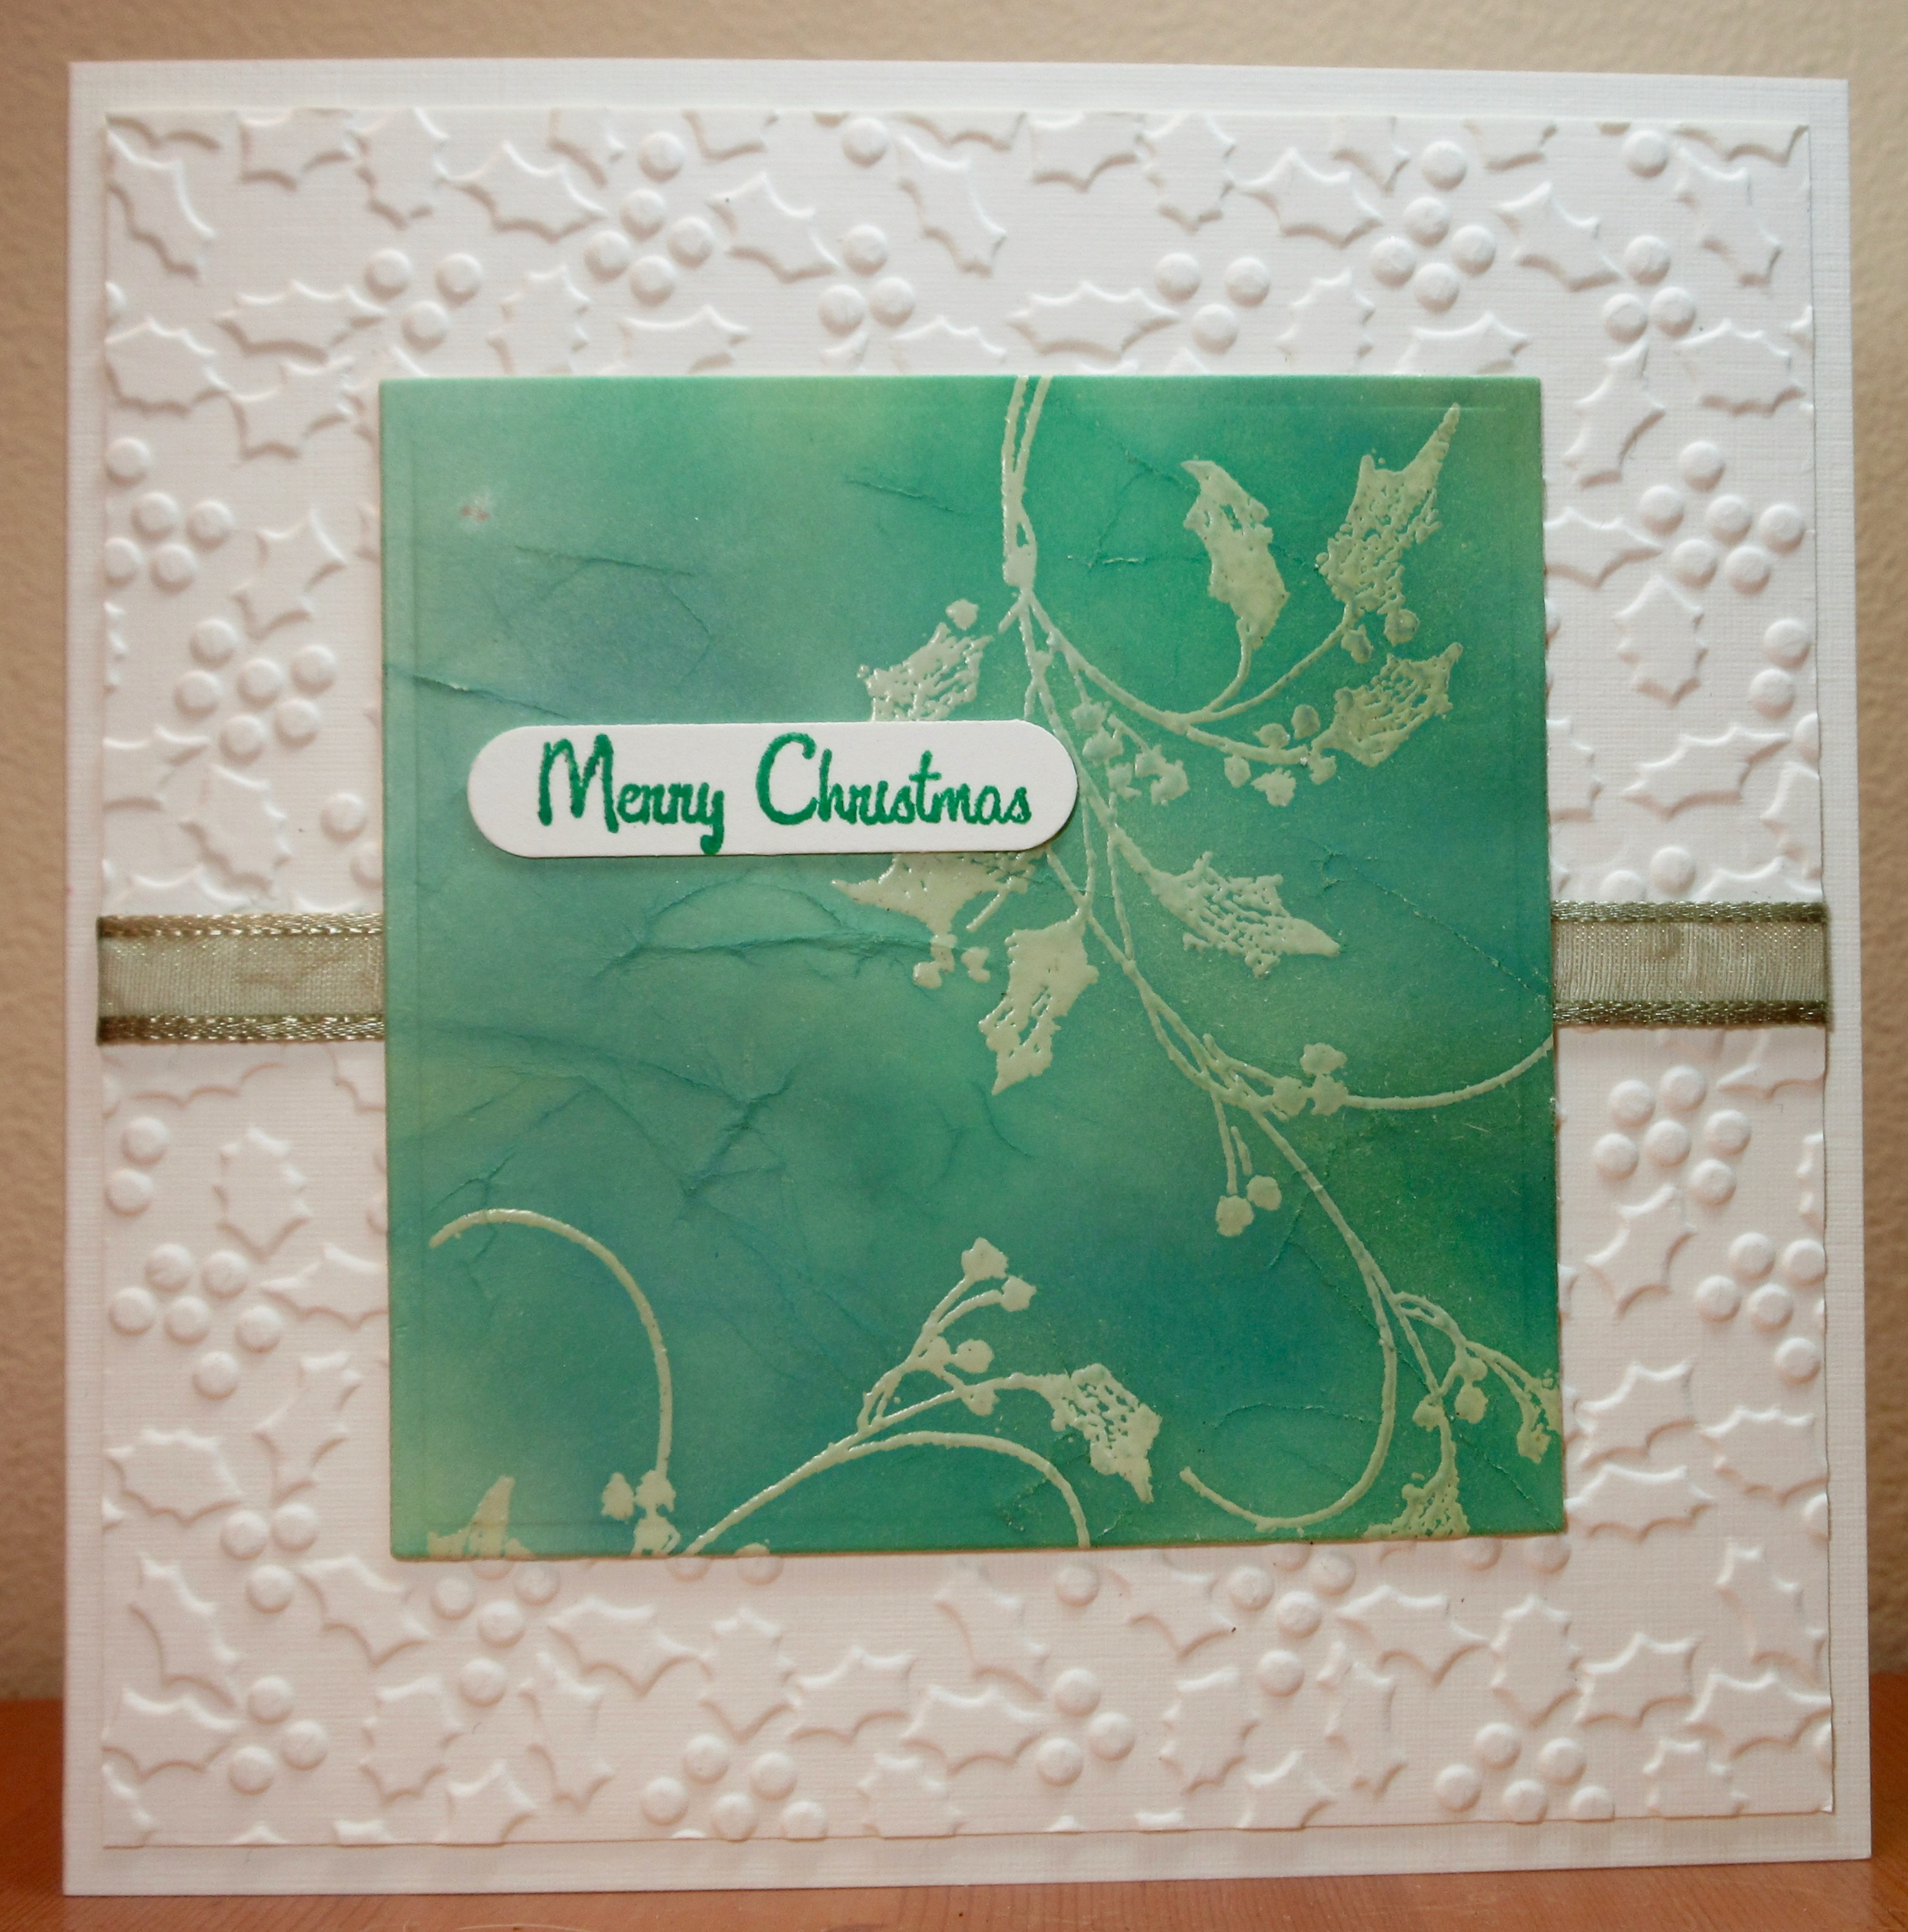
The Group of Seven Cardmakers are trying the batik technique this month.  I did this a few years ago but was not totally happy with the results.  Group of Seven has posted a video with the technique so I watched it, followed it to the letter, but really didn't like the results.  I wondered what I could do to get a better result and decided that what I didn't like was the way the creases came out - and that was my problem when I tried it before.  See the snowflake card on this post to see the way the creases are - I just didn't like them.  I like the creases on this post slightly better but still not that happy.  

Like the video on Group of Seven, both of my earlier cards used regular weight cardstock.  I had the idea to try something lighter that I could just scrunch it up rather than fold and score it, and, hooray, I got results I like much much better.  I used a heavyweight printer paper - 32 lb. weight (as opposed to regular printer paper which is only 20 lb. weight).  After stamping and heat embossing, I literally scrunched up the paper and that created far more random creases than the folding and pressing with a bone folder like the video shows.

Here's the first card I made:


For this one I followed the video's instructions about laying down some light colour first (I think I used Shabby Shutters and Old Paper), then stamped and heat embossed in clear embossing powder, then crumpled the paper, and then sponged over it with darker shades of green.  I trimmed it, used a sheet of double sided tape to stick it to cardstock to give it strength, then layered over a dry embossed background.  Because my panel was 5" wide I had to run half of it through the embossing folder, then the other half, so I ended up with a messy bit in the middle - I covered that with a strip of ribbon.

What I didn't like about that card was how muted the holly looks with the inks behind it, so for the next card, I just stamped and heat embossed with clear embossing powder before crumpling the paper and doing the ink blending.  

Same process after that - trimming and sticking to cardstock.  I cut a slightly larger panel of green cs and set it and the batik panel at angles (something I rarely do!!)

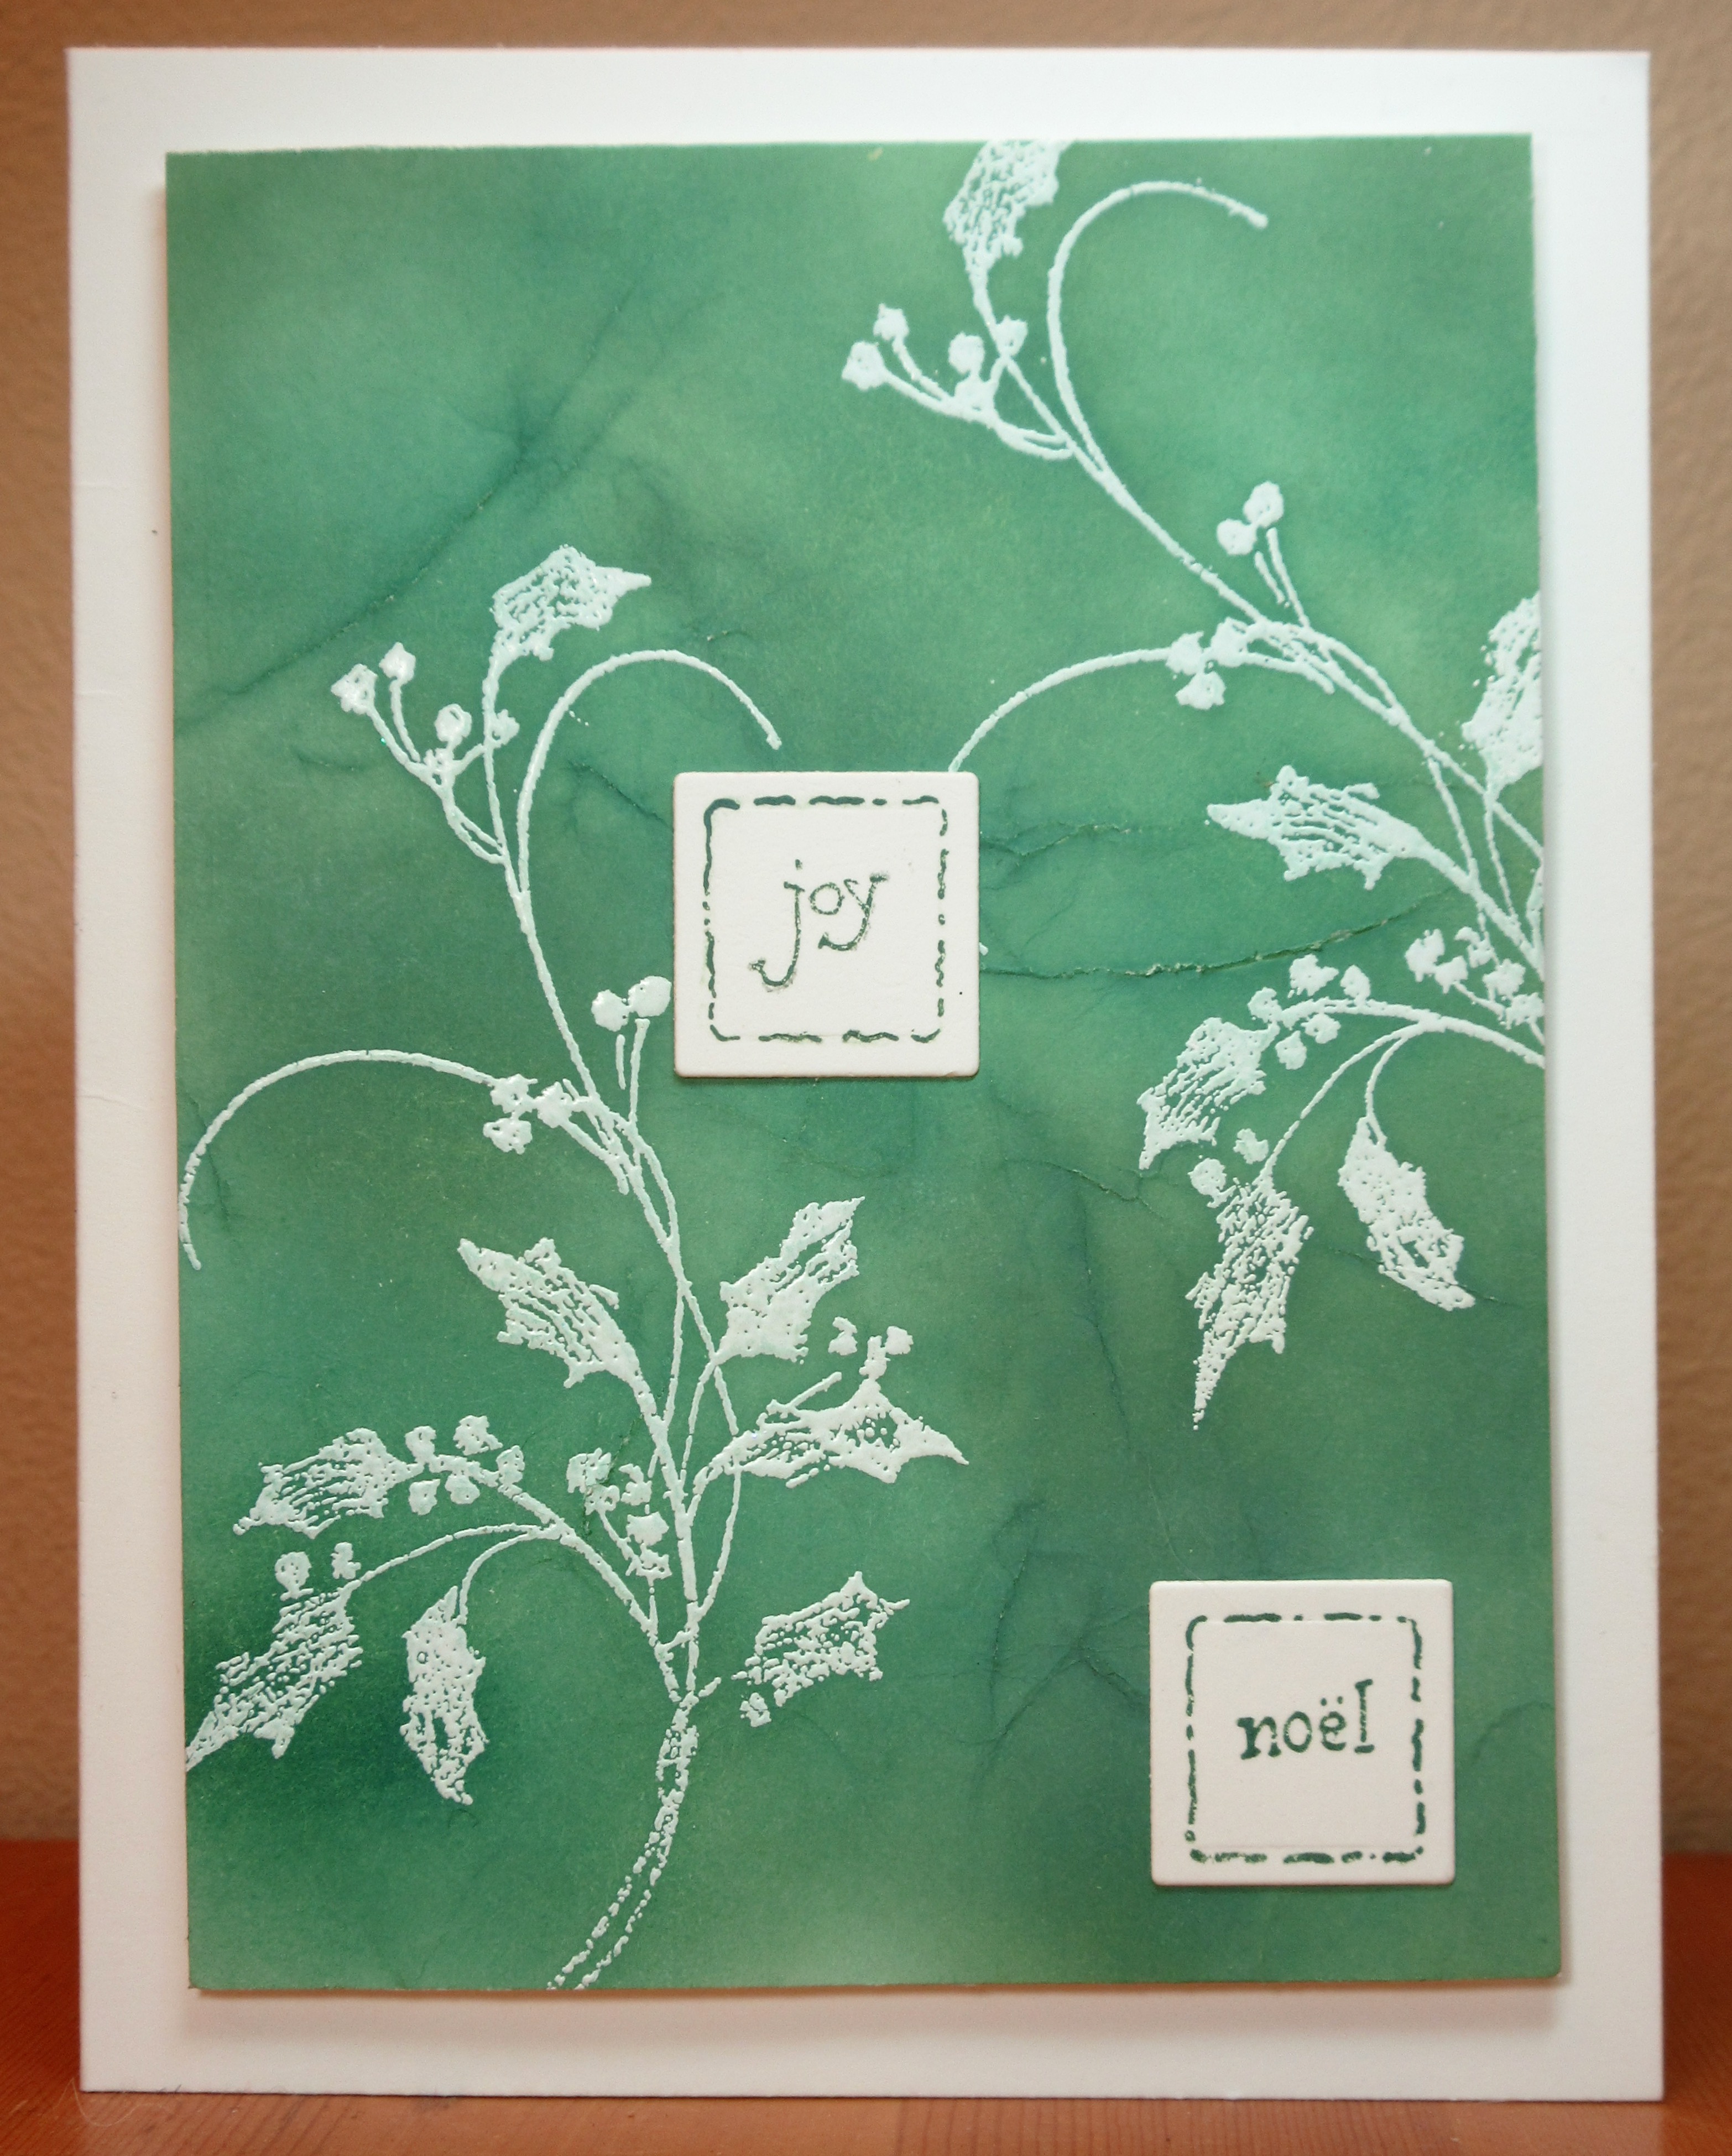
I still wanted more contrast between the image and the ink blending so for my last (and favourite one), I stamped and heat embossed with opaque creamy white embossing powder.

Followed all the same steps after that.  The panel is popped up on fun foam on a cream card base, with two small sentiments stamped and die cut with small square dies.  I really like this one and am very happy with the random creases.

Please let me know in the comments which one you like best!!

We'd love to have you try whatever way you like to get a batik look to your card.  Please post over at Group of Seven.  And check out the other examples by the rest of our group!


Supplies:
Stamps - Penny Black holly stamp, Rubber Soul Merry Christmas, Stampendous little square sentiments
Ink - Versamark, many various green Distress Oxide inks
Paper - white, cream, and green cs, 32 lb. heavyweight printer paper
Size - A2 and 5.25" square
Accessories - clear embossing powder, Papermania Seafoam White embossing powder, Sizzix holly embossing folder, ribbon, SU sentiment punch, Spellbinder square and rectangle dies

Monday, 28 April 2025

Gilding Flakes on Acetate

This month, the Group of Seven Cardmakers are trying out gilding flakes on acetate.  We followed the technique on this video.  Here's my card:

I patted the wreath stamp with Cosmic Shimmer Flake and Glitter Glue (using a square of foam as an applicator), then stamped onto the acetate.  Then immediately washed my stamp with warm soapy water.  Added the gilding flakes and pressed them into the glue, then used a craft scrubby to rub off the excess.  I added the acetate to the card base with double sided tape around its edges and covered it with a die cut frame so that the tape wouldn't show.

Here's a close-up of the lovely colours in my gilding flakes:

 
I love gilding flakes even though they're so messy to work with, but not sure I like using them on acetate (mainly because of the static).
 
Loll suggested we also try it on vellum.  I followed the same stamps as above.
 
I think my image was perhaps too detailed for gilding flakes but I do kind of like the misty look of it.  Again to cover the tape holding the gilding flakes panel to the card base, I used a die cut frame.
 
And a close up of the gilding flakes on the vellum:
I just love the colour blend!
 
There's lots more ideas from the rest of the Group of Seven over on the blog.  If you're inspired to try it, please link up so that we can see how you use the technique.


Supplies for card 1:
Stamps - Impression Obsession wreath stamp, unknown sentiment
Ink - gold
Paper - off white cs
Size - A2
Accessories - acetate, Cosmic Shimmer Mulled Wine gilding flakes, Cosmic Shimmer Flake and Glitter glue, Impression Obsession frame die

Supplies for card 2:
Stamps - Penny Black holly stamp, Rubber Soul sentiment
Ink - gold
Paper - off white cs, brushed gold shimmer cs
Size - A2
Accessories - Cosmic Shimmer Mulled Wine gilding flakes, Cosmic Shimmer Flake and Glitter glue, MFT pierced dot frame

Friday, 28 March 2025

Paste through a Stencil, Paste without a Stencil

Group of Seven Cardmakers are playing with paste this month.  I made one new card using glitter paste that I coloured with green ink.

I tapped some Rustic Wilderness Distress ink onto my craft mat and mixed in some Nuvo glimmer paste - it has lovely sparkle in it.  I then spread it through a holly stencil on off-white cs.  I kept the card very CAS so that the embossed holly takes centre stage, but I added quite a large sentiment on a banner over a section where the paste went under the stencil.  I finished off with red gemstones on all the berries that were part of the stencil. 

I happened to do a couple of cards using paste recently so I thought I'd repeat them here as they used pastes in two other ways.

This one uses a mixture of pastes to get some interesting varied colour - a rough mixture of black, copper, and white embossing paste. It came out way too dark and too shiny so I then sponged white gesso over it to lighten it and dull it down a bit. I also splattered a bit of the white gesso on it.  See this post for list of supplies and more details.


I mostly use paste through a stencil, but I decided to try a card where I just used paste without a stencil - in this case some Distress Snowfall Grit Paste applied directly to the focal panel to make the snowy ground.  See this post for details.

That's lots more examples from the rest of the Group of Seven design team, and if you're inclined to make a card using paste in some way, please link it up to inspire us with your ideas.

A couple of comments about paste:

1. I decided to check all of my various pastes as I hadn't used a lot of them for a while.  I threw out three pots because they had totally dried out.  They were not nearly as old as my Dreamweaver pastes which I've had for at least 10 years and are still lovely and spreadable.  Sadly Dreamweaver no longer exists.

2. I have a magnetic board and it's one way to hold down cs and stencil but I don't find it as effective as taping the stencil down on the cs.  On the magnetic board, the paste is more likely to go under parts of the stencil.  Or for a very detailed stencil, I recommend Pixie Spray to stick it down really well.


I'm also linking up to Stencil Fun (anything with a stencil goes). 

LOVE to have you SHARE our BADGE


Supplies for the holly card:
Stamps - unknown sentiment
Ink - Versafine Onyx Black, Distress Rustic Wilderness
Paper - off white cs
Size - 5.5" square
Accessories - Memory Box holly stencil, Nuvo Glimmer Paste, red gemstones, stitched banner die


Friday, 28 February 2025

Floating Poinsettia Frame

This month the Group of Seven Cardmakers are trying a technique called Floating Frames.  It's a technique I'd never done before so I watched the two videos we're linking to on Group of Seven.  I ended up following the instructions in the Natasha Foote video as the Jennifer McGuire one called for Press'n'Seal kitchen wrap and I didn't have any. 


I don't buy many stamp and die cut sets but just happened to have bought this one recently.  I stamped the image twice on watercolour paper and coloured it with watercolour paints, then die cut it with the matching die.  I added foam tape to the back and arranged the two die cuts on opposite corners of my focal panel piece of cs.  I trimmed off the parts hanging over the edges.  From those extra parts, I chose bits of them that would fill in the gaps around the edges between the two pieces I'd already stuck down.  I used one of the sentiments from the same stamp set and its matching die and glued that to the centre.

I really like the final effect - the die cuts really do look like they are floating.  But I found it took a long time to make this card so if you're looking for a quick technique, this wouldn't be it.  If I had more stamp / matching die sets, I might try it again, but not if I had to fussy cut images for it!

Head over to Group of Seven and see what the others made in the way of samples, and then give it a try and link your results up with us!

I'm also adding it to the latest NBUS challenge as it's the first time I've used the stamps and dies.


Supplies:
Stamps - Simon Says Stamp Poinsettia Swag set
Ink - Versafine Onyx Black
Paper - watercolour paper, off white cs
Size - 5.5" square
Accessories - watercolour paints, Simon Says Stamp Poinsettia Swag dies, foam tape

Tuesday, 28 January 2025

Dry Embossed Highlights

This month the Group of Seven Cardmakers are doing a technique called Dry Embossed Highlights over Ink Blending.  This works best with the newer 3D embossing folders.  First I tried one using the technique in this video.

I placed a border mask over my focal panel and blended three shades of blue Oxide inks inside the mask.  When dry, I dry embossed it with a snowflakes embossing folder.  I patted with a white pigment ink (but my pad was quite dry so didn't have the best results.  I also tried adding a bit more white with an ink blending tool but ended up getting a bit of the blue ink transferring to the snowflakes outside of the masked area.  I added a white die cut sentiment and three die cut snowflakes, and went around the edge of the focal panel with a blue metallic marker.

I'm also adding this card to The Sisterhood of Crafters "snowflakes" challenge.  And to Can You Handle the Pressure? "Snow".

For the second one, I used the same technique with a few shades of red Oxide ink.  But instead of using white to highlight, I used gold.

 
This poinsettia embossing folder worked better for the technique than my snowflake one did  - I think because it has higher larger raised areas.
 
Head over to the Group of Seven blog to see more examples by the rest of the Design Team, and feel free to try out the technique and link up your card. 


Please Grab Our Badge! Please Grab Our Badge


Supplies for card 1:
Ink - various blue Distress Oxide inks, Adirondack Snow Cap
Paper - white cs
Size - A2
Accessories - SSS snowflake embossing folder, blue metallic pen, Stamplorations sentiment die, Cherry Lynn tiny snowflakes die

Supplies for card 2:
Ink - various red Distress Oxide inks, Delicata Golden Glitz
Paper - white cs
Size - A2
Accessories - Sizzix poinsettia embossing folder, gold metallic pen

Saturday, 28 December 2024

Ombre Sky, Trees, and Stars

This month the Group of Seven Cardmakers is showcasing Ombre as our Design Element.  For my first example, I used ink blending to create a blue sky.  This is the method I've typically used when I think of creating an ombre effect.


I blended various blue Distress inks from light up to dark on coated cs (easier to get a nice blend than on regular cs).  When dry, I stamped the image in archival ink, then coloured the berries with a white gel pen.  I did a little bit of splattering with a white Posca paint pen to give the effect of a few lazy snowflakes drifting down on a cold winter day.  I added a sentiment die cut with an oval die.

On our Group of Seven website we have a couple of videos showing different ways of doing ombre.  I followed the technique in this video for my next card.


I die cut the trees from three shades of green cs and layered them over a dry embossed background, using bits of foam tape to raise each layer off the previous layer.  Then I added a black die cut Santa and sleigh and a black border.

I made one more using the stacked die cuts ombre method.


For this one I used three shades of copper glitter cs and die cut stars out of it and stacked them on top of each other, and then on top of a star embossed background.  In hindsight, I wish I'd cut each word out of a different shade of the cs - but too late!

I'm adding this third card to My Time to Craft's "New" challenge (one of the options is a New Year's card).

Please check out the cards by the rest of the Group of Seven Design Team.  We'd love to have you link up cards using an ombre technique.  It's not a challenge but we all love seeing your ideas or interpretations.  

  My Time To Craft!


Supplies for card 1:
Stamps - Penny Black
Ink - Archival Jet Black, Distress Tattered Glass, Broken China, Stormy Sky, Salty Ocean
Paper - white cs, coated cs
Size - A2
Accessories - white gel pen, white Posca paint pen

Supplies for card 2:
Stamps - SSS sentiment
Ink - Archival Jet Black
Paper - white, black, 3 shades of green cs
Size - A2
Accessories - CuttleBug snowfall embossing folder, Frantic Stamper Santa / sleigh die, unknown trees die, foam tape

Supplies for card 3:
Paper - white cs, 3 shades of copper glitter cs
Size - 4.75" square
Accessories - star embossing folder, Spellbinders star dies, Tattered Lace sentiment die

Thursday, 28 November 2024

Textured Backgrounds Using Die Cuts

The Group of Seven is playing with a technique to get more out of our dies - using die cuts to create a textured background similar to an embossed background.  Because it is tone-on-tone, it is basically faux dry embossing.  Unlike an embossing folder, using die cuts allows you to arrange the embossed sections as you wish.

My first example is simply white-on-white.  I followed this video but simplified it a bit.


I die cut a variety of small stars and glued them to my panel for my faux dry embossed background.  Then die cut the large star three times, twice out of scrap cs and once out of white shimmer cs, and glued them together.  I "hung" it on the card with fine silver thread that I also wrapped around the star.  Added a sentiment die cut with a banner die, and put the whole piece on a matching white card base, and I was done.

For my other example, I followed this video that uses the same technique but with a blended ombre background and a matching ombre piece for the die cutting.

With various green Distress inks, I blended two A2 size panels in an ombre of greens.  Then I die cut the holly from one of them and added it to the same colour sections of the other panel.  I left an open section where I wanted to add my sentiment.  I splattered with a bit of gold acrylic paint and die cut a few gold holly leaves to tie in with the gold die cut sentiment (cut twice and glued together for dimension.  It's on a cream shimmer card base.

It's a fun technique so please give it a try and link your card up over at Group of Seven to add to the inspiration.


Supplies for card 1:
Stamps - unknown sentiment
Ink - Versafine Onyx Black
Paper - white cs, white shimmer cs
Size - A2
Accessories - various small star dies, MFT large star die, banner die, fine silver thread

Supplies for card 2:
Ink - various green Distress inks
Paper - mixed media cs, cream shimmer cs, gold cs
Size - A2
Accessories - Sizzix holly dies, Penny Black holly jolly sentiment die, gold acrylic paint


Saturday, 28 September 2024

Group of Seven Stencil Monoprints

The Group of Seven Cardmakers are playing with the stencil monoprint technique this month.  I tried it with two different mediums - ink pads and mica sprays.

First up using Distress ink pads:


I patted various shades of blue and purple mini Distress ink pads on my star stencil, spritzed with water, and laid it down on watercolour paper, pressing lightly with a rag.  I removed the stencil and patted up any excess watery ink.  I had some areas around the edges without any colour so I sponged the same inks around all the blank edges.

I die cut the Santa and reindeer twice from black cs and glued them together, then added them to the stencil monoprint, along with a sentiment banner.

I wasn't 100% happy with the monoprint as there were some blotchy sections, especially around where the reindeer are - the result of not enough water when I spritzed.  So I decided to try doing one using TH mica sprays, thinking I'd get better coverage on the stencil:


I still got some blotchy sections over on the right but I trimmed the panel down and got rid of most of them.  I used three different colours of mica sprays and got a nice blend of colours.  I added a snow bank and sentiment (die cut from white glitter cs) and two reindeer (die cut from copper shimmer cs and from scrap cs and glued together for more substance).  The card base is the same copper cs as the reindeer.

There are two good videos on the technique here:

Stencil Monoprint by Lee-Ann Cross (6:50)
Stenciling with Brushos by Loll Thompson (2:29)
 
And please head over to the Group of Seven blog to see more samples by the rest of the group.  If you give it a try, we'd love to have you link your card up as inspiration for us and others. 


Supplies for card 1:
Stamps - unknown sentiment
Ink - TH Distress inks (Chipped Sapphire, Faded Jeans, Stormy Sky)
Paper - watercolour paper, white cs
Size - 6x4.25"
Accessories - star stencil, Santa die,

Supplies for card 2:
Paper - watercolour paper, copper shimmer cs, white glitter cs
Size - A2
Accessories - TH mica sprays (Winter Frost, Fresh Balsam, Frosted Juniper), TCW tree stencil, SSS stitched slopes die, TH reindeer and joy die

Wednesday, 28 August 2024

Vellum Three Ways

The Group of Seven Cardmakers are focusing on vellum with embossing (dry, wet, or heat) this month.  I've chosen to only use dry and heat.

My first card is just a simple embossed frame on my piece of vellum, with the texture of the embossing remaining quite subtle.

I love this embossed snowflake frame - I have so many stamps that will fit in it.  I used quite a heavy weight vellum as it takes the embossing folder better.  I stamped the bird and sentiment on the front of the embossed piece, and then coloured it on the back with alcohol markers.  I added the whole panel to a double sided adhesive sheet in order to adhere it to the card base.

This next card is my favourite of the three.  Again it uses an embossing folder but by colouring it on the back with Distress inks, I was able to make the embossing show up more.

Again I used a heavy weight vellum.  But this time I used a 3D embossing folder and I had some cracking around the edges.  So trimmed the panel down to get rid of the cracked sections.  I sponged on the back of it with two shades of blue Distress inks - the raised parts of the vellum on the front remain uncoloured so really stand out.  To get more of the translucent feel of the vellum, I die cut the pierced frame die four times, glued three of them together and put the vellum panel on top of them, and then topped it with the fourth die cut - this made the vellum stand up more from the card base.  I added a tiny sentiment, stamped and die cut with a tiny tag die.

My third card uses heat embossing on the vellum.

I ran the vellum through a corner embossing folder and then rubbed lightly over the raised parts with Versamark.  I added sparkly white embossing powder, got my heat tool warmed up and then moved it quickly back and forth over the vellum.  I stamped the sentiment and used the same embossing powder on it.  I cut a frame for it with two rectangular dies out of white glitter cs.  When I first put it against a white card base, the embossing just disappeared against the white so I end up backing the vellum panel with a bit of grey/beige cs to provide some contrast with the white heat embossing.  Then when I put it against the white card base, there was too much contrast.  So I ended up going with a card base made from cs that's colour is called "chalk".

Head on over to the Group of Seven Cardmakers blog to see more examples from the other members and links to some instructional videos covering these techniques.  And feel free to try them yourselves and link up your card to Group of Seven for more inspiration for everyone.


Supplies for card 1:
Stamps - Nellie Snellen bird, SSS sentiment
Ink - SSS Intense Black
Paper - vellum, off white cs
Size - A2
Accessories - Ultimate Crafts snowflake frame embossing folder, alcohol markers, double sided adhesive sheet

Supplies for card 2:
Stamps - Rubber Soul let it snow
Ink - Distress Faded Jeans and Chipped Sapphire
Paper - vellum, white cs
Size - A2
Accessories - SSS 3D snowflake embossing folder, tiny tag die, MFT pierced rectangle frame die

Supplies for card 3:
Stamps - Hero Arts sentiment
Ink - Versamark
Paper - vellum, grey/beige cs, chalk cs, SU white glitter cs
Size - A2
Accessories - Cuttlebug snowflake swirl corner embossing folder, Judikins white diamond embossing powder, Spellbinders rectangle dies


Sunday, 28 July 2024

Christmas Kaleidoscope

The new Group of Seven Cardmakers' technique is something that our member, Darnell, is calling Kaleidoscope Technique.  We were inspired by this card of Jenny's (My Paper Epiphany).  Here's my interpretation:


I stamped the Pink Fresh background stamp with Versamark and heat embossed in gold.  Then watercoloured the image.  It was supposed to be loose watercolouring but I'm just no good at that so ended up watercolouring in my usual traditional way of staying inside the lines!!  Then cut the panel into 1/2" wide strips and played around with rearranging them out of order and deciding what I wanted the card to look like.  I decided to have a vertical sentiment so stamped it and heat embossed it in gold.  Then I glued two strips to the left hand side of it and four to the right.  I felt the card needed a little something else so I found an "encrusted jewels" star that was the same shade of gold in my UFO box and added it.  Here's a close-up of the star:

If you want information on how I do the encrusted jewel technique, see this post on my blog.

There are lots more examples of the Kaleidosope Technique over at Group of Seven Cardmakers from the rest of our members.  If you decide to try this technique, we'd love to have you link up your card for more inspiration for everyone.


Supplies:
Stamps - Pink Fresh background stamp, Impression Obsession vertical sentiment
Ink - Versamark
Paper - watercolour paper
Size - A2
Accessories - Ranger Princess Gold embossing powder, watercolour paints, star die, glitter