A blog devoted to the cards I make in my tiny upstairs space. When my sister stays there, she calls it an "artist's garret". I'm not an artist, but am an enthusiastic cardmaker - hence the title "Cardmaker's Garret".
___________________________________________________________________________________________
Showing posts with label window. Show all posts

Saturday, 3 August 2024

A Star in a Window

The Peace on Earth challenge always inspires me with its mood boards.  This time I was inspired by the top right image (see the mood board at the end of this post).

I created the star using the Encrusted Jewels technique.  I die cut the star from thin chipboard, then placed it on a warm grill on top of a layer of non-stick craft mat then parchment paper.  I sprinkled it with gold embossing powders.  Once they had melted, I added chunky gold glitter and tiny star glitter on top.  The melted embossing powders holds the glitter in place.  To finish it off, I melted UTEE (Ultra Thick Embossing Enamel) on top. 

I die cut the window three times - twice out of scrap cs and once out of light grey cs and glued them together.  I die cut the pine branch out of a piece of smooshed green background that I had in my box (and again out of scrap and glued them together).  I put everything together, with a bit of gold cord to hang the star from the branch and a sentiment on a banner.
  
Here's the mood board:

We'd love to have you join us, whether you're inspired by the mood board or choose to make an "anything Christmas" card.  That's lots more inspiration from the rest of the Peace on Earth Design Team.


Supplies:
Stamps - unknown sentiment
Ink - Versafine Onyx Black
Paper - white and light grey cs, lightweight chipboard
Size - A2
Accessories - small Spellbinders star die, TH branch die, Memory Box window die, gold embossing powder, UTEE, chunky gold glitter, tiny gold stars

Wednesday, 31 January 2024

Valentines, Houses, and Berries

Sneaking in under the wire with a Valentine card for Festive Friday "Valentine's Day" (I chose red, hearts, and a love sentiment out of their required elements list) and the Tic Tac Toe challenge (I chose the left hand vertical row of heart, red, and die cut).  I'm adding it to the AAA CAS Valentine challenge as well. 

I found the die cut heart that had text stamped on it in my UFO box. It's leftover from this card made back in 2022. So I decided to turn it into a Valentine for this year.

I dry embossed a strip of hearts across the card base, layered the heart on it, added a die cut sentiment, and a small matching solid red heart to the centre of the big heart.

And also sneaking under the wire with a Christmas card for the Jingle Belles challenge "Something Old ... Something New".  I have a very old window die and some old little snowflake dies combined with some new house dies.

I die cut the window out of cream cs and glued it to a white cardbase. I die cut the snowflakes and houses out of kraft cs and smooshed them into some brown Distress inks smeared on my craft mat. Added them to the card along with a stamped sentiment.

And today I have a Threefer so that I can sneak in under the wire once more.  This time it's for My Time to Craft Christmas "Berries".  I'm also adding it to the ABC Christmas challenge "B is for Berries".

It seemed a great opportunity to use up some berry-covered dp.  I paired it with an image that also has some berries on it.  I coloured the image with watercolour paints and cut my focal image with a circle die.  I cut a slightly larger circle out of a shimmer cs that's the closest colour I had to the stems in the dp and the leaves in the image for a border. 


My Time To Craft Christmas!


Supplies for card 1:
Stamps - Wendy Vecchi script background stamp
Ink - Memento Rhubarb Stalk
Paper - white and dark red cs
Size - A2
Accessories - Memory Box heart dies, Poppy Stamps sentiment die, SU hearts embossing folder

Supplies for card 2:
Stamps - SU cardinal, SSS sentiment
Ink - Versafine Onyx Black, Distress Speckled Egg
Paper - watercolour paper, dp, off white and shimmery light green cs
Size - A2
Accessories - watercolour paints, Spellbinders circle dies

Supplies for card 3:
Stamps - PB sentiment
Ink - Distress Frayed Burlap, Walnut Stain, and Gathered Twigs
Paper - kraft, white, and cream cs
Size - 5.25" square
Accessories - Charlie und Paulschen house dies, PB tiny snowflake dies, Memory Box
window die


Thursday, 18 January 2024

A Pop of Red and Frosted Windowpanes

The Paper Players have a colour challenge - "Black, White, and a Pop of Colour".  I chose red for my pop of colour.


A very CAS card - stamped the image, coloured the heart with a red marker, trimmed with a wonky stitched die, bordered with red cs, and popped up on fun foam.
 
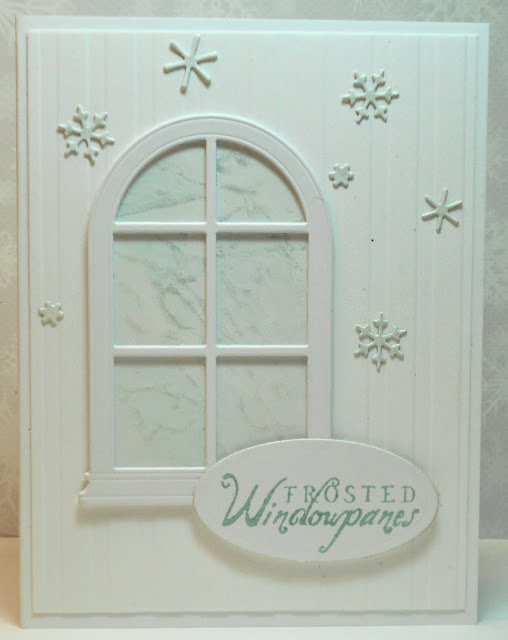
Then for The Sisterhood of Crafters "Icy Cold", I created a windowpane like the ones from my childhood in eastern Canada - we only had single glazed windows and they'd get covered in frosty ice during the frigid cold winter days.
 

I sprinkled very pale blue Magicals on coated cs and spritzed with water and let the colour run.  When dry, I went over some of the "veins" in the colour with Wink of Stella to increase the icy look.  I set it behind a window die, cut twice and glued together for more dimension, added that to a background of cs (embossed with vertical lines), added the sentiment (stamped and then die cut with an oval), and finished with a few small snowflakes die cut out of the leftover "frosty" panel.

It was hard to photograph so here's another view with different lighting that brought out more of the pale blue Magicals:


Remembering those cold eastern winters makes me appreciative of living in the more moderate climate of Vancouver, though we've just had a cold snap of days below freezing followed by quite a big dump of snow!

  Please Grab Our Badge!


Supplies for card 1:
Stamps - Penny Black image, PTI sentimen
Ink - Archival Jet Black
Paper - white and red cs
Size - A2
Accessories - red marker, MFT Wonky stitched rectangle die, fun foam

Supplies for card 2:
Stamps - Impression Obsession sentiment
Ink - Distress Speckled Egg
Paper - white cs, coated cs, pre-embossed white cs
Size - A2
Accessories - small snowflake dies, pale blue Magicals, Wink of Stella, Memory Box window die, Spellbinders oval die

Saturday, 16 September 2023

Reindeer Through a Window

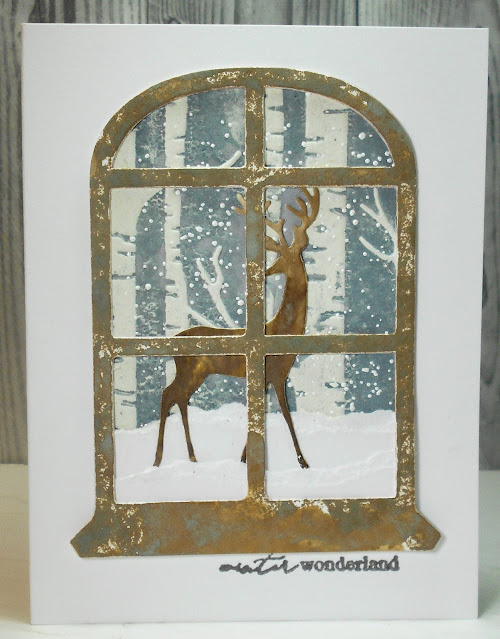
As soon as I saw the mood board for the new Peace on Earth challenge, I knew what I wanted to do for my Design Team card.  I was completely inspired by the upper left image (see the mood board at the end of the post).  Here's my card:


I took my birch trees embossing folder and rubbed over the debossing side with Weathered Wood Distress ink and then used a piece of chalk coloured cs to emboss my background.  The Weathered Wood ink transferred really well and the chalk colour of the cs made more natural looking birch trees than stark white cs would have.  I sprinkled some Chunky Frantage white embossing powder on it and heated from underneath to create the falling snow.

I die cut the window out of white cs and then smooshed it into Frayed Burlap Oxide ink and then again into a tiny bit of Ground Espresso.  I left some white spots as I wanted a really rustic looking window.  I die cut a second window and glued the two together for more dimension.

With the leftover Ground Espresso on my craft mat, I smooshed a scrap of white cs and then die cut the reindeer from that.

I tore two strips of white cs for the snowy ground and stuck it to the birch tree background, along with the reindeer.  Then trimmed the background to fit behind the window and glued the window on top of it all.

The stamped sentiment says "winter wonderland" - I think I over-inked it as I didn't get a very clear impression from the stamp.

We'd love to have you join us at Peace on Earth.  There's lots of inspiration from the mood board and the rest of the Design Team, but you can just link up an "anything Christmas" card if you prefer.

   Our Blog Badge

I'm also linking my card up with Can You Handle the Pressure "A Twist of Trees" and with the NBUS Challenge - I'd never used the reindeer die before.  One of my commenters kindly invited me to add my card to The Holly and Ivy Christmas "Anything Goes" Challenge as well.

Please Grab Our Badge  Grab our badge to display on your blog. The Holly and Ivy Christmas Challenge


Supplies:
Stamps - PB sentiment
Ink - Distress Oxide Ground Espresso and Frayed Burlap, Distress Weathered Wood, Versafine Clair Morning Mist
Paper - white and chalk cs
Size - A2
Accessories - Spellbinders window die, TH reindeer die, SU embossing folder, Stampendous Chunky Frantage white embossing powder

Thursday, 4 May 2023

A Window and Some Dogs in a Boat

Addicted to CAS wants to see a window.

 
I found a bit of leftover background (probably smooshed with various Distress inks) in my UFO box. I stamped the Magenta stamp onto it (the sentiment is part of the stamp) in brown, trimmed it down to fit behind a die cut window (cut twice and glued together for more dimension), and popped it up on fun foam.
 
And Penny Black Saturday Challenge wants to see something funny.  I created my own humorous sentiment for it.


I made this card for my niece who has a wonderful English bulldog called Norman. Norman's favourite thing to do is sleep so this image is totally perfect as the bulldog is asleep while all his friends enjoy their boat ride.

I typed and printed a sentiment to fit the scene. Watercoloured the image, bordered with navy cs that I trimmed with my deckle trimmer.


Supplies for card 1:
Stamps - Magenta
Ink - Archival Acorn
Paper - white cs, scrap of a background
Size - A2
Accessories - Memory Box window die, fun foam

Supplies for card 2:
Stamps - Penny Black
Ink - Archival Jet Black
Paper - watercolour paper, white and navy cs
Size - A2
Accessories - computer generated sentiment, watercolour paints, TH deckle edge trimmer


Saturday, 19 February 2022

Window with Greenery

Time for another Peace on Earth Christmas card challenge!  Here's my card, inspired by the mood board:


I had some scraps of cs that I'd sprayed with various green sprays and I thought they'd be perfect for die cutting some little pieces of greenery.  I also die cut the window and window box (with second die cuts glued behind the top ones to give more dimension).

I glued a scrap of dp behind the window, glued the greenery under the window box, and added it all to a rustic wood embossed background.  A tiny sentiment on the window box finished it off.

Please come and join us at the Peace on Earth challenge before March 3rd.   Here's the lovely mood board - needless to say, I was inspired by the bottom left image.  Being inspired by the mood board is optional - it's an anything Christmas goes challenge.


Supplies:
Stamps - SSS sentiment
Ink - Distress Peeled Paint
Paper - white cs, scrap of dp
Size - A2
Accessories - Memory Box window and window box dies, TH greenery dies, various green sprays, Cuttlebug embossing folder

Monday, 29 March 2021

An Inspired Window with a Wreath

I was looking at the SCS Inspiration Challenge on the weekend and saw an image that immediately inspired this card:


The inspiration was from a Pinterest page for a company called HomeBNC.  Here's the photo that inspired me:

Here are the steps for creating my card:
 

I took a piece of wood grain cs and lightly rubbed Frayed Burlap Distress ink over it to make the wood grain show up more.

I die cut the window twice and glued them together for more dimension and painted patches of Hickory Smoke Distress ink on the top one to give it a more rustic aged look.

I created the wreath by die cutting a thin circle and punch many pine branches with the old Martha Stewart punch out of various dps that were mostly green. I glued them to the circle, added it to the window, and added a few white pearl embellishments.

I finished with a vertical sentiment stamped in Hickory Smoke on a narrow strip edged with more Hickory Smoke ink.


As well as the SCS challenge, I'm adding it to:

52 Christmas Card Throwdown - Wood Background


Supplies:
Stamps - Rosie's Roadshow sentiment
Ink - Distress Frayed Burlap and Hickory Smoke
Paper - wood grain and white cs, various green dps
Size - 6.25x3.25"
Accessories - Martha Stewart pine branch punch, window die, pearl embellishments

Wednesday, 29 January 2020

New Chickadees

The current Jingle Belles Challenge is "Look What Santa Brought Me" - in other words, use something new that we got for Christmas or in the sales.


I love bird stamps as many of you know! 

I stamped and added some subtle colouring with watercolour paints and then did the berries with a red marker.   This beautiful chickadee stamp is called Stained Glass Birds.  I didn't colour it as if it were stained glass but I layered a piece of acetate over it to make it seem to be a window (that's why there is inconsistent definition in the photo - light was bouncing off the acetate).  I added a red frame over top to hold the acetate in place and to match the berries.

I'm looking forward to colouring it more as a stained glass window next time.

Thanks for stopping by today!


Supplies:
Stamps - Magenta Stained Glass Birds
Ink - Archival Jet Black
Paper - mixed media cs, red and white cs
Size - 4.75" square
Accessories - watercolour paints, red marker, Spellbinders square dies

Sunday, 11 February 2018

Birds at a Frosty Window

I've been wanting to enter the Craft Stampers challenge and finally made a card that I think is worthy of linking up.

I found inspiration at the Merry Monday Christmas challenge:


I immediately thought of the little Penny Black birds that I love so I made this card:


I die cut the window and placed first a layer of acetate and then a little scrap of dp behind it.

I die cut two branches and the word "joy" and glued them onto the panel overlappeing the window with the branches.  I added some Martha Stewart glitter paste on the bottoms of the window panes and rubbed a tiny bit of it onto the branches.

I stamped, watercoloured and fussy cut the birds, placed them on the lower branch, and added some Aleene's paste to the brims and pom poms of their hats.

So glad I got it finished in time for Merry Monday!  And happy to be adding my card to the Craft Stampers challenge.


Supplies:
Stamps - Penny Black birds
Ink - Archival Jet Black
Paper - red, green, and white cs, watercolour paper, scrap of dp
Size - A2
Accessories - Memory Box window die, Tim Holtz branch dies, Inktense watercolour pencils, Martha Stewart snow paste, Aleene's paste, scrap of acetate, Tim Holtz joy die


Wednesday, 2 August 2017

Frosty Window

I hate to be thinking that it is the beginning of August and we are halfway through a beautiful summer, so the last think you'd think I'd want to do is think about frosty windows!  But this month's CAS Watercolour challenge is "salt":


The salt technique lends itself so well to winter / snow / Christmas types of cards.

I love frost, and I love the patterns it makes on windows.  Here's my card:


I took piece of watercolour paper and spritzed it with water, then did a very wet wash with some liquid silver watercolour paint given to me by Loll Thompson.  I sprinkled on quite a bit of kosher salt and let it dry overnight.  When I brushed the salt off the next morning, I had a lovely frosty look.

I die cut the window three times to get dimension, glued them together, then taped a piece of scrap acetate to the back, and then taped the salty piece to the back of that.

The sentiment is stamped and heat embossed in silver, and then its panel is die cut with a stitched rectangle and popped up on the cardbase on fun foam.  I realized when it was all put together that the stitched rectangle is a different shade of white cardstock but could not bear the thought of pulling it all apart and changing it, so decided I like the contrast it gives.

The above photo does not do the silver paint / salt piece justice.  Here's a close-up that hopefully shows the frosty shimmer it has:


I originally made the card with a piece done with blue watercolour paint and salt, but after putting it together, just looked at it and thought "frosty windows are not bright blue" so started again to make the one above.  But I do like my blue paint / salt piece and will either sell it or send it to someone, so here's a peek at that card:


I like it because I love blue and white, but really like the monotone one as it really does make me think of waking up on a winter morning when I was a child in Ontario and our old single pane windows would be all silvery with frost.

Be sure to come and join in with something you've made using a salt and watercolour technique.  There is lots of inspiration from the rest of the CAS Watercolour Design Team and our August Guest Designer, Ros (of Mikey'sMom blog), and from the videos linked up at the challenge.  Please be sure that your card is clean and simple, and link up by August 24th!


Supplies:
Stamps - Impression Obsession sentiment
Ink - ColorBox Silver
Paper - white cs, watercolour cs
Size - A2
Accessories - Memory Box window die, silver liquid watercolour paint, kosher salt, silver embossing powder, Lil Inkers stitched rectangle, acetate, fun foam


Friday, 30 December 2016

New Moon Through a Window

I like doing the SCS Ways to Use It challenges but was too busy with Christmas baking last week to do the "Windows on the World" challenge so combined it with this week's "A New Moon" challenge.


The trees are stamped and heat embossed, and at the end I put some Rock Candy glitter on the snowy parts.

I made the moon mask by cutting a small Spellbinders circle and then recutting it with the die moved over to get a crescent shape.

Then I sponged the sky, leaving it lighter where the moon would cast some light.

I cut two of the windows and glued them together for substance. And used a dp as "wallpaper".

I've stamped "Happy New Year" inside so will send it to a friend I didn't send a Christmas card to.


Supplies:
Stamps - unknown tree stamps
Ink - Versafine Olympia Green; Distress Faded Jeans, Chipped Sapphire, and Dusty Concord
Paper - white cs, Recollections dp
Size - A2
Accessories - Memory Box window die, clear embossing powder, Rock Candy glitter