A blog devoted to the cards I make in my tiny upstairs space. When my sister stays there, she calls it an "artist's garret". I'm not an artist, but am an enthusiastic cardmaker - hence the title "Cardmaker's Garret".
___________________________________________________________________________________________
Showing posts with label gesso. Show all posts

Monday, 29 January 2024

Winter Wonderland and a Single Snowflake

I chose a lovely winter village scene for Sparkles Christmas Challenge "Winter Wonderland".


The image is coloured with plain old inexpensive watercolour paints - they aren't as vibrant as a lot of the newer watercolour mediums but I think the softness suits the wintery scene. I added glitter to all the rooftops and trees and along the snow lines. I cut the image out with an oval die and bordered with dark silver cs.

Christmas Cards All Year Round has an image of a Christmas sweater with one large gold snowflake on the front of it.  It inspired me to make this card with a gold snowflake.

I started by using gesso to stencil the snowflake on black cs to create a resist for my stamping, then stamped the Christmas script background stamp over it in white. I replaced the snowflake stencil and sponged gold ink through it quite lightly so that some of the white gesso showed through.  I trimmed the panel and popped it up with fun foam on a platinum shimmer card base.

Please take a copy of our badge  Grab our badge!


Supplies for card 1:
Stamps - Art-Kure Castle Combe Village, SU sentiment
Ink - Versafine Onyx Black
Paper - watercolour paper, dark silver and natural cs
Size - A2
Accessories - watercolour paints, SU label punches, Nesties oval dies, dimensionals, glitter

Supplies for card 2:
Stamps - text background stamp
Ink - gold and white ink
Paper - black cs, platinum shimmer cs
Size - 4.75" square
Accessories - snowflake stencil, white gesso, fun foam

Monday, 4 December 2023

A Sad Card and Two Christmas Cards

First of all today, for Festive Friday "International Animal Rights Day", a dog sympathy card to have on hand. 


For Festive Friday, you have to choose at least 3 things from their list - I chose animal, supportive sentiment, texture (the embossing folder), neutral colours, and animal patterns (the paw prints).

I did a letterpress technique on the embossing folder by running dark grey ink over the raised area of the folder before embossing.  The dog and the sentiment are stamped in black.  The condolences sentiment is inside the card.

Next up, Can You Handle the Pressure? challenge wants dry embossing with a twist of Christmas, and Shopping our Stash "Splish Splash" (use a water medium - I used Magicals, a powder that is activated with water).  My best friend always asks me to make her several Christmas cards with a dove / peace theme.


The background was made with the embossed toilet paper technique.  I layered 5 squares of toilet paper, misting with water in between each one and again on the top layer.  I placed it inside a script embossing folder and ran it through my Cuttlebug.

Then I took a piece of mixed media cs, sprinkled it with Magicals and spritzed with water.  When dry, I stamped and heat embossed the dove on it and then fussy cut.  The sentiment was die cut out of the same piece.  I created a frame with a pierced die, cut twice and layered for more substance.  I find using a frame of some sort over a toilet paper background prevents the edges from coming apart.

The embossed toilet paper has a wonderful feel of homemade paper.  For more ideas for using it, see this video and this tutorial.

For both this card and the first one, I used some cs I bought at a paper outlet.  I don't know what brand it is but the colour is labelled "chalk" - it's a great neutral colour.  I have a big pack of it so I'm sure it will show up often!

A threefer today!  For AAA Cards Challenge "Black, White, and Gold" and My Time to Craft Christmas "Snowflakes":

I started by using gesso to stencil the snowflake on black cs to create a resist for my stamping, then stamped the Christmas script background stamp over it in gold. I replaced the snowflake stencil and sponged gold ink through it.  I splattered with a bit of white acrylic paint and trimmed the panel.  I stamped and heat embossed the sentiment in white on vellum and wrapped it around the panel, then popped the panel up with fun foam on a gold shimmer card base.

  Please Grab Our Badge 

    Grab Our Badge!   

My Time To Craft Christmas!


Supplies for card 1:
Stamps - SU dog, Technique Junkies sentiment
Ink - SSS Intense Black, Versafine Clair Morning Mist
Paper - chalk cs
Size - A2
Accessories - Spellbinders rectangles, unknown embossing folder

Supplies for card 2:
Stamps - unknown dove stamp
Ink - Versafine Onyx Black
Paper - toilet paper, chalk cs, mixed media cs
Size - 5.25" square
Accessories - Sizzix embossing folder, blue Magicals, clear embossing powder, MFT pierced square frame, TH peace die

Supplies for card 3:
Stamps - unknown Christmas script stamp, Stampabilities sentiment
Ink - gold and white ink
Paper - gold shimmer cs, black cs, vellum
Size - A2
Accessories - snowflake stencil, gesso, white embossing powder, white acrylic paint, fun foam


Tuesday, 22 August 2023

A Christmas Tree with Holly Background and a Stencilled Snowflake

Vancouver has watering restrictions as we've had such a dry summer - we are no longer allowed to water our lawns so I have a very brown lawn.  I'm making up for that lack of green with a very green card today.

I went with a green card base, a focal panel background created with a stencil monoprint of holly, and a smooshed green die cut tree.  I also die cut the tree out of white cardstock and glued them together for more dimension and slightly offset to give a bit of a line of snow on the branches.  Embellished with a silver star on top and off it goes to Jingle Belles and My Time to Craft Christmas who both want to see Christmas trees.  

My Time to Craft Christmas has a sister challenge, My Time to Craft, and it wants stencilling on a card.  So I kept going with Christmas cards and stencilled a snowflake on this card:

I started by using gesso to stencil the snowflake on black cs to create a resist for my stamping, then stamped the text background stamp over it.  I replaced the snowflake stencil and sponged Distress Speckled Egg ink over it to add colour to the snowflake.  I die cut the pierced frame die twice and stacked them for more dimension and embellished with stick-on pearls.


 My Time To Craft Christmas!

My Time To Craft!


Supplies for card 1:
Ink - various green Distress inks
Paper - white and dark green cs
Size - A2
Accessories - Sizzix holly embossing folder, unknown tree die, silver star

Supplies for card 2:
Stamps - unknown text stamp
Ink - Distress Speckled Egg
Paper - black and cream cs
Size - 4.75" square
Accessories - snowflake stencil, gesso, MFT pierced square frame die, blue pearls

Saturday, 5 November 2022

Inspired Robin and Background

For the new Peace on Earth challenge, I was totally inspired by the mood board (see below, the top right image).  I immediately thought of a stamp I have of a robin sitting on a holly branch.  And I wanted to recreate the snowy grey background.


I started by stamping the image and watercolouring it.  I then stamped it again on masking paper, fussy cut it, and masked the watercoloured image.

My crafty Zoom group did a technique recently where we made backgrounds by using gesso through a stencil to create a resist.  This is one of them.  I made a stencil by using a die of multiple small snowflakes.  I laid the stencil over my panel and went over it with white gesso.  This created a faint resist of small snowflakes.  I sponged with two shades of grey blue ink.  I removed the mask from the bird and holly and splattered with a bit of watered down gesso.

I added a few snowflakes die cut from the same die I used to create the stencil and a die cut sentiment.  And finished off by going over the snow on the branch and holly with a quickie glue pen and some glitter (sorry - it's hard to see the sparkle in the photo).

Here's the Peace on Earth mood board that inspired me:


Please come and join us at Peace on Earth.  You can either be inspired by the mood board or enter an "anything Christmas goes" card.

I'm also entering it in Sparkles Christmas Challenge "Festive Things with Wings".

And the Winter Wonderland Challenge "Robin Redbreast".


Supplies:
Stamps - Penny Black
Ink - Versafine Onyx Black, Altenew Arctic, Archival Pearlescent Ice Blue
Paper - watercolour paper, off white cs
Size - A2
Accessories - watercolour paints, masking paper, white gesso, glitter, Spellbinders Noel die, Cheery Lynn snowflakes die

Monday, 3 October 2022

Snowy Trees

The ABC Christmas Challenge wants to see S for Snow and T for Trees.  Here's my card:

I created a background by sprinkling various blue Brushos on my craft mat and spritzing with water, then pouncing mixed media cs into it till I was happy with the result. I let it dry then splattered a bit of white gesso on it for snow in the sky. Added a die cut white tree line, sentiment, and a gold star and popped the panel up on fun foam for dimension.

ABC Christmas Challenge


Supplies:
Stamps - A Muse sentiment
Ink - blue ink
Paper - mixed media cs, gold shimmer and white cs
Size - A2
Accessories - various blue Brushos, white gesso, Memory Box star die, tree line die, fun foam

Saturday, 1 October 2022

Inspired Snowflake

Inspired by the Peace on Earth mood board (see below), I created this card:

I started by using gesso to stencil the snowflake on black cs to create a resist for my stamping, then stamped the text background stamp over it.  I replaced the snowflake stencil and sponged Distress Speckled Egg ink over it to add colour to the snowflake.  Popped the panel up on fun foam on an icy blue card base and added a die cut sentiment.

Here's the Peace on Earth mood board.  I wanted to capture the single snowflake and the black and icy blue/grey colours of the top right image.


Please come and join us at Peace on Earth.  You can enter an "anything Christmas" card or you can be inspired by the mood board.  There's lots more inspiration from the rest of the Design Team!


Supplies:
Stamps - unknown text / snowflake background stamp
Ink - Distress Speckled Egg
Paper - black and icy blue cs
Size - 4.75" square
Accessories - snowflake stencil, gesso, fun foam, Spellbinders Noel die

Saturday, 5 March 2022

Wreath on a Brick Wall

My goodness, the weeks are flying by!  It's already time for a new Peace on Earth Challenge.  Here's my card to help inspire you to get another Christmas card made.


I created the wreath by die cutting a small ring using two circle dies, one slightly larger than the other.  Then I used the good old Martha Stewart pine branch punch and punched many branches out of various dp that have grass on them (made for scrapbooking themes on various sports) - there is really nice colour variation in them that makes the wreath more pleasing to my eye than just plain green.  I glued the branches to the die cut ring, overlapping them as I went.

The background is a piece of dp printed with grey and brown bricks.  It was too vibrant in colour for the wreath so I went over the dp with a thin coat of white gesso to mute the colours.  It also makes it look more like the inspiration I chose from the inspiration board (see below).

I stamped a small sentiment on the dp, glued on the wreath, mounted the dp on fun foam, added it to the card base and finished off by adding a bunch of tiny red stick-on pearls for berries.

Here's the Peace on Earth inspiration board for this challenge:

Peace on Earth is an "anything Christmas goes" challenge so you don't have to be inspired by the inspiration board unless you want to be.  Please come and join us!


Supplies:
Stamps - Simon Says Stamp tiny sentiment
Ink - Versafine Clair Fallen Leaves
Paper - white cs, various dp with grass images, brick wall dp
Size - 4.75" square
Accessories - Martha Stewart pine branch punch, red stick-on pearls, Spellbinders circle dies, white gesso, fun foam

Monday, 6 December 2021

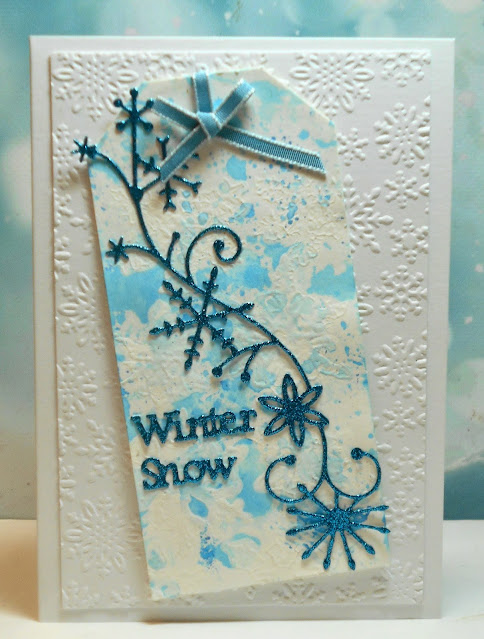
Winter Snow

For the Tic Tac Toe Challenge, I picked "Snowflakes, Free, and Winter" for this card:


The tag was an experiment in doing a gesso resist - I spread gesso through a snowflake stencil onto a tag and then smooshed the tag into blue Distress oxide inks. I didn't get a clear snowflake pattern as the inks coloured some of the gesso, but I like the splotchy look of the tag.

I added a glitter cs snowflake flourish and two word die cuts to the tag, and added it to an embossed background. Finishing touch - a little blue bow.

Tic Tac Toe Challenge - I chose the vertical centre row - Snowflakes, Free, Winter.


Supplies:
Paper - white cs, tag, blue glitter cs
Size - 6x4.25"
Accessories - Embossalicious snowflake embossing folder, white gesso, snowflake flourish die (Memory Box?), Tattered Lace word dies, blue ribbon, snowflake stencil

Thursday, 11 April 2019

Brightly Lit Windows

I'm sneaking in under the wire for the Less is More challenge:


I went with a Christmas card and electric light, showing all the windows in the houses lit up with light on a cold winter's evening.


My sky was created by putting gesso through a snowflake stencil to create a resist and then using a variety of blue, pink, and mauve sprays to create a wintry sky. Unfortunately the gesso absorbed some of the colour.

I then die cut the village and taped it over the sky panel, and then used a white card base with stamped sentiment. As a final touch, I went over the windows with a gold gel pen as if all their lights were on.


Supplies:
Stamps - Make an Impression sentiment
Ink - Vivid Sky Blue
Paper - white cs
Size - A2
Accessories - various blue, pinky, and mauve sprays; snowflake stencil, gesso, AE village die, gold gel pen


Tuesday, 21 November 2017

A Flexible Card

The Jingle Belles Christmas challenge this week is "Thankful for the Holidays" - either an obvious post-Christmas thank you card or one that could be quickly turned into a last minute Christmas card if needed or be saved for after Christmas.  I went with the second option as I never know when I'll run out!


I made the background piece by stamping a text stamp on a piece of tissue paper (after stamping off once), then spraying with various green sprays. I dried it with my heat tool, allowing it to wrinkle. I then glued it to white cs with matte medium. When dry, I applied white gesso with a palette knife on just the raised areas created by the wrinkling.

I trimmed the panel, bordered it with white, and added it to a green card base.

I die cut the tree, the deer, and the word "winter" twice and glued them together for more dimension. I glued them to the background panel, allowing the tree to overhang.

I figure "winter" is generic enough that it could be either a Christmas card or a post-Christmas thank you card.


Supplies:
Stamps - Inkadinkado text stamp
Ink - Memento Tuxedo Black
Paper - white and green cs, tissue paper
Size - A2
Accessories - varioius green sprays, gesso, Tim Holtz multi matte medium, Impression Obsession tree die, Penny Black deer die


Thursday, 13 July 2017

Gesso and Distress Oxides Done Correctly!

In my post yesterday, I showed a card I made where I didn't quite follow the instructions for Brenda's great technique at Country View Crafts.

Here's yesterday's card so that you have it here for comparison:


And here's the version I did after realizing that we hadn't read Brenda's instructions properly:


As you can see, I didn't lose all the lovely colouring layering from the Oxide inks in this version.

I used the same two shades of blue Oxides to smoosh the background and dried between layers, and then watered down some gesso on my craft sheet and smooshed the panel into it a few times, drying between each time.  The big difference between today's and yesterday's version is the smooshing of the gesso instead of painting it on like a wash.

I then stamped the wildflowers, using the MISTI and spritzing before stamping.  I stamped and heat embossed the sentiment.  This time I used blue glitter cs for the die cut. 

The gesso tones down the Oxide colours and gives a nice vintage feeling.  Here is the background panel, with just the Oxide smooshing:


And here it is with the gesso smooshing over it:


It's even more effective in true vintage tones of pinks, browns, etc. but I needed a birthday card for one of my sisters who loves blue as much as I do!


Supplies:
Stamps - Tim Holtz wildflowers, Memory Box sentiment
Ink - Distress Oxide Salty Ocean, Peacock Feathers, and Faded Jeans
Paper - mixed media cs, white cs, blue glitter cs
Size - A2
Accessories - Tim Holtz wildflower die, gesso, clear embossing powder, fun foam


Wednesday, 12 July 2017

Gesso and Distress Oxides

Loll Thompson hosted a few of us for a fun day of crafting on Sunday and one of the things we wanted to try was this technique Brenda posted on Country View Crafts.  Loll and I were looking at the instructions as we went along, and you'd think, being two educated adults, we'd be able to read and follow instructions well, but we just rushed ahead picking up odd details.  Needless to say, our results didn't look like Brenda's!

We did the smooshing with Oxide inks really well as we've done that before and ended up with great backgrounds.  What we did wrong was to read the next step as making a wash with gesso and water, and brushing it over the whole panel.

We ended up with kind of murky chalky pieces but went ahead and stamped our images on them.  Here's my finished card:


It's a pretty enough card but I lost all the lovely colour layering from the Oxide inks.

The flower stamps were inked up with Distress markers, using a MISTI, then spritzed with water and stamped on the background - I repeated the process to get a bit more detail.

The wildflower die was cut out twice and glued together for more dimension, and coloured with the same Distress markers.  I went over it with Wink of Stella for a bit of sparkle.

I kept the sentiment muted so as not to take away from the busy flower layers.

When I got home that night, I re-read Brenda's instructions and realized we'd done the gesso wash wrong.  So made another card doing it correctly, using the same colours, die, etc..  Come back tomorrow to see it - this blog post is already long enough!


Supplies:
Stamps - Unity "Insightful Meadows" flower, Rosie's Roadshow sentiment
Ink - Distress Oxide Peacock Feathers and Salty Ocean
Paper - mixed media and white cs
Size - A2
Accessories - Tim Holtz wildflower die, Tim Holtz blue and green markers, gesso, Wink of Stella, fun foam