A blog devoted to the cards I make in my tiny upstairs space. When my sister stays there, she calls it an "artist's garret". I'm not an artist, but am an enthusiastic cardmaker - hence the title "Cardmaker's Garret".
___________________________________________________________________________________________

Thursday 25 February 2021

Deer Eating the Garden

A friend of mine who is a keen gardener moved to an island from the city, and now has to battle the local wild deer who keep coming out of the woods and eating her beloved flowers and shrubs (they can jump over the high fence she built). So I made her a birthday card depicting this!

I stamped the Tim Holtz trees for the woods, then stenciled a tiny bit of a grid stencil to represent the fence and put a leaping die cut deer in front of it.

In the bottom left, I used some small Rubber Stamp Tapestry peg stamps in various colours to create shrubbery and flowers, and put a grazing deer there, trampling the bushes and eating the flowers.

I filled in all the remaining space with quite a large sentiment stamp.

I'm hoping she'll laugh rather than cry when she gets the card!

Linking up with:

Seize the Birthday "Create a Scene"


AAA Birthday "A Large Sentiment"


Supplies:
Stamps - Rubber Stamp Tapestry flowers, Inkdadinkado sentiment, Tim Holtz trees
Ink - various Memento inks
Paper - white and brown cs
Size - A2
Accessories - Impression Obsession and Memory Box reindeer dies, TCW Sketch Grid stencil, brown coloured pencil, fun foam

Tuesday 23 February 2021

A Cat Sleeping on Wool

A card for a friend who has a black cat and is a knitter.

 
I stamped and watercoloured the image. I ran a top panel through an embossing folder and cut out the inner rectangle. I layered it over the image with foam tape.


Supplies:
Stamps - Rubbernecker cat, Simon Says Stamp sentiment
Ink - Archival Jet Black
Paper - cream cs, watercolour paper
Size - A2
Accessories - watercolour paints, Cuttlebug embossing folder, foam tape

Saturday 20 February 2021

Text-Backed Snowflakes

A Christmas card using text as a background for the Jingle Belles "Text Me Christmas" challenge:


I started by sponging my background with different shades of blue Distress inks. I then stamped the text over it with a grey-blue ink.

I repeatedly stamped the Visible Image snowflake with Versamark and then heat embossed with the Weathered Wood Embossing Glaze - it adds some colour and shine but allows the text stamping to show through. The tint in the embossing glaze adds a bit of colour and makes the snowflakes stand out more than a clear embossing powder. You can see the nice shine it gives on the upper left snowflake - they are all like that even though the photo doesn't show it.

I stamped the sentiment on a strip of white cs in Distress Broken China and heat embossed it with the same Weathered Wood embossing glaze.

I popped the panel up on fun foam on the card base for some dimension.

Thanks for stopping by!


Supplies:
Stamps - Visible Image snowflake, Wendy Vecchi script stamp, Hero Arts sentiment
Ink - various blue Distress inks
Paper - white cs
Size - 4.75" square
Accessories - Distress Weathered Wood embossing glaze, fun foam

Thursday 18 February 2021

Masculine CAS Sympathy Card

A friend's father passed away so I made this sympathy card for him.


I masked off a rectangle on the main panel, sponged it with two shades of Distress inks, then stamped the branches while masked with solid ink and stamped off ink. After I removed the mask, I stamped the sentiment and one more branch in a dark brown.  I trimmed it with a white border and popped it up on fun foam.

While I had everything out, I made a variation on it as it's always good to have sympathy cards on hand and the ones I make are usually more feminine than these ones.


I flicked a bit of water on the sponged background, did a slightly different layout with the stamps and sentiment, and added a dark brown border.

I'm linking up to three challenges:

Cardz for Guyz - "A Masculine CAS Card"

Krafty Chicks Challenge - "A CAS Card"

Less is More - "Color Challenge - Chocolate"  (it can include chocolate caramel which is what I think my background is, with milk chocolate and dark chocolate stamping)


Supplies:
Stamps - SU Just Believe, PTI sympathy
Ink - Distress Antique Linen and Frayed Burlap, Memento Rich Cocoa
Paper - white and brown cs
Size - A2
Accessories - masking tape, fun foam

Tuesday 16 February 2021

Two More Valentines

I've got a last couple of Valentines today.


I sprayed some gold spray on mixed media cs and then took the nozzle out of the bottle and tapped the tube to get some larger drops to fall.  I wrapped some gold thread around the panel.  I die cut the hearts out of red glitter cs and arranged them across the panel. Popped it up on fun foam for dimension.

Here's another photo showing the sparkle of the spray on the upper left corner.  It's so hard to capture it in a photo.


It's for the Just Us Girls "Slim Line Cards" challenge.


And the NBUS Challenge - I've never used those heart dies before.


Moving on to my second card:


I sprinkled pink Magicals on watercolour paper and spritzed with water. I die cut the circle of hearts out of white cs and layered it over the pink Magicals layer. I stamped the sentiment in the centre and popped the whole panel up on fun foam.

Here's a close-up that picks up the sparkle of the Magicals:


This card is for Addicted to CAS "Code Word: Hearts"


Thanks for stopping by today!


Supplies for card 1:
Paper - red glitter, white, and mixed media cs
Size - small slimline - 6.25x3.25"
Accessories - Penny Black All My Hearts die set, gold spray, gold thread, fun foam

Supplies for card 2:
Stamps - PTI sentiment
Ink - Memento Rose Bud
Paper - white cs, watercolour paper
Size - 4.75" square
Accessories - pink Magicals, heart circle die, fun foam


Monday 15 February 2021

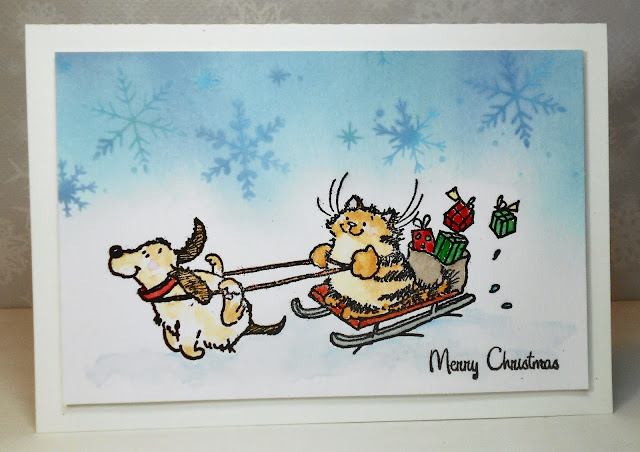
A Cat and a Dog

Time to remind you to enter the CAS Christmas February challenge "Dogs and / or Cats".

I started by stamping my image on hot press watercolour paper.  I left it uncoloured as I wanted to try following this video by Nina Marie for the sky, though I used snowflakes instead of her circles, and I didn't keep my colours as distinct as she did.  And no point going to the trouble of colouring the image if the sky didn't work out!

I sponged a few shades of blue Distress Oxide inks across the top and down close to the image, then stencilled some snowflakes using the same inks.  I liked the end result except for where my stencil moved a bit and I ended up with blobby snowflakes but they were easily disguised by putting a die cut sentiment on top of them!   I went ahead and watercoloured the image, after deciding to keep it in tones of blues and greys.  

Because it's for our CAS challenge, I needed to have more white space than using an A2 card base would allow so used a larger size card base.  Popped it up on fun foam, and die cut the sentiment out of a dull silver cs and glued a white die cut behind the silver to give it more dimension.

I liked the technique so much that I redid it using the same image and taking more care not to let the stencil shift.  This time I used different shades of blue for the sky and a different colour scheme for the image.

 
I didn't need to have the white space for this card so put it on a smaller card base (but a smidge wider than an A2 - to fit a UK envelope) with a simple stamped sentiment and fun foam behind the image for dimension.
 
Which colour scheme do you prefer?
 
If you want to join us at CAS Christmas, be sure to link up by February 24th.  


And because the stamp is a new one that I haven't inked up before, I'm linking one of the cards up with Darnell's NBUS challenge.


And it's a Penny Black stamp, so off it goes to the Penny Black February Saturday Challenge "Anything Goes".

And the Christmas Cards All Year Round "Something that starts with C and / or D" - in my case, "cat and dog".


Supplies:
Stamps - Penny Black "Christmas Joy", Rubber Soul sentiment
Ink - Versafine Clair Nocturne, various blue Distress Oxide inks
Paper - hot press watercolour paper, white cs, scrap of dull silver cs
Size - 7.25x5" for first card, 6.25x4.25" for second card
Accessories - Carta Bella "Falling Snowflakes" stencil, Tim Holtz "be merry" die, watercolour paints, fun foam

Saturday 13 February 2021

A Valentine

It's Valentine's Day and I'd like to send virtual hugs and love to my followers - I really appreciate all your comments and support.   

A friend always asks me to make her a few Valentine cards every year, and she always wants one with a bird on it.


I created a background panel by sprinkling pink Magicals on mixed media cs and spritzing with water.  When it was dry, I inked up a script stamp with red ink and dabbed off bits of ink so that there would be random coverage of the script.

I set it behind a panel with a die cut heart in the middle of it.  I added a sentiment to the panel and also a small die cut heart (to cover up a smudge of ink that wouldn't come off).

For the bird, I placed a scrap of watercolour paper in my MISTI, inked up the bird stamp with
markers and spritzed lightly with water before stamping.  I then die cut the bird and set it on the edge of the heart aperture with its feet glued down and its head and shoulders popped up with foam tape.

Taking it to the following challenges:

The Color Throwdown - pink, red, black, and white


Double D Challenge - Valentine Love 

Day of the Month Card Club - Valentine's Day 


Here's hoping you all have either beautiful flowers or delicious chocolates to celebrate the day!


Supplies:
Stamps - SU Best Birds, SU sentiment, Wendy Vecchi script stamp
Ink - SU Real Red
Paper - white and black cs, mixed media cs, watercolour paper
Size - 5" square
Accessories - pink Magicals, large and very small heart dies, SU matching bird die

Thursday 11 February 2021

Japanese Hearts

A friend gave me a bunch of scraps of beautiful printed Japanese papers (I believe it's called Chiyogami paper) and they've been sitting on a shelf for ages.  I just realized lots of them are red and pink so thought I'd make a Valentine card for a friend who loves all things Japanese.


I die cut the printed paper with a small die, and then because the paper is very thin, I glued each one to a die cut white cs heart.  I wrapped my focal panel with gold cord, scattered the hearts along it, and added a gold heat embossed sentiment.

Linking up with:

Time-Out Photo Inspiration Challenge


Pixie's Crafty Workshop Snippets Playground


Supplies:
Stamps - Impression Obsession sentiment
Ink - ColorBox gold
Paper - scraps of printed Japanese papers, white cs
Size - A2
Accessories - small heart die, gold cord, gold embossing powder, Lil Inkers stitched rectangle die

Tuesday 9 February 2021

A Die Cut Valentine

Three challenges are asking for a Valentine this week.


I used nothing but die cuts for this card - all cut out of red glitter cs and glued to a white card base. A lot of very fiddly gluing but worth the effort!

For these challenges:

Just Us Girls "Word Week - Valentine" 


Day of the Month Card Club "Valentine's Day" 

The Paper Players "Theme Challenge - Hearts and / or Stars" 


Supplies:
Paper - red glitter cs, white cs
Size - 4.75" square
Accessories - Poppy Stamps sentiment die, various heart dies

Thursday 4 February 2021

Encouragement

A card for my youngest sister who's having a hard time during Covid as she's lost most of her hours at work and is so worried about getting way behind on her mortgage.


I love the Kay Foley sentiment stamps and I have this one that I think offers real encouragement when people go through a hard time.

Since the sentiment takes up most of the card, I wanted to create an interesting background for it so used a whole bunch of Distress Oxide inks (the colours for this week's Color Throwdown).  I dabbed each ink on my craft mat, spritzed with water, then pressed my mixed media cs into it, drying between layers.

I stamped and heat embossed the sentiment and added two die cut wildflowers for interest.

I'm linking it up at the Color Throwdown challenge.


Supplies:
Stamps - Kay Foley sentiment
Ink - Versafine Onyx Black, Distress Oxides (Wilted Violet, Broken China, Cracked Pistachio, Antique Linen, and Seedless Preserves)
Paper - white and black cs, mixed media cs
Size - A2
Accessories - Tim Holtz Wildflower dies, clear embossing powder

Wednesday 3 February 2021

Stealing the Christmas Tree

Hello CAS Christmas fans!  I'm hosting February's challenge and this month's theme will come as no surprise to those of you who know what an animal lover I am - "Dogs and / or Cats".

I went with dogs for this card:

I love the Penny Black spaniel images.  This one reminds me of my Tessa who loves to steal socks - when she dashes off with one, she has a similar look on her face as this dog who is stealing the Christmas tree.

A simple card - stamped, watercoloured, bordered with dark red, popped up on fun foam, and some Glossy Accents on the ornaments.  

I coloured the dog in Tessa's colours.  Here she is, guarding a sock she stole:

Please come and join us at CAS Christmas.  There's lots of inspiration from the rest of the Design Team and this month's Guest Designer, Jane (Onions and Paper blog).  And remember, it's never too early to start making your Christmas cards!


Supplies:
Stamps - Penny Black dog, Rubber Soul sentiment
Ink - Archival Jet Black
Paper - red and white cs, watercolour paper
Size - A2
Accessories - watercolour paints, glossy accents, fun foam

Tuesday 2 February 2021

Blue Sky, Embossed Snowflakes, Die Cut Village

The Paper Players have a great Tic Tac Toe challenge on right now - it's great because one of the options is blue and you all know how much I love blue!  My card uses the diagonal line that says "die cut - embossing - blue".  And the Christmas Kickstart Challenge wants a Slimline Card.

I created a background on mixed media cs by sponging various light shades of blue Distress Stormy Sky and Faded Jeans inks, then stamping the snowflakes in Versamark and heat embossing them, and then sponging again with Distress Chipped Sapphire ink - it makes a more subtle background than stark white snowflakes.

I added the village die cut over part of it and stamped my sentiment, then popped the panel up on fun foam.

The village die cut is very long so enough for two cards and I had enough of the background for two cards, so that made me pretty happy as I'm always eager to increase my Christmas card stash.  Here's the two of them together:

You can see the different parts of the die cut and the different sentiments I used.

 Challenges:

The Paper Players "Tic Tac Toe"


Christmas Kickstart Challenge "Slimline Cards"


Supplies:
Stamps - snowflake background stamp, Rubber Soul sentiment
Ink - Distress Stormy Sky, Faded Jeans, and Chipped Sapphire; Versamark
Paper - white cs, mixed media cs
Size - 6.25x3.5"
Accessories - village die, clear embossing powder, fun foam