A blog devoted to the cards I make in my tiny upstairs space. When my sister stays there, she calls it an "artist's garret". I'm not an artist, but am an enthusiastic cardmaker - hence the title "Cardmaker's Garret".
___________________________________________________________________________________________
Showing posts with label holly. Show all posts

Wednesday, 28 May 2025

Batik with Holly

The Group of Seven Cardmakers are trying the batik technique this month.  I did this a few years ago but was not totally happy with the results.  Group of Seven has posted a video with the technique so I watched it, followed it to the letter, but really didn't like the results.  I wondered what I could do to get a better result and decided that what I didn't like was the way the creases came out - and that was my problem when I tried it before.  See the snowflake card on this post to see the way the creases are - I just didn't like them.  I like the creases on this post slightly better but still not that happy.  

Like the video on Group of Seven, both of my earlier cards used regular weight cardstock.  I had the idea to try something lighter that I could just scrunch it up rather than fold and score it, and, hooray, I got results I like much much better.  I used a heavyweight printer paper - 32 lb. weight (as opposed to regular printer paper which is only 20 lb. weight).  After stamping and heat embossing, I literally scrunched up the paper and that created far more random creases than the folding and pressing with a bone folder like the video shows.

Here's the first card I made:


For this one I followed the video's instructions about laying down some light colour first (I think I used Shabby Shutters and Old Paper), then stamped and heat embossed in clear embossing powder, then crumpled the paper, and then sponged over it with darker shades of green.  I trimmed it, used a sheet of double sided tape to stick it to cardstock to give it strength, then layered over a dry embossed background.  Because my panel was 5" wide I had to run half of it through the embossing folder, then the other half, so I ended up with a messy bit in the middle - I covered that with a strip of ribbon.

What I didn't like about that card was how muted the holly looks with the inks behind it, so for the next card, I just stamped and heat embossed with clear embossing powder before crumpling the paper and doing the ink blending.  

Same process after that - trimming and sticking to cardstock.  I cut a slightly larger panel of green cs and set it and the batik panel at angles (something I rarely do!!)

I still wanted more contrast between the image and the ink blending so for my last (and favourite one), I stamped and heat embossed with opaque creamy white embossing powder.

Followed all the same steps after that.  The panel is popped up on fun foam on a cream card base, with two small sentiments stamped and die cut with small square dies.  I really like this one and am very happy with the random creases.

Please let me know in the comments which one you like best!!

We'd love to have you try whatever way you like to get a batik look to your card.  Please post over at Group of Seven.  And check out the other examples by the rest of our group!


Supplies:
Stamps - Penny Black holly stamp, Rubber Soul Merry Christmas, Stampendous little square sentiments
Ink - Versamark, many various green Distress Oxide inks
Paper - white, cream, and green cs, 32 lb. heavyweight printer paper
Size - A2 and 5.25" square
Accessories - clear embossing powder, Papermania Seafoam White embossing powder, Sizzix holly embossing folder, ribbon, SU sentiment punch, Spellbinder square and rectangle dies

Tuesday, 20 May 2025

CAS Square with a Bird and a Rectangular Variation


The Paper Players want a clean and simple card with things that fly.  My Time to Craft wants a square card.  And Try It on Tuesday wants to keep it simple - my card is both CAS in design and simple to make.


This is definitely simple to make as the image requires very little colouring after stamping it.  I used alcohol markers to add the colour.  I trimmed the panel with a hemstitch square die and layered it over red cs.

While I had the stamp and the red cs out, I made a regular A2 version of it. 

I coloured this one with Tombow markers to see how they compared to the alcohol markers in the first one, trimmed it with a pierced dot rectangle die, and added to a red A2 card base.
 

  Pop this on your blog to find us fast!My Time To Craft!


Supplies for card 1:
Stamps - Impression Obsession bird, Hero Arts sentiment
Ink - Memento Tuxedo Black
Paper - white and red cs
Size - 4.5" square
Accessories - alcohol markers, Spellbinders hemstitch square die

Supplies for card 2:
Stamps - Impression Obsession bird, Hero Arts sentiment
Ink - Versafine Onyx Black
Paper - white and red cs
Size - A2
Accessories - Tombow markers, Sizzix pierced dot rectangle die

Tuesday, 6 May 2025

Seasonal Cardinals / Blue and Yellow Birthday

The Inkspirational challenge wants "Seasonal" - cards based on occasions and images specific to the season.  I went with a winter card, that could be used for Christmas.  It's got holly, snow, and cardinals, plus a seasonal sentiment.


It's stamped and watercoloured, trimmed with a stitched square, and glitter added to all the snow on top of the fence.

As a break from Christmas cards, I needed to make a birthday card.  It's for Color Hues "Blue and Yellow" (one of my favourite colour combinations).  It's also for AAA Birthday (anything birthday).

I smooshed two pieces of mixed media cs, one in blues and one in yellows. I stamped some subtle text about happiness on the yellow piece, and stamped some silhouette wildflowers on the blue piece. I bordered the blue piece with a piece of corrugated card, tearing one of the edges for more interest. And finished off with a sentiment cut out with a stitched tag die.


Supplies for card 1:
Stamps - Penny Black
Ink - Versafine Onyx Black
Paper - watercolour paper, off white cs
Size - 4.75" square
Accessories - watercolour paints, glitter, Lil Inker stitched square die

Supplies for card 2:
Stamps - Magenta Floral Silhouettes, Savvy Stamps sentiment, PaperArtsy happiness text
Ink - various Distress Oxide blues and yellows; Versafine Onyx Black
Paper - mixed media, white cs, corrugated card
Size - A2
Accessories - stitched tag die


Monday, 28 April 2025

Gilding Flakes on Acetate

This month, the Group of Seven Cardmakers are trying out gilding flakes on acetate.  We followed the technique on this video.  Here's my card:

I patted the wreath stamp with Cosmic Shimmer Flake and Glitter Glue (using a square of foam as an applicator), then stamped onto the acetate.  Then immediately washed my stamp with warm soapy water.  Added the gilding flakes and pressed them into the glue, then used a craft scrubby to rub off the excess.  I added the acetate to the card base with double sided tape around its edges and covered it with a die cut frame so that the tape wouldn't show.

Here's a close-up of the lovely colours in my gilding flakes:

 
I love gilding flakes even though they're so messy to work with, but not sure I like using them on acetate (mainly because of the static).
 
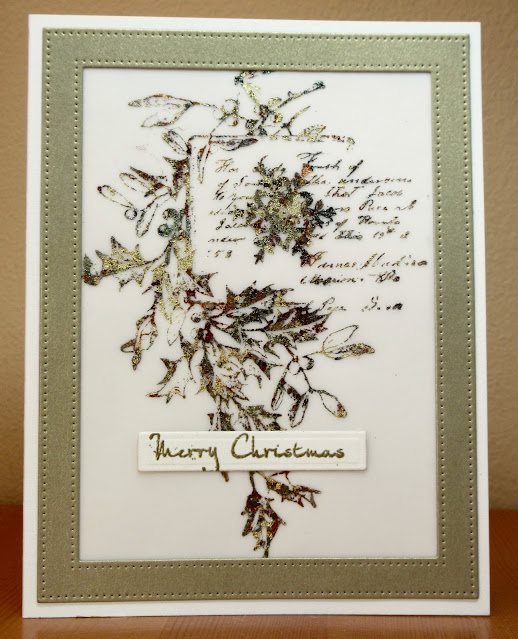
Loll suggested we also try it on vellum.  I followed the same stamps as above.
 
I think my image was perhaps too detailed for gilding flakes but I do kind of like the misty look of it.  Again to cover the tape holding the gilding flakes panel to the card base, I used a die cut frame.
 
And a close up of the gilding flakes on the vellum:
I just love the colour blend!
 
There's lots more ideas from the rest of the Group of Seven over on the blog.  If you're inspired to try it, please link up so that we can see how you use the technique.


Supplies for card 1:
Stamps - Impression Obsession wreath stamp, unknown sentiment
Ink - gold
Paper - off white cs
Size - A2
Accessories - acetate, Cosmic Shimmer Mulled Wine gilding flakes, Cosmic Shimmer Flake and Glitter glue, Impression Obsession frame die

Supplies for card 2:
Stamps - Penny Black holly stamp, Rubber Soul sentiment
Ink - gold
Paper - off white cs, brushed gold shimmer cs
Size - A2
Accessories - Cosmic Shimmer Mulled Wine gilding flakes, Cosmic Shimmer Flake and Glitter glue, MFT pierced dot frame

Wednesday, 23 April 2025

Vintage Poinsettia and Multi Coloured Holly

It's beautiful weather here at the moment - perfect for gardening.  Fortunately for my Christmas card quota, I can no longer garden all day like I could when younger (or my back protests very painfully) so I'm forced to do other things during the day.  Today I got a couple of cards made.

For The 12 Months of Christmas Link-up "Vintage" and the Christmas Kickstart "Positively Poinsettia" challenges:


With the stamp in my MISTI, I stamped it first in Antique Linen, then inked up the poinsettia with red and green TH crayons, misting lightly, and going back and forth until I was happy with the results. Trimmed it, bordered it with dark gold, added the sentiment, a dark gold border, and some champagne-coloured pearls in the centre of the flower.  

Then for Sparkles Christmas Challenge "Christmas Foliage" and Christmas All Year Round (be inspired by a line from Rockin' Around the Christmas Tree - I went with "Deck the halls with boughs of holly"):

I stamped the holly stamp twice with an old Kaleidacolor pad to get the lovely colour variation, added the sentiment, trimmed with a stitched rectangle and popped it up on fun foam, added red Stickles to the berries and a little red bow.


Grab our badge! Please take a copy of our badge


Supplies for card 1:
Stamps - TH poinsettia postcard, Mama Elephant sentiment
Ink - Distress Antique Linen, Versafine Clair Nocturne
Paper - off white and dark gold cs
Size - A2
Accessories - TH crayons, champagne pearls

Supplies for card 2:
Stamps - Penny Black
Ink - Kaleidacolor Caribbean Sea
Paper - off white cs
Size - A2
Accessories - Lil Inker stitched rectangle die, red Stickles, red cord, fun foam


Wednesday, 5 March 2025

Nordic Winter and Blinged Holly


For the ABC Christmas Challenge, I'm going with "D for Die Cuts".


I got out my Tim Holtz Nordic Winter die - it's so much fun to use.  I die cut it three times, once each out of white, green, and bronze shimmer cs, then made a blue shimmer card base, glued the negative piece from the white die cut over it, and then inlaid the green trees and bronze reindeer.  I added a sentiment on a narrow strip banner.
 
The problem with using this die (which I love) is that you always end up with many leftover little bits, and how many cards do I want to make to use them all up?!!   But it is fun doing the inlaying and coming up with colour combinations for it. 

I've also got a card today for the Jingle Belles challenge "Bring on the Bling".  Lots of gemstones on this card:
 
I laid a holly stencil over watercolour paper, spritzed generously with water, lifted off the stencil, and sprinkled with a few shades of green Brushos. After it was dry, I trimmed it down to the best section, stamped the sentiment, die cut a frame (twice so I could layer them together for more substance), added it all to a red card base, and added red gemstones to the berries in the image.


Supplies for card 1:
Paper - white, green, blue, and bronze shimmer cs
Size - A2
Accessories - TH Nordic Winter die

Supplies for card 2:
Stamps - Penny Black sentiment
Ink - Memento Cottage Ivy
Paper - watercolour paper, dark red cs
Size - A2
Accessories - Tim Holtz holly stencil, green Brushos, red gemstones, MFT pierced rectangle frame die


Sunday, 29 December 2024

Holly, a Winter Cabin, and Ornaments

Sparkles Christmas Challenge wants us to feature a Christmas carol or song.  I chose "Deck the Halls".  Rudolph Days and 12 Months of Christmas are both "anything Christmas".


I put the holly stamp in my Misti and inked it up with various Oxide inks and Memento Dew Drop inks, stamping and reinking until I was happy.  I added some lightly stamped text and postmarks to the background.  Then sponged around the edges.  I finished with a Tim Holtz clippings sticker with the line from Deck the Halls, and added Wink of Stella to the berries.

Christmas Crafts All Year Round wants bows, gifts, or decorations.  I went with decorations.

I created a dry embossed background that creates a three-sided border of ornaments, leaving space in the middle for my die cut ornaments to hang.  I did one each out of red, green, and silver mirror card, and hung them with silver thread.

Stamping Sensations wants to see "Winter".

I love this winter scene.  I stamped it in black and heat embossed with Iridescent Ice embossing powder (it's very sparkly in real life).  I bordered it with black shimmer cs.

Please take a copy of our badge 

Grab our badge!  Please grab our logo


Supplies for card 1:
Stamps - Penny Black holly, unknown Christmas script stamp
Ink - various Oxide and Memento Dew Drops, Adirondack Lake Mist
Paper - white cs
Size - A2
Accessories - Wink of Stella, Tim Holtz clippings sticker

Supplies for card 2:
Stamps - SSS sentiment
Ink - Delicata Copper Glitz
Paper - white cs; red, green, and silver mirror cs
Size - A2
Accessories - Crafts Too embossing folder, Spellbinders ornament die, silver thread

Supplies for card 3:
Stamps - Crafty Individuals winter cabin, Penny Black sentiment
Ink - Versafine Onyx Black
Paper - chalk cs, black shimmer cs
Size - A2
Accessories - SU Iridescent Ice embossing powder


Thursday, 28 November 2024

Textured Backgrounds Using Die Cuts

The Group of Seven is playing with a technique to get more out of our dies - using die cuts to create a textured background similar to an embossed background.  Because it is tone-on-tone, it is basically faux dry embossing.  Unlike an embossing folder, using die cuts allows you to arrange the embossed sections as you wish.

My first example is simply white-on-white.  I followed this video but simplified it a bit.


I die cut a variety of small stars and glued them to my panel for my faux dry embossed background.  Then die cut the large star three times, twice out of scrap cs and once out of white shimmer cs, and glued them together.  I "hung" it on the card with fine silver thread that I also wrapped around the star.  Added a sentiment die cut with a banner die, and put the whole piece on a matching white card base, and I was done.

For my other example, I followed this video that uses the same technique but with a blended ombre background and a matching ombre piece for the die cutting.

With various green Distress inks, I blended two A2 size panels in an ombre of greens.  Then I die cut the holly from one of them and added it to the same colour sections of the other panel.  I left an open section where I wanted to add my sentiment.  I splattered with a bit of gold acrylic paint and die cut a few gold holly leaves to tie in with the gold die cut sentiment (cut twice and glued together for dimension.  It's on a cream shimmer card base.

It's a fun technique so please give it a try and link your card up over at Group of Seven to add to the inspiration.


Supplies for card 1:
Stamps - unknown sentiment
Ink - Versafine Onyx Black
Paper - white cs, white shimmer cs
Size - A2
Accessories - various small star dies, MFT large star die, banner die, fine silver thread

Supplies for card 2:
Ink - various green Distress inks
Paper - mixed media cs, cream shimmer cs, gold cs
Size - A2
Accessories - Sizzix holly dies, Penny Black holly jolly sentiment die, gold acrylic paint


Thursday, 31 October 2024

A Tiny Snowman and A Recycled Ornament

Christmas Cards All Year Round wants snowmen.

I stamped the image and sentiment onto the centre of a piece of watercolour paper, and used watercolour paints to colour it.  Then I placed it in a snowflake frame embossing folder and ran it through my Cuttlebug.  It came out partly embossed normally and partly letterpress.  I really like the look so am going to check for more stamps that will fit in that centre section.


My other card today is for 52 Christmas Card Throwdown's recycling challenge.  A friend and I regularly go out for tea and pastries at a lovely little French cafe.  I always save the foil cardboard thingies that the pastries come on as they look exactly like a Christmas ornament.  So that is the recycled item on my card.

I die cut the holly out of some smooshed green leftovers and the word joy out of some red glitter cs and glued both to the gold "ornament".  Because the foil is so slippery, the glue oozed out from under it in a lot of places.  There was no way to get it off so I sprinkled fine glitter all over the sticky sections.  It looks better in real life - quite sparkly - but in the photo it looks kind of splotchy.  I added red Stickles to the berries on the holly, and wrapped red twine around the top and through a hole I punched in the top of the ornament and through the card base.

Grab our badge!  


Supplies for card 1:
Stamps - Penny Black
Ink - Versafine Onyx Black
Paper - watercolour paper, off white cs
Size - A2
Accessories - Ultimate Crafts Snowflake Frame embossing folder, watercolour paints

Supplies for card 2:
Paper - white cs, leftover smooshed green scrap
Size - 4.75" square
Accessories - holly die, Joy die, red Stickles, red metallic twine