A blog devoted to the cards I make in my tiny upstairs space. When my sister stays there, she calls it an "artist's garret". I'm not an artist, but am an enthusiastic cardmaker - hence the title "Cardmaker's Garret".
___________________________________________________________________________________________
Showing posts with label acetate. Show all posts

Monday, 28 April 2025

Gilding Flakes on Acetate

This month, the Group of Seven Cardmakers are trying out gilding flakes on acetate.  We followed the technique on this video.  Here's my card:

I patted the wreath stamp with Cosmic Shimmer Flake and Glitter Glue (using a square of foam as an applicator), then stamped onto the acetate.  Then immediately washed my stamp with warm soapy water.  Added the gilding flakes and pressed them into the glue, then used a craft scrubby to rub off the excess.  I added the acetate to the card base with double sided tape around its edges and covered it with a die cut frame so that the tape wouldn't show.

Here's a close-up of the lovely colours in my gilding flakes:

 
I love gilding flakes even though they're so messy to work with, but not sure I like using them on acetate (mainly because of the static).
 
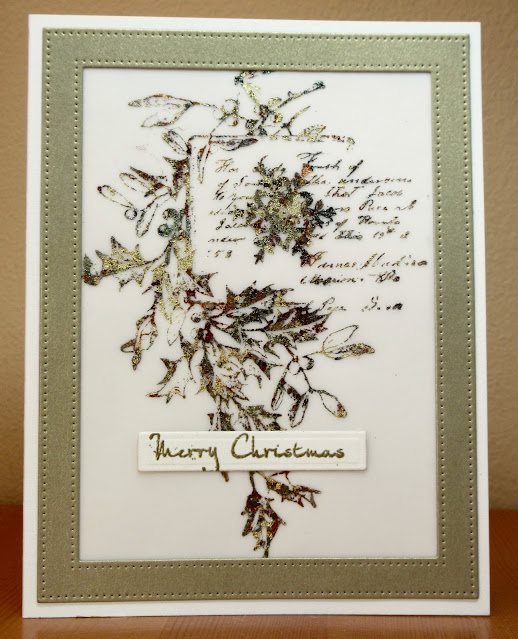
Loll suggested we also try it on vellum.  I followed the same stamps as above.
 
I think my image was perhaps too detailed for gilding flakes but I do kind of like the misty look of it.  Again to cover the tape holding the gilding flakes panel to the card base, I used a die cut frame.
 
And a close up of the gilding flakes on the vellum:
I just love the colour blend!
 
There's lots more ideas from the rest of the Group of Seven over on the blog.  If you're inspired to try it, please link up so that we can see how you use the technique.


Supplies for card 1:
Stamps - Impression Obsession wreath stamp, unknown sentiment
Ink - gold
Paper - off white cs
Size - A2
Accessories - acetate, Cosmic Shimmer Mulled Wine gilding flakes, Cosmic Shimmer Flake and Glitter glue, Impression Obsession frame die

Supplies for card 2:
Stamps - Penny Black holly stamp, Rubber Soul sentiment
Ink - gold
Paper - off white cs, brushed gold shimmer cs
Size - A2
Accessories - Cosmic Shimmer Mulled Wine gilding flakes, Cosmic Shimmer Flake and Glitter glue, MFT pierced dot frame

Sunday, 23 February 2025

Red Acetate Poinsettia and Pink Watercoloured Sweet Peas

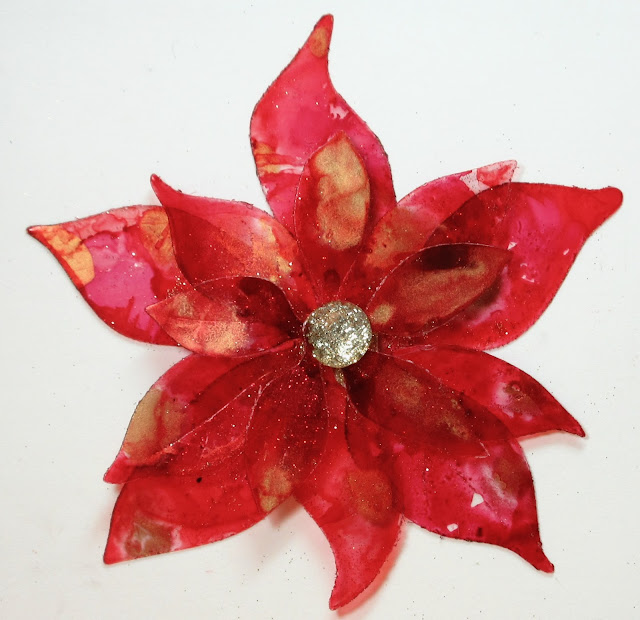
The Jingle Belles Christmas Challenge is asking for see-through elements.  I decided to create a layered acetate poinsettia.


I coloured a piece of acetate with a few different red alcohol inks and a bit of gold mixative.  Then die cut three layers of a poinsettia, and stuck them together with dimensionals in the centre.  To hide the dimensionals I added a gold sparkly rhinestone sticker.

I stamped and heat embossed the sentiment in gold on my focal panel, die cut with a hemstitch square.  I wanted to have exactly the same gold as the sentiment showing through the hemstitch openings so I took a scrap of cs, ran ink around its edges, and heat embossed the edges.

Here's a close-up of the poinsettia showing how see-through the layers are:

 
As a nice contrast to a red poinsettia, I went with shades of pink in my next card.  It's for The Flower Challenge "Feature the Colour Pink".
 

I love sweet peas and grow them every year in my garden.  The image is stamped and watercoloured, with a little bit of black splatter around the image.  Since it's a large image and not really enough room to add a border layer, I took a black marker and went around the edges of the focal panel.  I left it without a sentiment as I'll either use it as a notecard or add a sentiment on the inside. 


Supplies for card 1:
Stamps - Northwoods sentiment
Ink - ColorBox gold
Paper - off white cs
Size - 4.75" square
Accessories - acetate, red alcohol inks, gold mixative, gold embossing powder, poinsettia die, dimensionals, Recollections gold sparkly rhinestone sticker, Spellbinders square hemstitch die

Supplies for card 2:
Stamps - Stamps Happen Sweet Peas
Ink - Versafine Onyx Black
Paper - watercolour paper, off white cs
Size - A2
Accessories - watercolour paints, black marker

Wednesday, 29 January 2020

New Chickadees

The current Jingle Belles Challenge is "Look What Santa Brought Me" - in other words, use something new that we got for Christmas or in the sales.


I love bird stamps as many of you know! 

I stamped and added some subtle colouring with watercolour paints and then did the berries with a red marker.   This beautiful chickadee stamp is called Stained Glass Birds.  I didn't colour it as if it were stained glass but I layered a piece of acetate over it to make it seem to be a window (that's why there is inconsistent definition in the photo - light was bouncing off the acetate).  I added a red frame over top to hold the acetate in place and to match the berries.

I'm looking forward to colouring it more as a stained glass window next time.

Thanks for stopping by today!


Supplies:
Stamps - Magenta Stained Glass Birds
Ink - Archival Jet Black
Paper - mixed media cs, red and white cs
Size - 4.75" square
Accessories - watercolour paints, red marker, Spellbinders square dies

Tuesday, 26 February 2019

Glittered Poinsettia

The Jingle Belles challenge is "All that Glitters" and I've used plenty of glitter on this card:


I stamped the poinsettia in black on a piece of acetate and heat embossed with clear ep.  Working on the opposite (or back) side, I added glue carefully inside the lines of the image, doing the leaves first and adding green glitter, and then doing the flower, except for its centre, and adding red glitter, and finally the centre of the flower and adding gold glitter.  I set it aside to dry for a few hours.

I dry embossed the background, created a frame to go on top of the acetate, and stamped and heat embossed a white sentiment on black cs, trimming it into a banner.  I tucked the sentiment under the frame and put everything together.

It was really hard to photograph the card to capture the sparkle of the glitter, but trust me it's there!


Supplies:
Stamps - Penny Black poinsettia, Make an Impression sentiment
Ink - ColorBox white, Versafine Onyx Black
Paper - white and black cs
Size - A2
Accessories - acetate, SU embossing folder; green, red, and gold glitter; Spellbinders rectangle die, clear and white embossing powder


Friday, 23 March 2018

Back to Blue

So yesterday I said I'd be back to blue today.  And here I am.  Another card for the CAS Mix Up challenge that I'm hosting.


It's the same technique I used on my previous card here, but with the addition of a background.  I have acetate, stamping, die cutting, and smooshing with Oxide inks.


The butterfly was stamped and heat embossed on the front of the acetate.  Then working from the back, I used a clear-drying glue and glitter to colour the butterfly.  I used blue and purple, one at a time, aiming it where I wanted it with a straw with a point cut at the end to act as a little scoop.

When you first turn it over, it just looks like white blobs of glue from the front - it needs a few hours for the glue to completely dry and turn clear, and then you can see your lovely colours of glitter.

I created a background using blue and mauve Oxide inks and the smooshing technique on mixed media cs, and glued it to the card base.  Then die cut the front panel with a stitched square die, and used an old Spellbinders label die to create the opening and the frame around the opening.  I stuck the acetate to the back of the opening and then popped that whole panel up over the background with foam tape so that the butterfly is raised off of the background.


Since CAS Mix Up closes tomorrow and since shaker cards are one of the best ways to use acetate, I thought I'd add another card that I made for a shaker card challenge at SCS.  I posted it months ago on SCS but never got around to posting it on my blog.  It fills the requirements of CAS Mix Up with its stamping, acetate, and acrylic paints.  So here it is:


This one uses an Impression Obsession circle shaker window and the matching cs overlay so was really easy to put together.  The fairy was stamped on a background created with blue and silver acrylic paints.  Here's a close-up of her lovely glittery shaker stuff:


You've got one more day to enter CAS Mix Up and show us how you like to use acrylic on a card!


Supplies for the first card:
Stamps - Carabelle butterfly
Ink - Versafine Onyx Black; various blue and purple Oxide inks
Paper - white cs, mixed media cs
Size - 4.75" square
Accessories - acetate, clear embossing powder, glitter, Nesties label dies, Lil Inker stitched square die, foam tape

Supplies for the second card:
Stamps - Lavinia fairy, SU sentiment
Ink - Versafine Onyx Black, Memento Tuxedo Black
Paper - white cs, mixed media cs, Impression Obsession shaker cs overlay
Size - A2
Accessories - Impression Obsession "shake it window", clear embossing powder, sequins and starry sprinkles, fun foam, blue and silver acrylic paints


Thursday, 15 March 2018

Glittered Poppies on Acetate

It's mid-month so time to remind you to have some fun with incorporating acetate into your clean and simple mixed media card for the CAS Mix Up challenge!


And because it's our second birthday, we are celebrating and there are prizes to be won this month!

I chose to use glitter with my acetate this time:


I used the technique in this video for adding the glitter to the acetate.  But I gave my card more dimension by popping up the panel with the acetate on fun foam.

I stamped and heat embossed the poppies on the front of the acetate.  Then working from the back, I used a clear-drying glue and glitter to colour the poppies.  I used red glitter on two of the larger poppies and burgundy glitter on the third large poppy.  Then I mixed red and gold glitter for the smaller ones, and for the two bottom ones, I used the leftover bits of all the colours.

When you first turn it over, it just looks like white blobs of glue from the front - it needs a few hours for the glue to completely dry and turn clear, and then you can see your lovely colours of glitter.

I die cut a rectangular window in my top layer of cs, taped the acetate panel (heat embossed side up, glitter to the back) behind it, and added a die cut frame.  Then I backed this panel with foam tape so that the poppies appear to be floating above the card base.  You can sort of see that here (and also can see the glitter colours better):


I'll be back in a couple of days with another card using this technique but layered over a smooshed background.

You have until March 24th to join us at CAS Mix Up with a clean and simple card featuring stamping, acetate, and at least one other element - I have heat embossing, colouring with glitter, and die cutting.

This is my last post as a Design Team member for CAS Mix Up!  I'm honoured to be the hostess for this month - going out in high style!  I'd like to thank Loll and Bonnie for all their help - it's been quite a learning curve for me and they've been very patient!!  And now off to my new Design Team at their CAS Christmas Card Challenge!


I'm also adding the card to a couple of other challenges:

Where it's ANYTHING GOES as long as there's stamping on it, and my poppies are stamped.
 
 Create anything that sparkles and all those glittered poppies definitely sparkle!


Supplies:
Stamps - Penny Black
Ink - Versafine Onyx Black
Paper - white cs
Size - A2
Accessories - acetate, clear embossing powder, glitter, clear-drying glue, MFT pierced rectangle frame die, foam tape


Thursday, 1 March 2018

Stars on Acetate


This is both a happy and sad post for me - I'm happy to be hosting the CAS Mix Up challenge for March, but I'm sad because it is my last month on the Design Team for CAS Mix Up.  But I'm leaving it for a very good reason - Loll and Bonnie are starting a new challenge "CAS Christmas Card Challenge" and, since I love making Christmas cards above all other cards, I asked to switch over to that Design Team.  More about it at the end of this post.

On to CAS Mix Up.  This month we are asking for:


One of my favourite ways to use acetate is with alcohol inks and tissue paper.


On a piece of aluminum foil, I dripped a couple of shades of blue alcohol inks and a white mixative.  I spritzed with alcohol ink blending solution.

I smooshed a piece of acetate into it until happy with the result (re-spritzing with the AI blending solution if the AIs got too dry).  I let the acetate air dry.

I scrunched up a piece of white tissue paper and glued it to the acetate (the side with the AIs).

When the glue was dry, I stamped and heat embossed the branch and stars with Versamark and gold embossing powder on the non-AI/tissue side.  I did the same for my vertical sentiment on a white cardbase, and then taped the acetate panel next to it.

A word of advice about heat embossing on acetate - it will not work on the acetate packaging that comes with our stamps and dies.  You need a good quality acetate - I use Grafix .007 acetate used here - available at Amazon.com.

Here are a couple of close-ups of the heat embossing:


If you head over to CAS Mix Up, we have lots of tutorials listed to give you ideas on various ways to incorporate acetate.  And great inspiration from the rest of the Design Team and our Guest Designer, Cathy (Cathy's Card Spot).

And then please join us with a clean and simple card featuring acetate, stamping, and at least one other option from the list on CAS Mix Up.  My options are alcohol ink, tissue paper, and heat embossing.  You will especially want to join in this month as it is our 2nd birthday and to celebrate, we are giving away two prizes.


Prizes
$25 gift certificate for Simon Says Stamp for challenge Winner
&
$25 gift certificate for Simon Says Stamp for one random draw of all entries
(must follow the challenge rules to be eligible for prizes)


And be sure to come back on March 3rd for the inaugural challenge of the CAS Christmas Card Challenge!  We have a great Design Team to inspire you and the monthly winners will get the chance to be a Guest Designer.


Thanks for reading this rather lengthy post!!


Supplies:
Stamps - Memory Box Stars at Night, Impression Obsession sentiment
Ink - Versamark
Paper - white cs, white tissue paper
Size - 7.25x5"
Accessories - acetate, various blue alcohol inks, white alcohol ink mixative, alcohol ink blending solution, gold embossing powder


Thursday, 3 August 2017

Gold Poinsettias and a Pierced Frame

The latest Less is More challenge is Piercing.


I used a pierced frame die to set off my gold and green Christmas image:


I smooshed a piece of acetate with various shades of green alcohol inks, using alcohol blending solution to help prevent them from drying too quickly.  Then I crumpled up a piece of tissue paper and glued it down to the inked side to give it backing and a more textured look.

On the clean side of the acetate, I carefully stamped and heat embossed the poinsettia image in gold.  I framed it with dark gold cs, using a pierced square frame die, and added my die cut sentiment.  Both the frame and sentiment were die cut twice and glued together for more substance.

Since I have stamping, alcohol inks, heat embossing, tissue paper, and die cuts, I'm also linking the card up with August's CAS Mix Up challenge to use alcohol inks.


And it's entered in SCS Dare to Get Dirty challenge posted by Nancy Littrell.
Thanks for stopping by today!


Supplies:
Stamps - Tim Holtz poinsettia
Ink - various green alcohol inks, ColorBox Gold
Paper - cream and dark gold cs, tissue paper
Size - 5" square
Accessories - gold embossing powder, acetate, Tim Holtz noel die, MFT Pierced Square Frame die