A blog devoted to the cards I make in my tiny upstairs space. When my sister stays there, she calls it an "artist's garret". I'm not an artist, but am an enthusiastic cardmaker - hence the title "Cardmaker's Garret".
___________________________________________________________________________________________
Showing posts with label Christmas trees. Show all posts

Sunday, 28 June 2026

Acrylic Block Stamping

The Group of Cardmakers are revisiting an old background technique - Acrylic Block Stamping.  

First up, a very basic way of doing it:

This is the original way I learned to do this - inking up a block with ink (in this case, with Distress Peeled Paint), spritzing with water, and stamping the block onto mixed media cs.  I used a block with a curved edge and grid lines on it to add extra interest.

I trimmed the panel, added a white die cut branch, popped it up on fun foam on a white card base, added a red sentiment, and embellished the branch with red Smooch for the berries.

For my second card, I used a different medium to colour the acrylic block - Twinkling H2Os watercolour paints.

T

I spritzed the acrylic block with water, and then added my favourite shade of blue Twinkling H2O paint. I pressed it onto watercolour paper and let it dry. I then stamped the dragonfly and used a sparkly embossing powder, the colour of which is "marcasite" - not quite black, but darker than grey or silver, and with a lot of sparkle in it. I used the same powder on the sentiment. I added a shimmery black border and mounted it on a cream card base.

For the third one, I used a technique I found on SCS (see here) that uses a coordinating colour of spray for the spritz instead of plain water.

I used two Oxide inks - Broken China and Tumbled Glass - and smeared them randomly on a large block. I spritzed with Distress Blueprint Sketch spray and that started the two inks blending and moving. I wanted more movement so also spritzed with some water. Then I stamped the block onto watercolour paper. I love the blend of the blues and the variation in intensity!

I die cut two reindeer out of off white cs (cutting each twice and gluing together for more substance). I trimmed the background panel, added the reindeer and a sentiment.

There are lots more examples over at The Group of Cardmakers! 

Group of Cardmakers badge 


Supplies for card 1:
Stamps - A Muse sentiment
Ink - Distress Peeled Paint, Memento Lady Bug
Paper - white and mixed media cs
Size - A2
Accessories - Penny Black Winter Branch die, red Smooch accent ink, fun foam, acrylic block

Supplies for card:
Stamps - Old Island Stamp Co. dragonfly, SU sentiment
Ink - Versafine Onyx Black
Paper - Gina K ivory cs, watercolour paper, shimmery black cs
Size - A2
Accessories - Stampendous Marcasite embossing powder, Twinkling H2O Blue Flame, acrylic block

Supplies for card 3:
Stamps - Simon Says Stamp sentiment
Ink - Distress Oxide Broken China and Tumbled Glass
Paper - watercolour paper, off white cs
Size - A2
Accessories - acrylic stamp block, Distress Blueprint Sketch spray, MFT reindeer dies

Saturday, 20 December 2025

Christmas Drink with Cinnamon Sticks and Christmas Trees

Peace on Earth has a mood board full of Christmas drinks (see end of post).  I chose the bottom right image and used a stamp that has a mug with marshmallows, cinnamon sticks in the drink and on the ground around it just like in the image.

I coloured the image with coloured pencils, trimmed it with a deckle edged die, and bordered it with red dotted dp.  I created the background panel with a stencil and Distress ink close in colour to the green pencil I used in the image.

Here's our Peace on Earth mood board.  Please head over to Peace on Earth to see what the rest of the Design Team were inspired to create, and then link up your creation.


Supplies:
Stamps - unknown stamp
Ink - Versamark Onyx Black, Distress Lucky Clover
Paper - white cs, red dotted dp
Size - A2
Accessories - coloured pencils, Spellbinders deckle edged rectangle die, ARTplorations Christmas Tree stencil

Saturday, 2 August 2025

Red House in the Woods


For Peace on Earth's new challenge, I was inspired by the bottom left image in their mood board (see it at the end of my post). 


I kept the background white and completely clean like the image in the mood board.  I die cut the house and trees die out of watercolour paper, then painted the trees and house with Distress inks.  I stamped the sentiment with Fired Brick (the same red as the house) and die cut it with a stitched sentiment banner.  Both dies were also cut out of scrap cs and doubled up to give more dimension.

Here's the Peace on Earth mood board.  To see what the rest of the Design Team was inspired to create, head over to Peace on Earth.  If the mood board doesn't inspire you, you're welcome to link up an "anything Christmas" card.


I'm also linking it up Sparkles Christmas Challenge "Include a Tree".


Supplies:
Stamps - Rubber Soul sentiment
Ink - Distress inks in red and green
Paper - watercolour paper, off white cs
Size - A2
Accessories - Memory Box house and trees die, stitched sentiment banner die

Saturday, 14 June 2025

Non-traditional Forest for Peace on Earth

Peace on Earth's new mood board inspired me to step outside my comfort zone and go with very non-traditional colours.  I chose the top right hand picture of the non-traditional coloured Christmas tree decorations.  And the little turquoise reindeer on the right hand side of that image inspired the reindeer in my card.

I smooshed a bunch of scraps of mixed media cs in colours close to the mood board image.  Then die cut the trees from them.  I arranged them on the card base and layered the reindeer circle die cut over them.

There's lots of other inspiration from our Peace on Earth design team.  We'd love to have you join us.


Supplies:
Stamps - Art Impression sentiment
Ink - Distress Oxide Pine Needles, Peeled Paint, Picked Raspberry, and Mermaid Lagoon
Paper - white linen cs, mixed media cs
Size - 4.75" square
Accessories - Impression Obsession tree dies, Memory Box deer circle die

Wednesday, 19 February 2025

Bits and Pieces 2 - the Tree Edition

Those of you who were kind enough to take a look at my post from a few days ago called Bits and Pieces - the Reindeer Edition, would have noticed there were quite a few die cut trees combined with the reindeer.  Well, I had even more leftover die cut trees hanging about on my desk.  So today those trees are the focus of the cards.  Again, these were put together to use up bits and pieces, rather than with any particular design in mind or to fulfill a challenge.


Thanks for taking a look, and if you desperately want to know what anything is on one of these cards, leave me a comment and I'll look for it in my supplies and get back to you.

I might be back with one more collection of odds and ends!


Saturday, 15 February 2025

Owl and Forest

Peace on Earth's new mood board has a beautiful image of a Snowy Owl so I was inspired to pull out a very old stamp and create this card.


In my first attempt, I stamped and heat embossed the owl in silver and then tried to stamp the trees around it but it just came out looking messy so I discarded it and started again.  

I stamped and heat embossed the owl in silver on a small piece of white cs and trimmed it with a small rectangle die.  On a larger piece of white cs I stamped the snowy trees by tapping the stamp with two shades of green Distress ink.  I trimmed that panel with a square die and added it to my card base.  I popped the owl up on fun foam.  And stamped and heat embossed a sentiment in silver and trimmed with a stitched banner die.  It's not quite what I'd envisioned making but I feel I captured the owl and the snowy trees from the mood board.

We'd love to see what our mood board inspires you to make.  Head over to Peace on Earth for more inspiration from the rest of the Design Team.


Supplies:
Stamps - Inkadinkado owl, Deep Red trees, Penny Black sentiment
Ink - ColorBox silver, Distress Pine Needles and Evergreen Bough
Paper - white cs
Size - 4.5" square
Accessories - silver embossing powder, rectangle and square dies, stitched banner die, fun foam

Saturday, 28 December 2024

Ombre Sky, Trees, and Stars

This month the Group of Seven Cardmakers is showcasing Ombre as our Design Element.  For my first example, I used ink blending to create a blue sky.  This is the method I've typically used when I think of creating an ombre effect.


I blended various blue Distress inks from light up to dark on coated cs (easier to get a nice blend than on regular cs).  When dry, I stamped the image in archival ink, then coloured the berries with a white gel pen.  I did a little bit of splattering with a white Posca paint pen to give the effect of a few lazy snowflakes drifting down on a cold winter day.  I added a sentiment die cut with an oval die.

On our Group of Seven website we have a couple of videos showing different ways of doing ombre.  I followed the technique in this video for my next card.


I die cut the trees from three shades of green cs and layered them over a dry embossed background, using bits of foam tape to raise each layer off the previous layer.  Then I added a black die cut Santa and sleigh and a black border.

I made one more using the stacked die cuts ombre method.


For this one I used three shades of copper glitter cs and die cut stars out of it and stacked them on top of each other, and then on top of a star embossed background.  In hindsight, I wish I'd cut each word out of a different shade of the cs - but too late!

I'm adding this third card to My Time to Craft's "New" challenge (one of the options is a New Year's card).

Please check out the cards by the rest of the Group of Seven Design Team.  We'd love to have you link up cards using an ombre technique.  It's not a challenge but we all love seeing your ideas or interpretations.  

  My Time To Craft!


Supplies for card 1:
Stamps - Penny Black
Ink - Archival Jet Black, Distress Tattered Glass, Broken China, Stormy Sky, Salty Ocean
Paper - white cs, coated cs
Size - A2
Accessories - white gel pen, white Posca paint pen

Supplies for card 2:
Stamps - SSS sentiment
Ink - Archival Jet Black
Paper - white, black, 3 shades of green cs
Size - A2
Accessories - CuttleBug snowfall embossing folder, Frantic Stamper Santa / sleigh die, unknown trees die, foam tape

Supplies for card 3:
Paper - white cs, 3 shades of copper glitter cs
Size - 4.75" square
Accessories - star embossing folder, Spellbinders star dies, Tattered Lace sentiment die

Saturday, 9 March 2024

Green Dotted Die Cut Trees and a Bah Humbug Cat

It's March so inevitably lots of challenges ask for green.  See end of post for the challenges.


I die cut the set of four Poppy Stamp trees out of a scrap of green dotted cs sitting on my desk, layered them on two more layers cut from scraps of white cs for dimensions and arranged them around a green stamped sentiment.  Then bordered with green and cut a few sparkly white snowflakes out of a snippet of glitter cs.

As a retired librarian who worked as a children's librarian for many years, I couldn't resist the Once Upon a Time challenge to be inspired by the book The Cat in the Hat:


I stamped it, coloured the hat with a red alcohol marker and the stars with a gold metallic pen, trimmed it with a deckle edge die, and bordered it with gold shimmer cs.

Challenges for the first card:

The Sisterhood of Crafters "Dots and/or Stripes"

Colorful Options "Green" 

Jingle Belles "Primarily Die Cuts" 

Christmas Kickstart "Get Your Grinch On (Green Takes Centre Stage)" 

Snippets


Badge...  Please Grab Our Badge! 

  Player's Badge


Supplies for card 1:
Stamps - Rosie's Roadshow sentiment
Ink - Distress Lucky Clover
Paper - white cs, green dotted cs, white shimmer cs
Size - A2
Accessories - Poppy Stamp set of four tree dies, tiny snowflake die

Supplies for card 2:
Stamps - Technique Junkies
Ink - Versafine Onyx Black
Paper - chalk cs, gold shimmer cs
Size - A2
Accessories - red alcohol marker, gold metallic pen, fun flock, Spellbinders deckle edge die


Tuesday, 5 March 2024

Alice the Dog and a Cake-inspired Christmas Tree

ABC Christmas Challenge has "D is for Dogs" this month.  I found a stamp that looks a lot like a friend's dog, Alice.


The dog is stamped and watercoloured, and a bit of green ink sponged around her. Then I created the Polaroid frame with a square die cut out of a rectangle of white cs. Added some fun flock to the dog's hat and a sentiment, and put it all on a red card base. 

Christmas Craft Creations wants stencils or embossing folders.  I went with a stencil.

The background was made on a gelli plate with green acrylic paint and a Christmas tree stencil.  The large tree on top is actually a gold cardboard holder for a slice of cake (from one of my favourite French bakeries - all their pastries sit on lovely gold cardboard shapes).  I decorated it with lots of clear and green gems and added a rub-on sentiment as I was worried about smudging if I tried to stamp on it.


Supplies for card 1:
Stamps - Technique Junkies dog, Mama Elephant sentiment
Ink - Archival Potting Soil, Distress Bundled Sage
Paper - white and red cs, watercolour paper
Size - A2
Accessories - watercolour paints, Mama Elephant die for the sentiment, Spellbinders square die, fun flock

Supplies for card 2:
Paper - white cs, gold cardboard cake slice holder
Size - 6x4.25"
Accessories - green acrylic paint, Stamplorations Christmas tree stencil, gelli plate, Tim Holtz rub on, green and clear gems


Tuesday, 3 October 2023

Another Santa Card and Some "Snowflakes"

Santa is always a great theme for Christmas cards so here's another one, this time for Christmas Cards All Year Round "For a Male" and Jingle Belles "A Christmas Story" (this card has as its sentiment the last line from Twas the Night Before Christmas and of course it has Santa flying away as he does at the end of the story).

I used a technique I learned from Karen Dunbrook of tearing many strips of scrap paper to use as masks, starting at the bottom with the first sponging of ink, and then moving up the card. It creates a beautiful cloudy sky. Once my background was dry, I stamped my images. Then once they were dry, I splattered with a bit of white acrylic paint. I mounted it on the card base and stamped the sentiment.

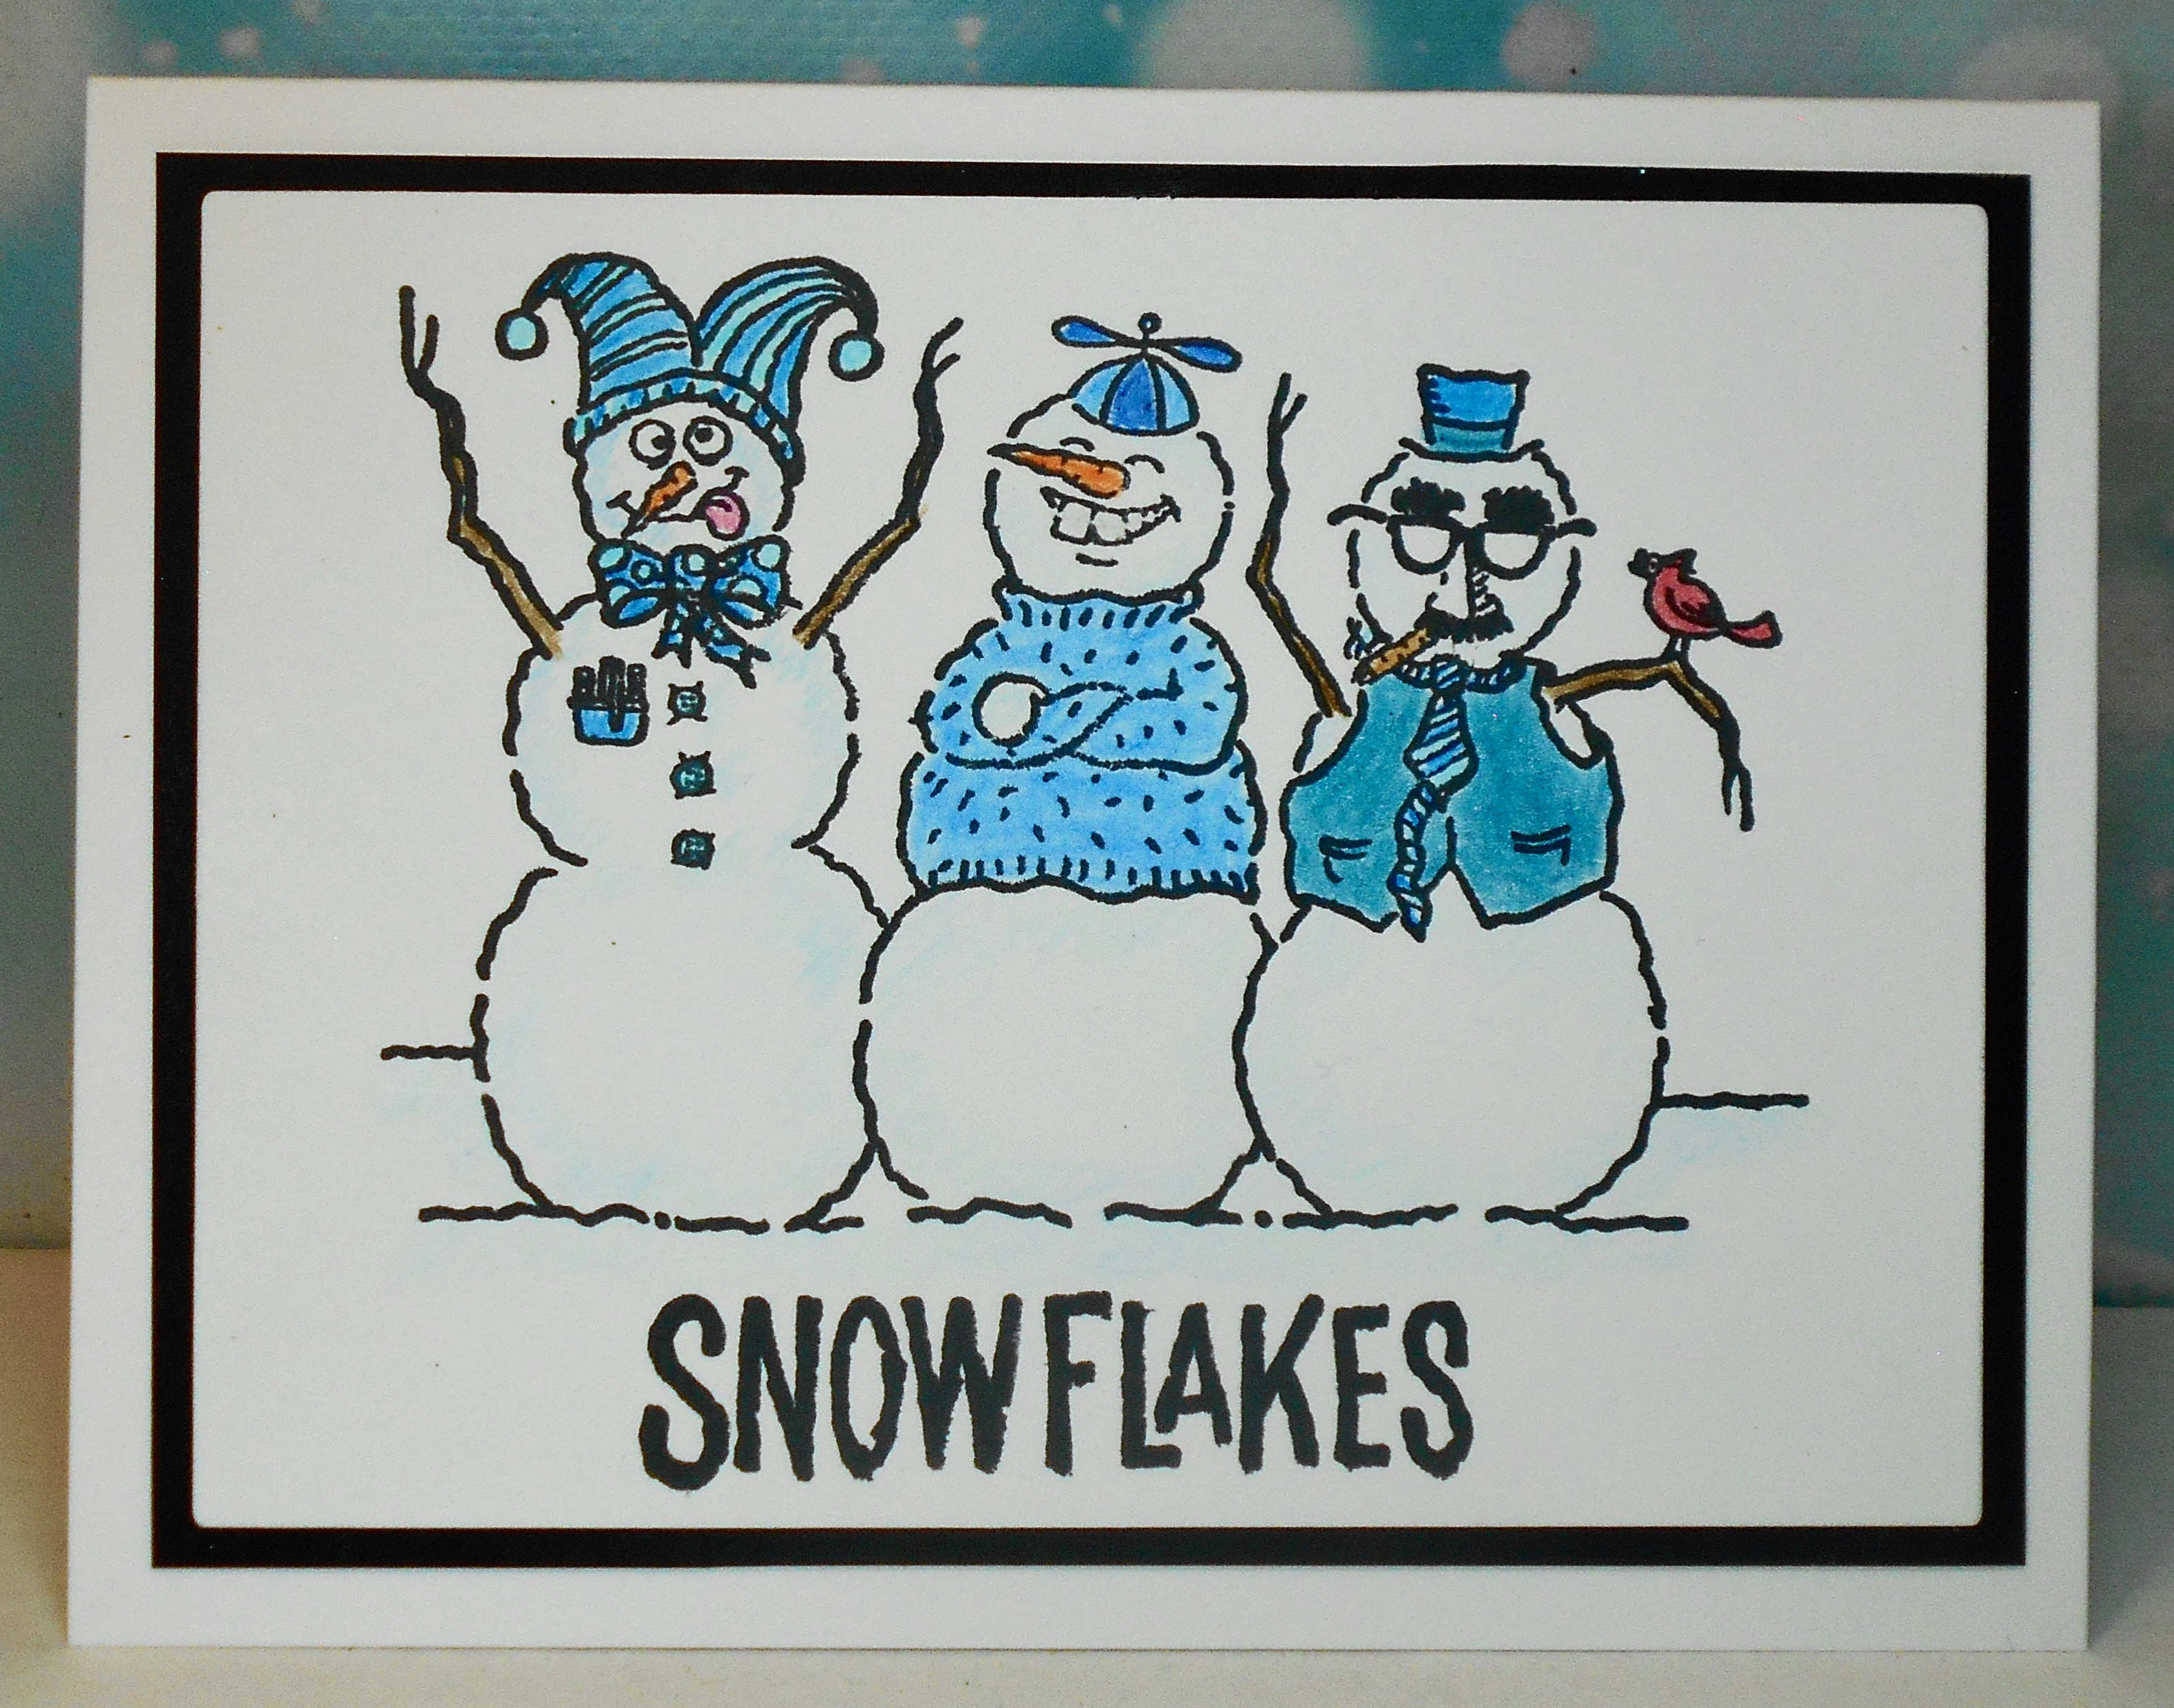
My second card today has some humour to it - a special request from one of my friends who comes to my Christmas card fundraiser sale (what he actually asked for were some "snarky" cards - not my style but this might please him).  It's for ABC Christmas Challenge "S for Snowman and T for Three of a Kind" - I've covered off both of them with my three snowmen all dressed in blue:


I saw this image on some cards my friend Bonnie made and she kindly stamped off a few for me and mailed them to me.   I watercoloured them, keeping them all dressed in blue so that they are more "Three of a Kind" for the challenge.  Then bordered with black cs before adding to the card base.


 Grab our badge!   


Supplies for card 1:
Stamps - Frantic Stamper Santa, Tim Holtz trees, Technique Junkies sentiment
Ink - Versafine Clair Nocturne, various mauve and blue Distress inks
Paper - white cs
Size - 6x4.25"
Accessories - white acrylic paint

Supplies for card 2:
Stamps - Rubber Cottage "Snowflakes"
Ink - Versafine Clair Nocturne
Paper - watercolour paper, off white and black cs
Size - A2
Accessories - watercolour paints