A blog devoted to the cards I make in my tiny upstairs space. When my sister stays there, she calls it an "artist's garret". I'm not an artist, but am an enthusiastic cardmaker - hence the title "Cardmaker's Garret".
___________________________________________________________________________________________

Sunday, 30 July 2023

Gold Two out of One

A quick post with a card for Sparkles Christmas Challenge "Include Gold" and Shopping our Stash "No Stamping Allowed"


I used a "joy in a frame" die and cut it once out of gold shimmer cs and once out of cream cs. Then used the inlaid die cut technique to put them together.  I used cream for both card bases as I didn't have enough of the gold. With the tiny scrap of leftover gold, I cut some little stars and scattered them on each card.

It was an easy way to make two cards in one quick session.

Please take a copy of our badge  Grab Our Badge! 


Supplies:
Paper - cream cs, gold shimmer cs
Size - A2
Accessories - Papertrey Ink joy die, SSS tiny stars die

Friday, 28 July 2023

Embossing Folder Colouring

For the new Group of Seven technique post we tried three methods of colouring panels after they were embossed in a 3D embossing folder.

We tried three different methods.  For this one, I ran white cs through in the embossing folder and then used the ink pad swipe method seen in this video.  I swiped two different shades of red Distress inks over the top of the embossing.  

I trimmed the panel, bordered it with gold matte mirror cs, die cut "merry" from the same cs twice, gluing them together for more dimension, added it to the top of the poinsettias, and stamped and trimmed "Christmas" on white cs and added it below the "merry".

It's hard to photograph anything with mirror cs so here's another view of it:


I was able to make a second card from the same panel.  
I had enough left to just fit behind the SSS Holiday Frame so made this CAS card with it:

I cut the Holiday Frame once from the matte gold mirror cs and once from white cs, took the gold letters out of "Christmas", and glued them together so that the white would show through.

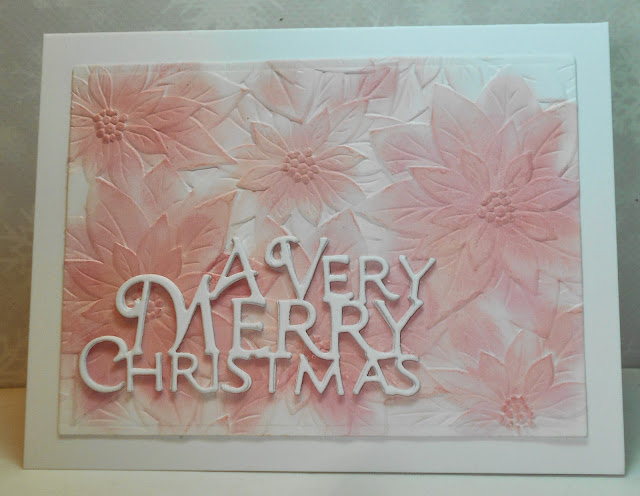
I then tried one of the other methods for my next card - sponging with pigment inks over the embossing as seen in this video.


I used blending brushes and three shades of pink pigment inks, leaving some bits white for contrast and shading.

I die cut the sentiment three times and glued them together so that it would stand out.

For the third technique, and for many more examples, go to our Group of Seven page.  You're welcome to try one of the techniques and add your card for inspiration to others but we are not a challenge so will not be selecting winners or commenting on all cards.

I'll be posting a card using the third technique soon.


Supplies for card 1 and 2:
Stamps - unknown Christmas (card 1)
Ink - Distress Festive Berries and Candied Apple
Paper - white cs, matte gold mirror cs
Size - card 1 is A2, card 2 is 4.5" square
Accessories - Nellie's Choice slimline poinsettia embossing folder, PTI "merry" die (card 1), SSS Holiday Frame (card 2)

Supplies for card 3:
Ink - Adirondack Pink Sherbert and Shell Pink, Vivid Tea Rose
Paper - white cs
Size - A2
Accessories - Nellie's Choice slimline poinsettia embossing folder, Penny Black sentiment die

Sunday, 23 July 2023

Bird in a Santa Hat

Jingle Belles want to see a "Santa Hat" on a card and Cardz 4 Guyz want to see a "Masculine Christmas Card".  I have a friend whose kids call him "an old fart" when they're teasing him so I made this with him in mind!


I stamped and coloured the bird and Santa hat, and die cut them both.  I stuck them to a cream panel on which I'd stamped the sentiment, then rubbed some green ink around the edges of the panel to create a border.  I added it to a background of dp.


Cardz 4 Guyz Logo


Supplies:
Stamps - Tim Holtz Crazy Birds and Santa Hat, Old Island Stamp Co. sentiment
Ink - Memento Tuxedo Black, Archival Library Green
Paper - cream cs, ColorBok dp
Size - 6.25x3.25" slimline
Accessories - Tim Holtz Crazy Birds and Santa Hat dies

Tuesday, 18 July 2023

Garden Flowers, Christmas Animals

A twofer today.  For the Sisterhood of Crafters "In the Garden", I used a flower stamp and a dp that talks about gardens, seeds, and growing.


The image is watercoloured, with a bit of splattering around it. The sentiment is heat embossed.  I used a scrap of the dp and a strip of black cs down the side.

The second card is for 52 Christmas Card Throwdown "Pets" and My Time to Craft Christmas "Christmas Animals":

I used coloured pencils for the image, trimmed it with an oval die, put it on fun foam on a nice warm red patterned paper background.

Please Grab Our Badge!   My Time To Craft Christmas!


Supplies for card 1:
Stamps - Altenew Charmed, unknown sentiment
Ink - Versafine Clair Nocturne
Paper - watercolour paper, black and white cs, Graphic 45 dp
Size - A2
Accessories - watercolour paints, clear embossing powder

Supplies for card 2:
Stamps - SSS Furry Friends, unknown sentiment
Ink - Versafine Clair Nocturne
Paper - white cs, patterned paper
Size - A2
Accessories - coloured pencils, Spellbinders oval die, fun foam


Saturday, 15 July 2023

Cabin in the Woods

The Peace on Earth challenge has a lovely mood board this time with two images of cabins in the woods.  It reminded me of a stamp I've had for many years but haven't used in ages.  So a good time to pull it out.


The image is stamped and coloured with coloured pencils.  Then I sponged the sky in a pearlescent ink and a Distress Oxide ink.  I sprinkled some Frantage Chunky White embossing powder on the sky and heated it from underneath to set it.  I went over the snow on the roof, on the trees, and on the ground with a Quickie glue pen and added fine glitter to it. 

The background is stencilled with a Distress ink through an pine tree stencil.  And then the focal panel is popped up on fun foam.

Here's the Peace on Earth mood board:


There's more inspiration from the rest of the Design Team over at Peace on Earth.  We'd love to have you join us either with your interpretation of the mood board or an "anything Christmas" goes card.


Supplies:
Stamps - Penny Black Christmas Cottage, Northwoods sentiment
Ink - Versafine Clair Nocturne, Brilliance Pearlescent Ice Blue, Distress Oxide Chipped Sapphire, Distress Evergreen Bough
Paper - Bristol cs, chalk cs
Size - A2
Accessories - coloured pencils, Artplorations stencil, Frantage Chunky White embossing powder, fine glitter, fun foam

Thursday, 13 July 2023

Sheep in Blue and Red

52 Christmas Card Throwdown wants pale blue and red, and My Time to Craft Christmas wants Christmas animals so I combined the two for this card.  I'm also entering it in Inkspirational's Christmas in July challenge.

It's a simple stamped and watercoloured image, trimmed with a stitched rectangle die, and finished off with some gold splatter and a gold border.

  Help yourself to our badge


Supplies:
Stamps - Inky Doodles
Ink - Versafine Clair Nocturne
Paper - watercolour paper, gold and cream cs
Size - A2
Accessories - watercolour paints, Lil Inker stitched rectangle die

Friday, 7 July 2023

Starry Layers and CAS Sympathy

The ABC Christmas Challenge is "L for Layers".  I mostly make CAS cards so it's hard for me to use lots of layers.  So here are some starry layers:

I've got two wreaths layered over each other - one cut from gold and one from silver glitter cs (the gold one barely shows so I added a couple of die cut gold stars to the top of the silver one). I put some holographic silver star dp down the left side over a layer of gold glitter cs. I added a gold embossed sentiment and some tiny gold and silver die cut stars to the right side.

And I have a twofer today - for Cardz 4 Guyz "CAS":

 
I masked off a rectangle on my focal panel and sponged it with a couple of brown Distress inks, then stamped some branches and wildflowers over the masked panel.  I removed the tape and added another wildflower and a sentiment in dark brown that came off the edge of the masked panel.


Cardz 4 Guyz


Supplies for card 1:
Stamps - Rubber Soul sentiment
Ink - ColorBox gold
Paper - white cs, gold and silver glitter cs, holographic silver star dp
Size - 4.75" square
Accessories - Lime Citron wreath die, unknown star wreath, tiny star dies, gold embossing powder

Supplies for card 2:
Stamps - unknown sentiment, SU Just Believe
Ink - Distress Antique Linen and Frayed Burlap, Memento Rich Cocoa
Paper - white cs
Size - A2


Wednesday, 5 July 2023

Greenery for Dec. 25

Shopping our Stash wants to see numbers for their new challenge and Sweet Stampin' wants no designer paper.  Here's my card:

I put the greenery stamp in my MISTI, inked up the leaves with various green Tombow markers, spritzed with water, and stamped on watercolour paper. Then stamped the sentiment with green Archival ink. I added clear rhinestone stickers for the mistletoe berries - I'd been thinking I'd have red holly berries and then realized all the berries were on the mistletoe stems and mistletoe berries are white, so no red berries this time. I used a matching dark green cs for the card base.

Grab Our Badge! 

Sweet Stampin' Challenge Blog


Supplies:
Stamps - Penny Black image, unknown sentiment
Ink - Archival Library Green
Paper - watercolour paper, dark green cs
Size - 6x4.25"
Accessories - green Tombow markers, Recollections Clear Rhinestone Stickers

Monday, 3 July 2023

The Sentiment Takes Centre Stage

Shopping our Stash challenge wants us to make the sentiment the focal point.  I have a sympathy sentiment that I just love so made a couple of cards using it.


I got out my blue acohol markers and did random horizontal scribbles with them, then stamped and heat embossed the sentiment on top.  For the first card, my vertical lines weren't as wide so I trimmed it smaller, bordered with blue, and added a strip of dry embossing down the right hand side.  For the second one, I trimmed it with my A2 layering dies and added a gold border and a few gold and white splatters with acrylic paints.

Grab Our Badge!


Supplies:
Stamps - Kay Foley sentiment
Ink - Versafine Clair Nocturne
Paper - white, blue, and gold cs
Size - A2
Accessories - blue alcohol markers, clear embossing powder, Spellbinders border embossing folder, gold and white acrylic paints

Saturday, 1 July 2023

Ornaments and a Watering Can

It's time for a new Peace on Earth challenge.  You can either be inspired by the mood board (see below) or enter an "anything Christmas" card.  I was somewhat inspired by the bottom left image - lots of red and a gift.  Here's my card:


I stamped the image on a very light kraft cs and coloured it with alcohol markers. I die cut the image into a square and added a sentiment.   My card base is the same light kraft cs as used for the image. I added a layer of polka dot textured paper to it and then popped the image up on fun foam, and finished off with putting Glossy Accents on the baubles.

Here's the mood board for this challenge should you be inspired by it:

There's lots of inspiration from the rest of the Peace on Earth Design Team so be sure to check it out!


Supplies:
Stamps - Power Poppy watering can, Simon Says Stamp sentiment
Ink - Memento Tuxedo Black
Paper - light kraft cs, Bazzill polka dot red paper
Size - 5.25" square
Accessories - alcohol markers, Glossy Accents, fun foam