A blog devoted to the cards I make in my tiny upstairs space. When my sister stays there, she calls it an "artist's garret". I'm not an artist, but am an enthusiastic cardmaker - hence the title "Cardmaker's Garret".
___________________________________________________________________________________________

Wednesday, 31 October 2018

Masking the Focal Image

The 52 Christmas Card Throwdown has a technique challenge this time:


I really like the look of having a text background around the focal image.  So I masked my focal image to achieve this.


I stamped the bird and holly in archival ink and watercoloured it.  I then stamped the bird and holly again on a post-it, roughly fussy cut it and masked the one on my card. 

I then inked up the text stamp in a pale grey ink and stamped over top.  I was pleased with the look when I removed the mask. 

I bordered in red, and popped it up on fun foam.

I meant to put Glossy Accents on the berries but forgot so will go back and do that.

Thanks for stopping by!


Supplies:
Stamps - SU Beautiful Season, Stampendous Christmas Background
Ink - Archival Jet Black, Memento London Fog
Paper - watercolour paper, PTI Vintage Cream, red cs
Size - A2
Accessories - Gansai Tambi watercolour paints, fun foam


Tuesday, 30 October 2018

Red Star with Snowflakes

I seem to be on a roll with using some of my older supplies these days.

I spotted the Just Us Girls photo inspiration challenge:


And immediately knew that I wanted to get out the old Stampin Up Christmas Star stamp.


I stamped it in Versamark and heat embossed in red, then fussy cut it, scored its lines, and folded it to get dimension.

I also smeared a scrap of cs with Versamark and heat embossed in the same red so that I would have a matching piece to use for my die cut sentiment.

I wanted to capture the large white snowflakes in the inspiration photo so dry embossed the background with an embossing folder depicting large snowflakes.

The star is glued down on its points and popped up with double and triple layers of foam tape in the centre, giving it lots of dimension.

It's also perfect for the Less is More challenge:


I really love all the challenges out there that are inspiring my Christmas cards right now!


Supplies:
Stamps - SU Christmas Star
Ink - Versamark
Paper - white cs
Size - A2
Accessories - Tim Holtz joy die, Ranger red embossing powder, Cuttlebug snowflake embossing folder, foam tape


Monday, 29 October 2018

"U" is for "Upon"

A card for the ABC Christmas Challenge where this month, we have to choose either "U is for Upon" or "V is for Very Quick".  I went with the first one and used an appropriate sentiment stamp that I really like.


I stamped and heat embossed the sentiment in dark red.  The star wreath is cut from gold glitter paper and just manages to fit around the sentiment.  I trimmed the panel with a stitched square die cut, bordered it with dark red shimmer cs, and popped it up on a cream card base.

Thanks for stopping by today!


Supplies:
Stamps - Kay Foley sentiment
Ink - Versafine Crimson Red
Paper - gold glitter, dark red shimmer, and cream cs
Size - 5.25" square
Accessories - Memory Box Starry Wreath, Lil Inker stitched square die, Ranger Polysparkle clear embossing powder, fun foam


Sunday, 28 October 2018

Black and White with Red


The latest challenge from 4 Crafty Chicks is Black / White and One Other Color.  I made a very CAS Christmas card, adding red to make the black and white more festive.

A simple stamped image, an embossed tree for the background, a black border, and a red card base - I think I will make a few of them for my card sale.

I'm also taking it over to Jingle Belles "While Shepherds Watched Their Flocks" challenge - they want animals and birds are animals, and besides, I have a whole flock of birds on my card!


Supplies:
Stamps - Viva Decor
Ink - Archival Jet Black
Paper - black, white, and dark red cs
Size - A2
Accessories - Tim Holtz tree embossing folder


Saturday, 27 October 2018

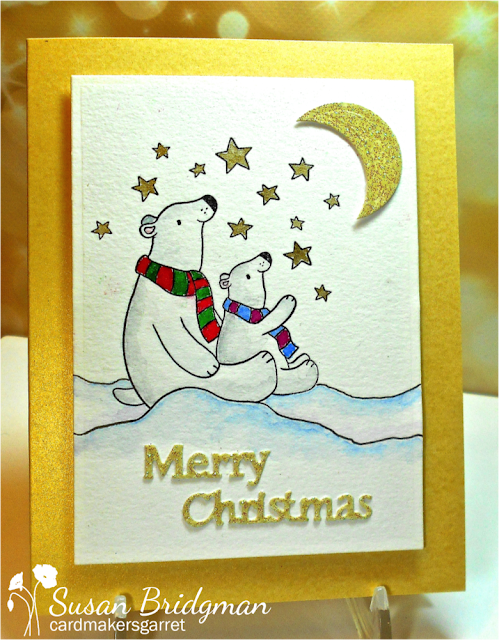
Bears in the Moonlight


AAA Cards' theme is "Moonlight".


I stamped and watercoloured the image, using my Gansai Tambi paints.  The set includes a metallic gold paint so I used that on the stars.  I decided that since the bears were already looking up at the stars, they might as well be looking at the moon as well so used a small circle die to cut the moon out of pale gold glitter cs.  I used the same glitter cs for the sentiment.  The card base is a similar shade of gold shimmer cs.

I drew extra hill lines with a fine pointed black marker around the bears as the baby bear looked like he was sitting in thin air in the stamp.  I added blue shading to the hills.

Here's a closer photo, hopefully showing more of the gold shine of the stars and the glitter cs of the moon:


I'm also adding it to The Merry Christmas Challenge "Anything Goes" and The Rudolph Days "Anything Goes" challenge.


Supplies:
Stamps -  Penny Black
Ink - Archival Jet Black
Paper - gold shimmer cs, scrap of gold glitter cs, watercolour paper
Size - A2
Accessories - Gansai Tambi watercolour paints, fine black marker, Spellbinders circle die, Tattered Lace sentiment die, fun foam


Friday, 26 October 2018

Keeping Warm in Winter


I made this card with three challenges in mind.

52 Christmas Card Throwdown:


12 Months of Christmas Optional Theme - Gear Up for Winter (winter clothes)

Jingle Belles - Animals 

I love this humourous Penny Black stamp as it makes me think of my young spaniel, Tessa, who loves to steal socks, gloves, winter hats.

I stamped on mixed media cs and watercoloured with my Gansai Tambi paints.  I used Stickles on the lines under the dog and snowman and on the snowflakes.  The sentiment is die cut from the same red as the card base - I thought "Happy Holidays" added to the humour as the snowman looks far from happy after losing his cosy hat and scarf.

Here's a close-up - hard to capture the sparkle of the Stickles:


I hope you're all getting busy with your Christmas cards!!


Supplies:
Stamps - Penny Black
Ink - Archival Jet Black
Paper - mixed media and red cs
Size - 6x4.25"
Accessories - Gansai Tambi watercolours, Stickles, Penny Black sentiment die


Thursday, 25 October 2018

Autumn Foliage

I feel like I'm surrounded by autumn leaves right now - making a card using them seemed totally appropriate after spending yesterday raking up lots of them (and there are more to fall off the trees so it's not over yet!).


I love the old SU set, French Foliage!  I inked up the leaves with different colours of my mini Distress inks, then spritzed lightly before stamping.  I did the sentiment in dark brown and used Antique Linen for the splats.  I popped it up on fun foam for some dimension.  And off it goes to the Addicted to CAS Foliage challenge.


Thanks for stopping by!


Supplies:
Stamps - SU French Foliage, unknown sentiment
Ink - various mini Distress inks
Paper - cream cs, watercolour paper
Size - A2
Accessories - fun foam


Wednesday, 24 October 2018

Sparkly Poinsettias


This is quite a large card for me.  It uses the full size Tim Holtz stencil in its entirety.  The size was inspired by a SCS challenge to make a tall card.  The poinsettias are for October's Flower Challenge "Add Sparkle".


I laid the stencil over some white cs and sponged with red and green Distress Oxide inks.  I washed the stencil and put it back in place and went over it with translucent embossing paste.  After removing the stencil, I immediately sprinkled glitter all over the wet paste.

When dry, I trimmed it, popped it up on fun foam, and added a heat embossed sentiment, die cut with a label die.  The label die needed a little something so I added red gemstones to the four points.

It's very hard to photograph glitter and sparkle, but I managed to capture it somewhat in this photo:


With Christmas coming up, I think I'll be using more of the glitter!


Supplies:
Stamps - Penny Black sentiment
Ink - Distress Oxide Candy Apple, Fired Brick, and Lucky Clover
Paper - white cs
Size - 7.75x4.5"
Accessories - Tim Holtz poinsettia stencil, Dreamweaver translucent embossing paste, Martha Stewart glitter, red gemstones


Wednesday, 17 October 2018

A Partridge in a Pear Tree


Reminder time for October's CAS Christmas challenge!  You only have until October 24th to join in!


I'm hosting this month and I chose "Bird" as the theme as I love Christmas cards with birds.  I went back to my cardmaking origins and used one of the first stamps I ever bought.  Way back when, I had been cutting up old commercial greeting cards I'd received and turning them into new cards and then I was at a craft fair and saw a booth selling rubber stamps and demonstrating heat embossing.  I was entranced and bought some stamps (including this one) and started using heat embossing on every card I made.

So for this card, I have heat embossed the image, but added newer more modern things like a die cut sentiment and a dry embossed background.  I love how we're always expanding our craft!  Here's a close up:


I wanted the green of the sentiment to match the image so a swiped ink over a scrap of cs and heat embossed with the same embossing powder as the image and then die cut the sentiment from that.

I was going to use a more Christmas-y embossing folder but realized that the leaves on this one almost perfectly matched the leaves in the image so went with it - it makes me think that the pear tree expands out of the image.

There's lots more inspiration for you over at CAS Christmas from the rest of the Design Team and this month's great Guest Designer, Sue (Sue's Card Craft)!


Supplies:
Stamps - Old Island Stamping Co. Partridge in a Pear Tree
Ink - ColorBox Evergreen
Paper - PTI Vintage Cream
Size - A2
Accessories - Cuttlebug embossing folder, Tattered Lace sentiment die, Stampendous Pearlustre Emerald embossing powder, fun foam


Tuesday, 16 October 2018

Deciduous Azaleas

Hard to believe we're at the midpoint of October already!  That means it's time for a reminder about CAS Watercolour!


Rather than an autumn themed card which would definitely suit the colours, I went with a spring flowering shrub - deciduous azalea - as I have a new die that makes me think of it.  Here's a photo of the type of deciduous azalea that inspired me:


My background is part of a stencil monoprint I made using various shades of brown Distress inks on mixed media paper.

I die cut the azalea circle and watercoloured it using Distress inks.  I die cut a second one and glued them together to give it more substance.  And then glued it on a circular piece of my stencil monoprint.

When I stamped "thank you" directly on the piece, it smudged, so I restamped it on a scrap of the stencil monoprint, and punched it out with an old SU label punch so that I could layer it over the smudged one.

I popped the circle up on fun foam.

Here's a close-up:


Please come and join us at CAS Watercolour before October 24th.  For more inspiration, check out the cards by the rest of the Design Team and our talented Guest Designer Brenda (Friends Craftin' with Friends).  And don't forget, we are turning two this month so we've got prizes to celebrate!


Supplies:
Stamps - Rosie's Roadshow sentiment
Ink - Distress Vintage Photo, Ripe Persimmon, Spiced Marmalade, Mowed Lawn (and various browns for the stencil monoprint)
Paper - mixed media and white cs, watercolour paper
Size - 4.75" square
Accessories - Prima stencil, Spellbinders circle die, Ali Express die, fun foam


Monday, 15 October 2018

Silver with Black Ice

I've been away on vacation so haven't posted anything for ages.  It's good to be home and back to crafting, gardening, walking my dog, seeing the horses and kids I volunteer with, etc.  I'll be very focused on Christmas cards in the next while as my fundraiser sale is coming up at the end of November.  So here's one for today:


The October colour challenge for 52 Christmas Card Throwdown is:


And the October CAS Mix Up challenge this month is:


Recently SCS posted a tutorial called Black Ice Technique.  It uses silver foil as a background so that seemed perfect for the 52CCT challenge.  And for CAS Mix Up, I have silver foil, black ice technique, stamping, and heat embossing.

I took piece of silver foil cs and lightly dragged my black Staz-on pad down it to create some streaks.  I then stamped the tree and sentiment with the black Staz-On and then heat set just to be sure I wouldn't smear it.  Then I lightly dragged a Versamark pad over it in the same direction as the black streaks, covered with clear embossing powder, and heat set it.

I trimmed the panel and popped it up on fun foam on a white cardbase.

It's very hard to photograph silver foil so here's another view of it:


Thanks for stopping by today!


Wednesday, 3 October 2018

Peaceful Bird

It's October already and I'm hoping you've all been building up your collection of Christmas cards ready for posting in a couple of months.  I'm hosting the October CAS Christmas challenge to spur you on to making another one:


I have a friend who always asks me to make several cards with a dove and a "peace on earth" sentiment for her to buy at my November fundraiser sale.  So I wanted to use this challenge to get one made for her:


I love spray starch, brushos, and cling wrap backgrounds, and I also love blue and white together (as does my friend who will buy the card!) so used all of that for my card.

I sprayed starch on mixed media cs, sprinkled blue brushos over it, and then placed cling wrap on top and scrunched it up.  I love the texture it gives to the background.

I trimmed the piece down, popped it up on fun foam and added a die cut dove to it, and a simple stamped sentiment beneath it.

Please come and join us with your clean and simple Christmas cards featuring birds.  The challenge is open until October 24th and there is wonderful inspiration from the rest of the Design Team and our fabulous Guest Designer, Sue (Sue's Card Craft) so head on over to CAS Christmas!


Supplies:
Stamps - A Muse sentiment
Ink - Vivid Inky Blue
Paper - white cs, mixed media cs
Size - A2
Accessories - Impression Obsession dove die, blue Brushos, spray starch, cling wrap, Spellbinders rectangle die, fun foam


Tuesday, 2 October 2018

Falling Oak Leaves

Hello everyone!  CAS Watercolour is turning two.  So come and join in the celebration - there are prizes this month!

 
Now on to the October CAS Watercolour Challenge!   This month, Bonnie is hosting and she's chosen a challenge that really fits autumn:


I went with falling oak leaves, using an old but much loved (by me) SU set, French Foliage.


I put the oak leaf stamp into my MISTI and used three scraps of watercolour paper since I was planning on fussy cutting.  I sprinkled green, brown, and orange Brushos randomly on the stamp, then spritzed with my mini mister (a regular mister gives way too much water for this type of stamp).  I then stamped.  I got a lovely mixture of the three colours, with some blending but not too much.  I wiped off the stamp and repeated the process on the other two scraps of watercolour paper.   I left them to air dry as I didn't want the heat tool blowing the wet Brushos around and causing more blending.  Then fussy cut them.

I stamped my sentiment in brown on a piece of cs and die cut it with a Sizzix label die.  As I was trying to decide on an arrangement of the leaves on it, I decided it looked too plain and boring so used the splatter and postmark stamps from the same set with a very pale ink - even with the pale ink, I stamped off each time on scrap paper so that I could get second generation stamping.

I then lightly sponged around the edge of the panel to give it some definition from the card base and popped it up on fun foam.  Last of all I attached the leaves by gluing down the stems and upper bits of the leaves and popping up the majority of the leaf with foam tape.

Here's a close-up of the lovely mixture of colours on the leaves:


Please come and join us with a clean and simple card, using some kind of watercolouring and the challenge colours.  There is lots more inspiration over at CAS Watercolour from the rest of the Design Team and our talented Guest Designer, Brenda (Friends Craftin' with Friends).  You have until October 24th to link up.  And just in case you're wondering, it does not have to have an autumn theme - I'm sure our participants in the southern hemisphere aren't feeling at all autumnal!


Supplies:
Stamps - SU French Foliage and sentiment
Ink - Versafine Vintage Sepia, Adirondack Lake Mist
Paper - watercolour paper, white cs
Size - 6"x4.25"
Accessories - orange, brown, and green Brushos, fun foam