A blog devoted to the cards I make in my tiny upstairs space. When my sister stays there, she calls it an "artist's garret". I'm not an artist, but am an enthusiastic cardmaker - hence the title "Cardmaker's Garret".
___________________________________________________________________________________________

Tuesday, 29 November 2022

Poinsettias, Stencilled and Die Cut

A couple of cards today using a poinsettia stencil and a poinsettia die cut (and a poinsettia sentiment).

I created the background with a poinsettia stencil and various red and pink Distress inks, then stamped and heat embossed the sentiment in copper. I set it behind a pierced die cut frame and added two small die cut poinsettias and copper stickles in the centres of the die cut and stencilled poinsettias for embellishment.

The second one uses stencilling inside stencilling.  See this tutorial on SCS for instructions.

I used red and pink Distress inks again through the same poinsettia stencil, dried the ink with my heat tool, then put the poinsettia stencil back in place and laid a star stencil over top of it and used an orange ink through the star stencil.

Trimmed the panel, bordered with a gold panel, then a white panel, and added it to a gold card base.  I added the "joy" die on top of its accompanying shadow die and embellished the centres of the poinsettias with tiny gold stick-on dots. 

Challenges:

Tic Tac Toe - I used the top horizontal row.

Stencil Fun Challenge

LOVE to have you SHARE our BADGE 

Rudolph Days November Challenge

52 Christmas Card Throwdown - use a stencil


Supplies for card 1:
Stamps - Penny Black sentiment
Ink - ColorBox copper, various Distress red and pink inks
Paper - red and white cs
Size - A2
Accessories - Dee's Distinctively small poinsettia dies, copper embossing powder, poinsettia stencil, copper stickles, pierced frame die

Supplies for card 2:
Ink - various Distress red, pink, and orange inks
Paper - gold and white cs
Size - A2
Accessories - poinsettia and star stencils, joy shadow die set, small gold stick-on embellishments

Thursday, 24 November 2022

Hedgehogs and Stars

I would love to use up some of decorative / patterned paper I've had for many years but my card making style has changed a lot so it's no longer the go-to supply it used to be.  I'm challenging myself to try and use it a few times a month even if it's only to border a focal image like I did in today's card:


I stamped and watercoloured the image, using metallic gold paint for the stars.  I bordered with a decorative paper covered in metallic gold stars and embellished with Fun Flock on the brims and pom poms of the hats.

It's being linked up at:

Penny Black Saturday Challenge - "Anything Goes - Optional Embellishment" - I'm not sure if Fun Flock counts as an embellishment but it's great to use on Santa hats.


Supplies:
Stamps - Penny Black
Ink - Versafine Clair Nocturne
Paper - watercolour paper, off white cs, Bazzill dp
Size - A2
Accessories - watercolour paints, Fun Flock

Monday, 21 November 2022

Stars and a Tree, and a Dog and a Present

A couple of simple Christmas cards today.


I inked up the tree stamp with green Distress mini inkpads, spritzed lightly with water, and stamped on watercolour paper. When dry, I stamped the stars and sentiment. I popped that panel up on fun foam on gold shimmer cs and added that to a red shimmer card base.


Stamped and watercoloured, matted with red cs, and popped up on fun foam on the card base.

Challenge for card 1:

Christmas Kickstart "Trees, Trees, Trees"

Challenges for card 2:

Addicted to CAS "Present"


Do-All Kreatives "Animals and Christmas"

Our badge to take with you 


Supplies for card 1:
Stamps - Art Impressions tree, PTI sentiment, SU star cluster
Ink - Distress Iced Spruce and Evergreen Bough, Delicata Golden Glitz, Memento Rhubarb Stalk
Paper - watercolour paper, gold and red shimmer cs
Size - A2
Accessories - fun foam

Supplies for card 2:
Stamps - SSS sentiment, ? dog
Ink - Versafine Clair Nocturne
Paper - watercolour paper, red and cream cs
Size - 4.75" square
Accessories - watercolour paints, fun foam

Saturday, 19 November 2022

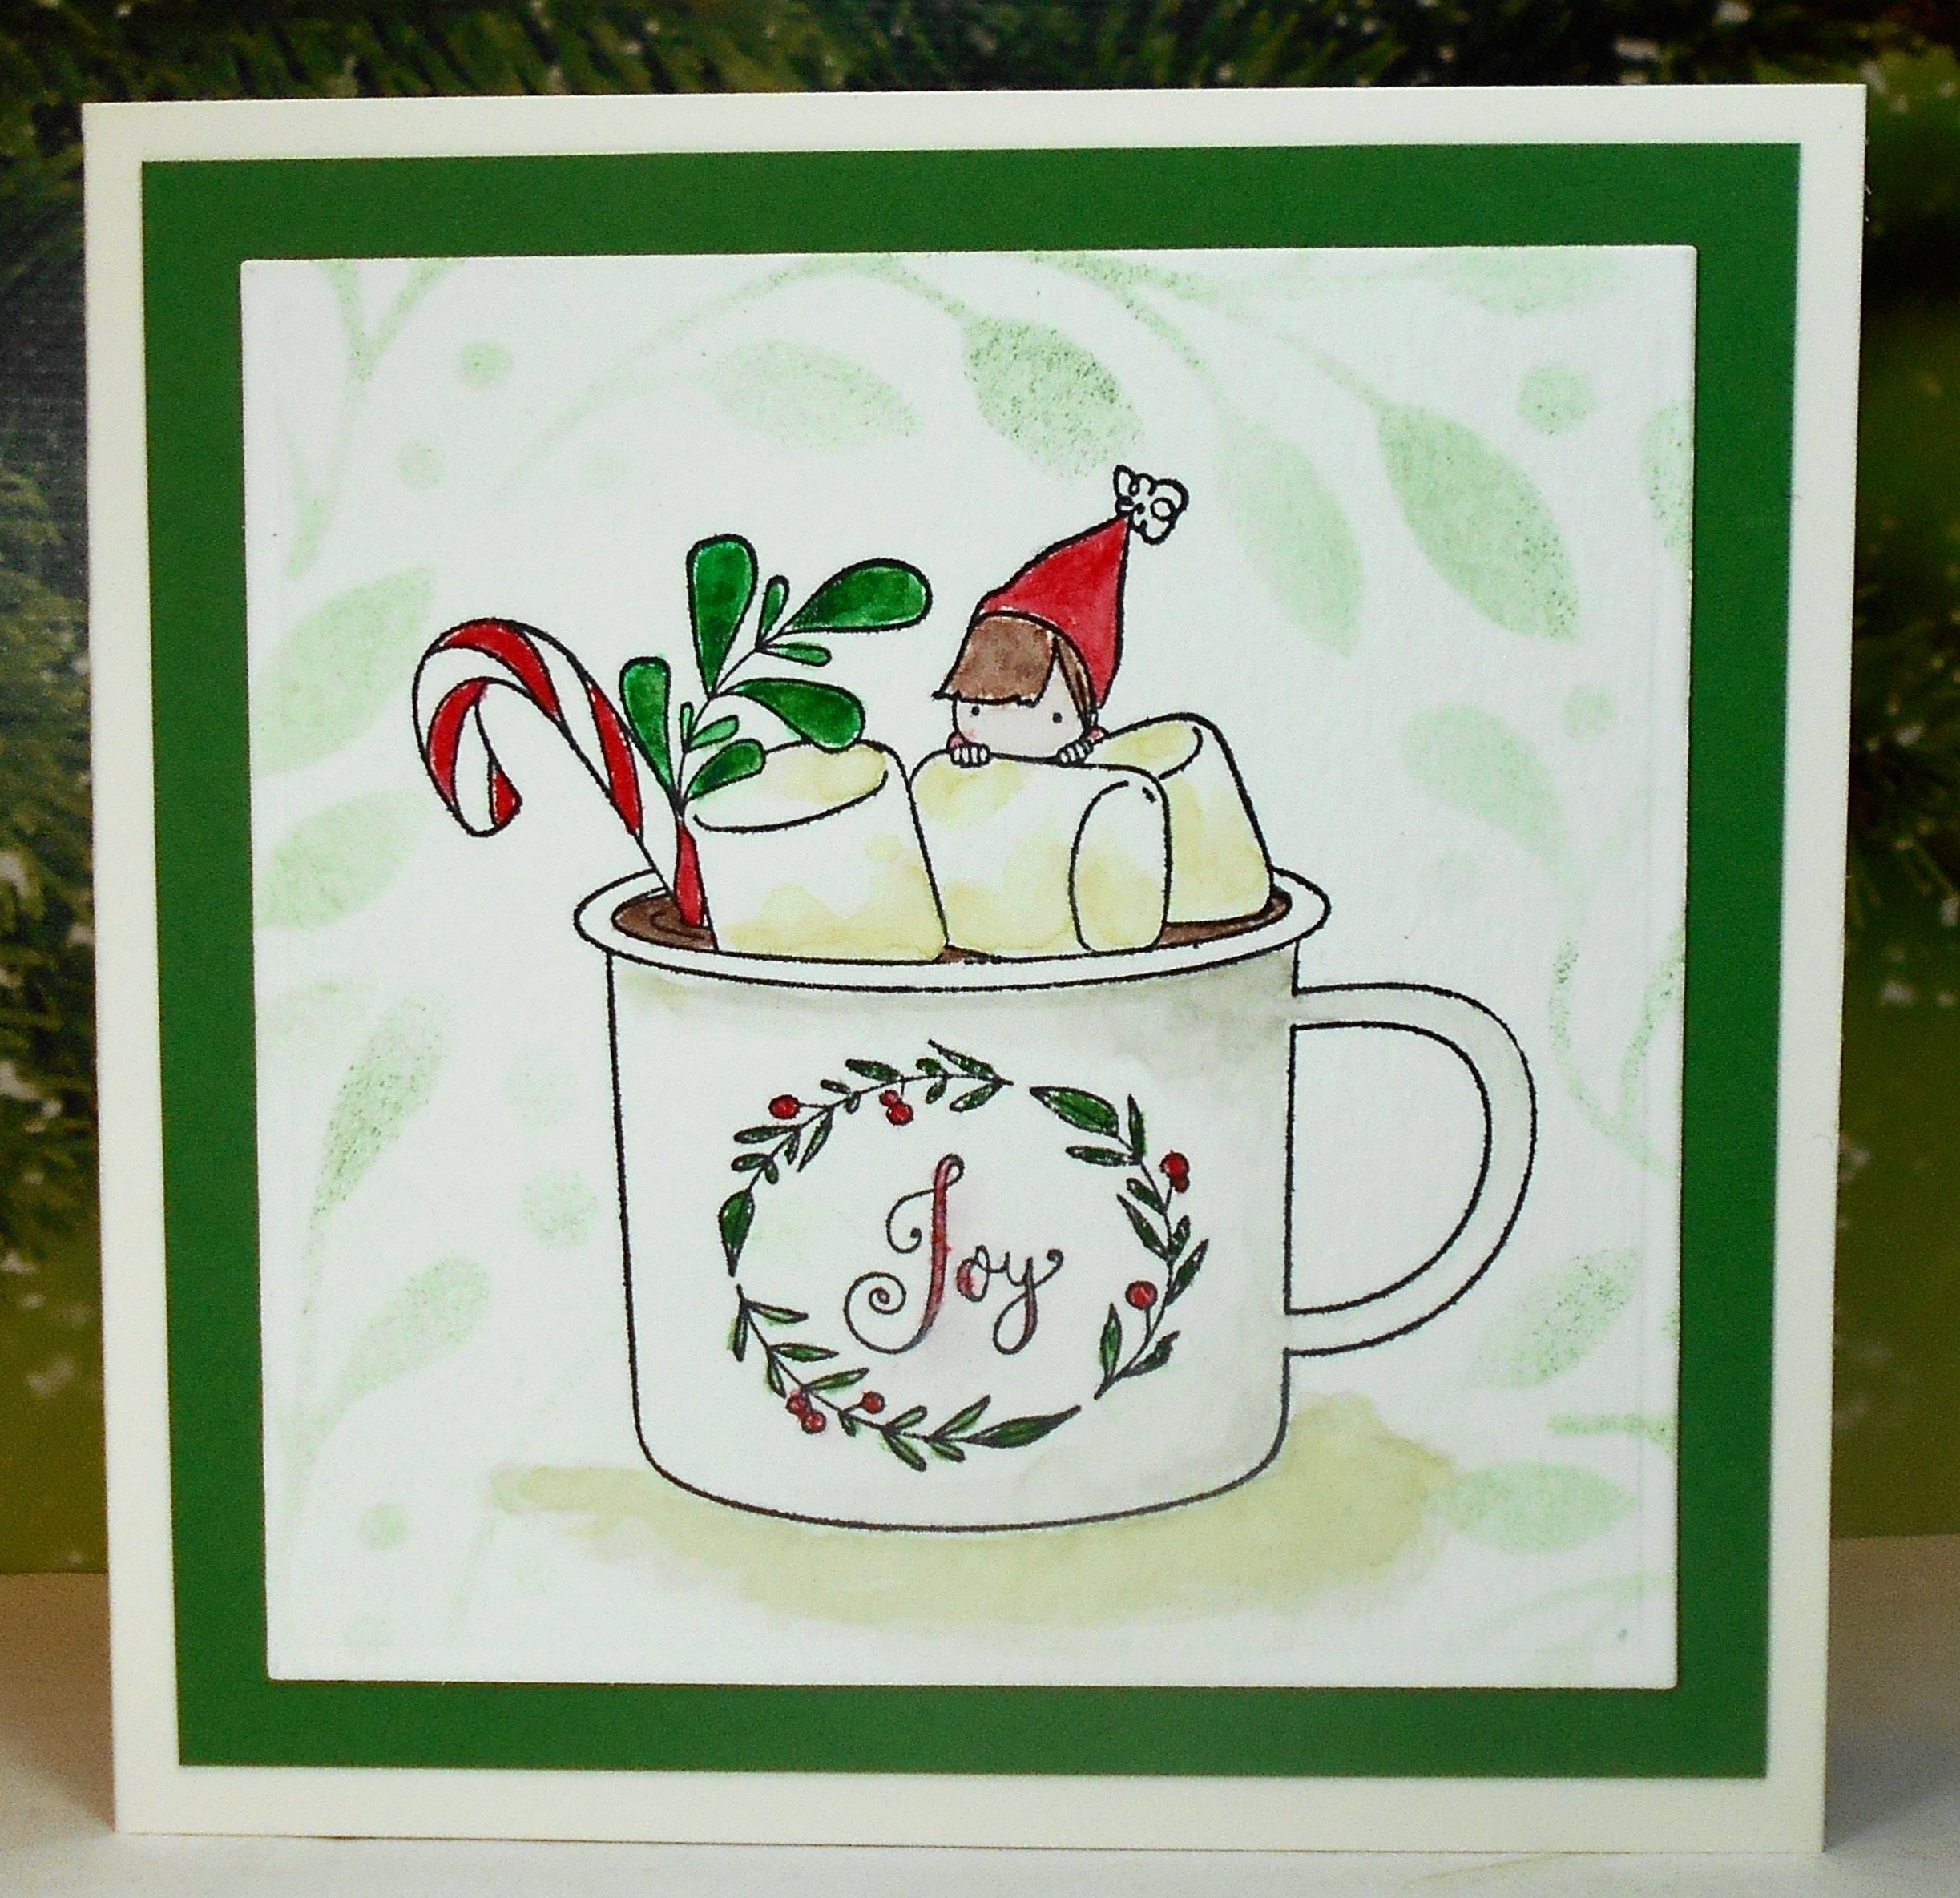
Cocoa, Candy Cane, and Marshmallows

For the new Peace on Earth challenge, I was inspired by the images of cups of cocoa with candy canes and marshmallows.


I stamped and watercoloured the image, and then laid a stencil over it and lightly stencilled the leaves in green Distress Oxide ink.  I bordered it with a similar green cs and used off white cs for the card base.

Here's the Peace on Earth mood board in case you want to be inspired by it, but if not, feel free to enter an "anything Christmas" card.  And be sure to check out the other cards by the rest of the Design Team.

I'm also adding it to the Stencil Fun Challenge.

LOVE to have you SHARE our BADGE

And to Double D "Hot Beverages"


Supplies:
Stamps - Stamping Bella
Ink - Versafine Onyx Black, Distress Oxide Rustic Wilderness
Paper - watercolour paper, green and off-white cs
Size - 4.75" square
Accessories - watercolour paints, leaf stencil

Wednesday, 16 November 2022

Trees with Some Doves

Christmas Kickstart Challenge wants "Trees, Trees, Trees".  I pulled out a stamp I've never inked up before.  It has lots of trees!

I pulled out a bit of smooshed background from my UFO box, put it in my Misti and stamped the trees and sentiment on it.  I added some doves die cut from silver glitter cs, used the same silver glitter cs as a border, and popped the panel up on fun foam.

Christmas Kickstart Challenge 


NBUS Challenge - I've never used the trees stamp before.

Grab our badge to display on your blog.


Supplies:
Stamps - Paper Roses trees, unknown sentiment
Ink - Versafine Clair Nocturne
Paper - silver glitter cs, white cs, piece of smooshed background
Size - A2
Accessories - Memory Box dove dies, fun foam

Tuesday, 15 November 2022

Deer and Music Collage

This post is a follow up from yesterday's post where I used the background created by the first step of Jennifer McGuire's distress monoprint technique.  See this video for detailed instructions.  My first card below uses the second step.  It created another lovely background but unfortunately I shouldn't have stamped on top of it - it would have been far better to put a die cut on top.


Here's yesterday's card to show the results of step one where you heat emboss a background over the sponged Distress inks:


For step two (which creates a second background), I spritzed the first background with water, laid another piece of mixed media cs on top of it and ran it through the die cutting machine just with the pressure plates.  This transfers the colour and the pattern of the background stamp.  If you look closely at today's card, you can see the pattern.  The colours come out paler but still make a very nice background.  Because the second background doesn't have any actual heat embossing on it, I assumed I'd be able to stamp on it with no problem but I think what happened was that the lines of the embossing pressed into the second background and therefore the ink from my stamping doesn't fill in those lines.  So the reindeer and the tree have a design on them!  

I decided to use it anyway.  I trimmed it down, bordered it with white glitter cs, and added a blue gemstone to the centre of the snowflake.

I prefer the results I get from this stamp when when I stamp it on plain cs so I did a second card for this post to show you how nice the stamp is:

 
It makes for a great quick card - simple stamping, addition of a sentiment, bordered in red glitter cs, and embellished with a single red gemstone in the centre of the snowflake.
 
I'm linking it up with:
 
 
NBUS Challenge - Never Before Used Stuff (I'd never used the reindeer / music collage stamp)


Supplies:
Stamps - Woodware Musical Deer, PTI sentiment
Ink - Versafine Clair Nocturne - both cards, various blue Distress inks - card 1
Paper - white and red glitter cs, white cs, mixed media cs
Size - A2
Accessories - gems, clear embossing powder