A blog devoted to the cards I make in my tiny upstairs space. When my sister stays there, she calls it an "artist's garret". I'm not an artist, but am an enthusiastic cardmaker - hence the title "Cardmaker's Garret".
___________________________________________________________________________________________

Monday, 5 March 2018

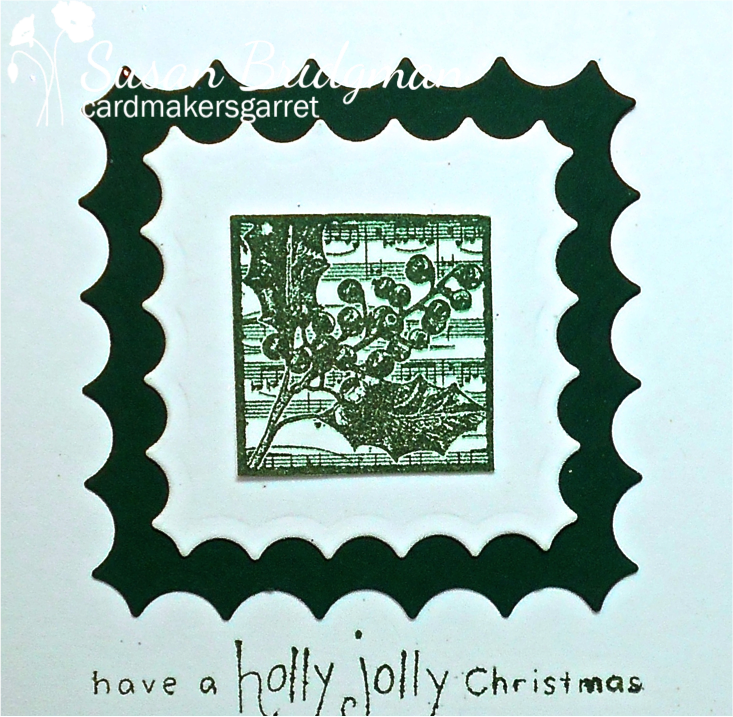
Holly Inchie

The Jingle Belles Christmas Card Challenge is "Have Yourself a Merry LITTLE Christmas" - with the emphasis on the "little" - we're to use an inchie or a twinchie.  I have a wonderful set of Christmas inchie stamps by Darkroom Door.

I picked the holly one so that I can also link it up with the inaugural CAS Christmas Card Challenge (the great new challenge by Loll Thompson and Bonnie Klass).


Here's my holly inchie card:


I stamped the inchie in green ink, trimmed it, mounted it on first a white inverted scallop die cut piece, and then a green one.  I like the way the inverted scallops look like holly.

I mounted all of that on a panel with the sentiment and a dry embossed holly border and popped it up on fun foam.

Here's a close-up of the lovely detail in the inchie:


The Jingle Belles challenge ends in a day or two, but the CAS Christmas Card Challenge runs until March 24th.


Supplies:
Stamps - Darkroom Door holly inchie, A Muse sentiment
Ink - Versafine Olympia Green
Paper - white and dark green cs
Size - A2
Accessories - Nesties square inverted scallops dies, Cuttlebug holly border embossing folder, fun foam


Saturday, 3 March 2018

Gilded Holly

I am so excited to be on the Design Team for Loll Thompson's and Bonnie Klass's new challenge - CAS Christmas Card Challenge!  The rules are pretty simple - keep it CAS and follow the theme.

Loll is hosting the inaugural challenge:


I did something a bit different from the usual green holly and red berries.


I love the Penny Black Snowflake and Holly collage stamp.  I sponged (using cut and dry foam) some Cosmic Shimmer glue on my stamp, getting a good even coating, then stamped on my cardstock. I immediately cleaned the stamp with some soapy water and a toothbrush. By the time I'd done that, the glue was tacky enough on the cs for the gilding flakes - added them, pushed them into the glue with my fingers, brushed off the excess, and then burnished with a piece of Tim Holtz Rub-It Scrub-It.

I added a small vertical sentiment, stamped in copper, then matted with copper shimmer cs.

The colours in the gilding flakes are wonderful.  Here's a close-up:


I love the look of gilding flakes and must remember to use them more often.

Please come and join us with a holly card over at CAS Christmas Card Challenge.  You have until March 24th to link up a card.  There is some great inspiration from the rest of our Design Team!


Supplies:
Stamps - Penny Black Snowflake and Holly, Rosie's Roadshow sentiment
Ink - ColorBox Copper
Paper - white cs, copper shimmer cs
Size - A2
Accessories - Cosmic Shimmer Mulled Wine gilding flakes, Cosmic Shimmer glue


Friday, 2 March 2018

Winter into Spring in the Garden

Over at CAS Watercolour we have a theme for March that is dear to my heart.


Gardening is one of my main activities - I have a vegetable garden, perennial borders, and lots of plants in pots on my patio.  The earliest sign of spring in my garden is the snowdrop.  They had started blooming a couple of weeks ago and then last week, we had an unexpected (and unusual for Vancouver) snowstorm and my snowdrops ended up under 8" of snow!  So I was inspired to make this card as it truly is representative of my garden right now!


I stamped the image with Archival ink, watercoloured with my Gansai Tambi paints, added a sentiment (to me, the snowdrops truly do say "Hello Spring"), trimmed the panel, popped it up on fun foam, and added a bit of glitter to the snowy areas.

Here's a close-up:


Please come and join us at CAS Watercolour for our theme of "Garden".  Your card should feature something more than just a flower - the emphasis is on "garden" not just "flowers".  Take a look at the inspiration from our Design Team and this month's Guest Designer, Nonni (Nonni's Handmade Cards), at CAS Watercolour.  You have until March 24th to link up your card.  Looking forward to seeing your card!


Supplies:
Stamps - Penny Black Pretty Perch, Rosie's Roadshow sentiment
Ink - Archival Jet Black
Paper - watercolour paper, white cs
Size - A2
Accessories - Gansai Tambi watercolour paints, Quickie Glue Pen, glitter, fun foam


Thursday, 1 March 2018

Stars on Acetate


This is both a happy and sad post for me - I'm happy to be hosting the CAS Mix Up challenge for March, but I'm sad because it is my last month on the Design Team for CAS Mix Up.  But I'm leaving it for a very good reason - Loll and Bonnie are starting a new challenge "CAS Christmas Card Challenge" and, since I love making Christmas cards above all other cards, I asked to switch over to that Design Team.  More about it at the end of this post.

On to CAS Mix Up.  This month we are asking for:


One of my favourite ways to use acetate is with alcohol inks and tissue paper.


On a piece of aluminum foil, I dripped a couple of shades of blue alcohol inks and a white mixative.  I spritzed with alcohol ink blending solution.

I smooshed a piece of acetate into it until happy with the result (re-spritzing with the AI blending solution if the AIs got too dry).  I let the acetate air dry.

I scrunched up a piece of white tissue paper and glued it to the acetate (the side with the AIs).

When the glue was dry, I stamped and heat embossed the branch and stars with Versamark and gold embossing powder on the non-AI/tissue side.  I did the same for my vertical sentiment on a white cardbase, and then taped the acetate panel next to it.

A word of advice about heat embossing on acetate - it will not work on the acetate packaging that comes with our stamps and dies.  You need a good quality acetate - I use Grafix .007 acetate used here - available at Amazon.com.

Here are a couple of close-ups of the heat embossing:


If you head over to CAS Mix Up, we have lots of tutorials listed to give you ideas on various ways to incorporate acetate.  And great inspiration from the rest of the Design Team and our Guest Designer, Cathy (Cathy's Card Spot).

And then please join us with a clean and simple card featuring acetate, stamping, and at least one other option from the list on CAS Mix Up.  My options are alcohol ink, tissue paper, and heat embossing.  You will especially want to join in this month as it is our 2nd birthday and to celebrate, we are giving away two prizes.


Prizes
$25 gift certificate for Simon Says Stamp for challenge Winner
&
$25 gift certificate for Simon Says Stamp for one random draw of all entries
(must follow the challenge rules to be eligible for prizes)


And be sure to come back on March 3rd for the inaugural challenge of the CAS Christmas Card Challenge!  We have a great Design Team to inspire you and the monthly winners will get the chance to be a Guest Designer.


Thanks for reading this rather lengthy post!!


Supplies:
Stamps - Memory Box Stars at Night, Impression Obsession sentiment
Ink - Versamark
Paper - white cs, white tissue paper
Size - 7.25x5"
Accessories - acetate, various blue alcohol inks, white alcohol ink mixative, alcohol ink blending solution, gold embossing powder


Wednesday, 28 February 2018

Christmas Challenges

If you've been following my blog for awhile, you probably know that I love Christmas card challenges!  Here are two cards for a couple of current challenges.

First up for Merry Monday and 52 Christmas Card Throwdown:


I made this card:


I placed the Penny Black Sparkler Poinsettia stamp in my MISTI and used red and green mini Distress inks to ink it up.  Once stamped, I used a variety of Distress inks in reds and greens to watercolour the poinsettia. 

When dry, I roughly masked the flower and splattered with a couple of the greens.

I added a gold heat embossed sentiment, three gold gemstones in the centre, and a gold shimmer cs mat.


And then my second card is for the AAA Card Challenge:


I chose a peace theme for this challenge and made this card:

 
The dove is die cut in the same gold as the card base, and the sentiment is stamped in gold. The white panel is die cut with a stitched rectangle and popped up on fun foam.


I hope you'll join me tomorrow as it's the start of the new CAS Mix Up challenge and I'll be hosting it.  And it's CAS Mix Up's 2nd birthday so we'll be offering some prizes!


Supplies:
Card 1:
Stamps - Penny Black Sparkler Poinsettia, Paper Smooches sentiment
Ink - various red and green Distress inks, ColorBox gold
Paper - watercolour paper, gold shimmer cs, PTI Vintage Cream cs
Size - A2
Accessories - gold gemstones, gold embossing powder

Card 2:
Stamps - SU sentiment
Ink - Delicata Golden Glitz
Paper - gold shimmer and white cs
Size - A2
Accessories - Penny Black dove die, Lil Inkers stitched rectangle die, fun foam


Tuesday, 27 February 2018

Grand Canyon Bird

Carrying on with Christmas cards, I've got a beautiful bird inspired by the colours of the Grand Canyon.


SCS's CAS Challenge this week is called "The Grand Canyon".  I've only visited the Grand Canyon once and I was astounded by the colours - so different to all the greens of the Pacific Northwest where I live.

I wanted to refresh my memory of the exact colours so found this image on line and used the colours in it to colour my bird:


I coloured the bird with pencils and gamsol, then framed it and added it to an embossed background so that I could enter it in the Less is More challenge "Dry Embossing".

They stressed that the dry embossing should ideally only cover a small portion of the card around the focal point.

I'm so happy to be getting Christmas cards made!  And right now it's easy as we've had snow so I feel quite inspired!


Supplies:
Stamps - Serendipity bird, Penny Black sentiment
Ink - Memento Rich Cocoa
Paper - white cs
Size - A2
Accessories - coloured pencils, Gamsol, Crafts Too embossing folder, MFT pierced frame die