A blog devoted to the cards I make in my tiny upstairs space. When my sister stays there, she calls it an "artist's garret". I'm not an artist, but am an enthusiastic cardmaker - hence the title "Cardmaker's Garret".
___________________________________________________________________________________________

Sunday, 29 December 2024

Holly, a Winter Cabin, and Ornaments

Sparkles Christmas Challenge wants us to feature a Christmas carol or song.  I chose "Deck the Halls".  Rudolph Days and 12 Months of Christmas are both "anything Christmas".


I put the holly stamp in my Misti and inked it up with various Oxide inks and Memento Dew Drop inks, stamping and reinking until I was happy.  I added some lightly stamped text and postmarks to the background.  Then sponged around the edges.  I finished with a Tim Holtz clippings sticker with the line from Deck the Halls, and added Wink of Stella to the berries.

Christmas Crafts All Year Round wants bows, gifts, or decorations.  I went with decorations.

I created a dry embossed background that creates a three-sided border of ornaments, leaving space in the middle for my die cut ornaments to hang.  I did one each out of red, green, and silver mirror card, and hung them with silver thread.

Stamping Sensations wants to see "Winter".

I love this winter scene.  I stamped it in black and heat embossed with Iridescent Ice embossing powder (it's very sparkly in real life).  I bordered it with black shimmer cs.

Please take a copy of our badge 

Grab our badge!  Please grab our logo


Supplies for card 1:
Stamps - Penny Black holly, unknown Christmas script stamp
Ink - various Oxide and Memento Dew Drops, Adirondack Lake Mist
Paper - white cs
Size - A2
Accessories - Wink of Stella, Tim Holtz clippings sticker

Supplies for card 2:
Stamps - SSS sentiment
Ink - Delicata Copper Glitz
Paper - white cs; red, green, and silver mirror cs
Size - A2
Accessories - Crafts Too embossing folder, Spellbinders ornament die, silver thread

Supplies for card 3:
Stamps - Crafty Individuals winter cabin, Penny Black sentiment
Ink - Versafine Onyx Black
Paper - chalk cs, black shimmer cs
Size - A2
Accessories - SU Iridescent Ice embossing powder


Saturday, 28 December 2024

Ombre Sky, Trees, and Stars

This month the Group of Seven Cardmakers is showcasing Ombre as our Design Element.  For my first example, I used ink blending to create a blue sky.  This is the method I've typically used when I think of creating an ombre effect.


I blended various blue Distress inks from light up to dark on coated cs (easier to get a nice blend than on regular cs).  When dry, I stamped the image in archival ink, then coloured the berries with a white gel pen.  I did a little bit of splattering with a white Posca paint pen to give the effect of a few lazy snowflakes drifting down on a cold winter day.  I added a sentiment die cut with an oval die.

On our Group of Seven website we have a couple of videos showing different ways of doing ombre.  I followed the technique in this video for my next card.


I die cut the trees from three shades of green cs and layered them over a dry embossed background, using bits of foam tape to raise each layer off the previous layer.  Then I added a black die cut Santa and sleigh and a black border.

I made one more using the stacked die cuts ombre method.


For this one I used three shades of copper glitter cs and die cut stars out of it and stacked them on top of each other, and then on top of a star embossed background.  In hindsight, I wish I'd cut each word out of a different shade of the cs - but too late!

I'm adding this third card to My Time to Craft's "New" challenge (one of the options is a New Year's card).

Please check out the cards by the rest of the Group of Seven Design TeamWe'd love to have you link up cards using an ombre technique.  It's not a challenge but we all love seeing your ideas or interpretations.  

  My Time To Craft!


Supplies for card 1:
Stamps - Penny Black
Ink - Archival Jet Black, Distress Tattered Glass, Broken China, Stormy Sky, Salty Ocean
Paper - white cs, coated cs
Size - A2
Accessories - white gel pen, white Posca paint pen

Supplies for card 2:
Stamps - SSS sentiment
Ink - Archival Jet Black
Paper - white, black, 3 shades of green cs
Size - A2
Accessories - CuttleBug snowfall embossing folder, Frantic Stamper Santa / sleigh die, unknown trees die, foam tape

Supplies for card 3:
Paper - white cs, 3 shades of copper glitter cs
Size - 4.75" square
Accessories - star embossing folder, Spellbinders star dies, Tattered Lace sentiment die

Wednesday, 25 December 2024

Scandinavian Christmas and Simple Snowman

52 Christmas Card Throwdown wants us to pick one of their theme challenges from the past year.  I chose May's Scandinavian / Hygge challenge for this card.


I just love making cards with this Tim Holtz Nordic Winter die - probably because I love doing jigsaw puzzles!  

I cut the die out of navy cs first, trimmed it a bit, and glued it down on my card base. Then I cut it several more times out of various colours of shimmer cs. I then had a lot of fun gluing in different coloured pieces into the navy panel. I bordered it with a white die cut frame.  I like to leave it without a sentiment on the front as it's such a busy focal panel.

So after that very busy card, I needed to do something very plain.  For Addicted to CAS (Code Word: BRRR!), Simply CAS (Anything Goes), and My Time to Craft (Something Snow-related).


Stamped in a metallic blue ink and heat embossed, then trimmed and popped up on fun foam on a metallic blue shimmer card card base.


  Please Help Us Spread the Word ...  My Time To Craft!
Merry Christmas to all my followers!


Supplies for card 1:
Paper - white and navy cs; copper, white, brown, blue, light green, and red shimmer cs
Size - A2
Accessories - Tim Holtz Nordic Winter die, Impression Obsession frame die

Supplies for card 2:
Stamps - Local King Rubber Stamp Co.
Ink - Encore Metallic Blue
Paper - white cs, blue shimmer cs
Size - A2
Accessories - clear embossing powder, fun foam
 

Thursday, 19 December 2024

Masculine Christmas and Poinsettias Embossed and Stamped

Cardz 4 Guyz wants a masculine Christmas card. 


I started with the background - used a circle die to cut a round mask for the moon and a hilly slopes die for the snowy ground (both cut out of masking paper). Then splattered masking fluid on the sky for snow. Then sponged with two shades of blue Distress ink, leaving it lighter around the moon. Once the ink was dry, I removed the paper masks and rubbed off the masking fluid. I die cut the buildings and trees out of black cs and added them to the background. Finished off by using white gouache on a fine paint brush to add snow to the roofs.

My second card today is for Can You Handle the Pressure (dry embossing with an optional theme of poinsettias - I went with this theme).

I stamped and watercoloured the candle / poinsettia image, trimmed it with a square die, popped it up on fun foam on a square of off white cs that I'd run through a floral embossing folder that could well be poinsettias.

Cardz 4 Guyz Logo  Please Grab Our Badge


Supplies for card 1:
Stamps - Make an Impression sentiment
Ink - Versafine Onyx Black, Distress Chipped Sapphire and Dusty Concord
Paper - white and black cs
Size - 4.75" square
Accessories - masking fluid, masking paper, SSS Winter Village dies, circle die, hilly slope die, Dr Phil Martin's bleed-proof white gouache

Supplies for card 2:
Stamps - Stamplorations
Ink - Versafine Onyx Black
Paper - watercolour paper, off white cs
Size - 4.75" square
Accessories - watercolour paints, square dies, Sizzix embossing folder

Saturday, 14 December 2024

Window, Window Box, and Greenery

Peace on Earth's new mood board reminded me that I haven't used my window dies for ages.  So using the bottom left image (see mood board at end of post) as my inspiration, I created this card:


I used a dp for the background that reminds me of the rustic wood in the mood board image.  I die cut the window and window box twice and glued them together for more dimension.  Using Distress Frayed Burlap, I randomly sponged them to give them a rustic look.  I stamped the sentiment on the bottom of the window box with the same ink.  I die cut lots of bits of greenery and glued them under the window box.  And backed the window with a bit of dp.

We'd love to have you join us at Peace on Earth, either with a card inspired by the mood board or an "anything Christmas" card.  There's lots more inspiration by our wonderful design team over on the challenge blog.


Supplies:
Stamps - SU sentiment
Ink - Distress Frayed Burlap
Paper - cream cs, scraps of green and cream cs, patterned papers
Size - A2
Accessories - Memory Box window and window box dies, Sizzix greenery dies

Friday, 13 December 2024

Christmas and Winter

My Time to Craft Christmas challenge's theme is Lights (candles, lamps, etc.).


A simple stamped and watercoloured image, bordered in red, popped up on fun foam on a panel embossed with stars.

Shopping our Stash wants to see "Winter not Christmas", My Time to Craft wants "Something Snow Related", and Stamping Sensations  wants "Winter".

I stamped a large snowflake background stamp in Versamark and then went over it with a couple of shades of Pan Pastels (a product I rarely use).  I trimmed the panel, popped it up on fun foam on a cream card base, and stamped and heat embossed a sentiment on a strip of the same cream card stock and popped it up on the panel.

My Time To Craft Christmas!
Grab Our Badge!  My Time To Craft!Stamping Sensations


Supplies for card 1:
Stamps - unknown candle stamp, Stampendous sentiment
Ink - Versafine Onyx Black
Paper - watercolour paper, off white cs
Size - 4.75" square
Accessories - watercolour paints, square dies, Sizzix stars embossing folder, fun foam

Supplies for card 2:
Stamps - unknown snowflake background stamp
Ink - Versamark, Versafine Onyx Black
Paper - cream cs, mixed media cs
Size - A2
Accessories - Pan Pastels, embossing powder, fun foam, rectangle dies


Thursday, 5 December 2024

Watercoloured Winter, Peaceful Ornament, and Grungy Birthday

Two more Christmas cards and one birthday card today!  

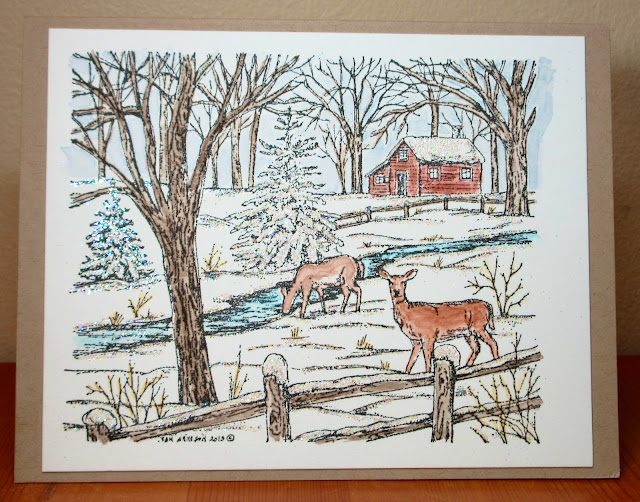
First, for ABC Christmas Challenge "W is for Watercolouring", Stamping Sensations "Winter", and Four Seasons "Winter" (the top left image on their mood board inspired me to pull out an old stamp that has a rustic wooden cabin as part of it).


The image is stamped, watercoloured, and added to a kraft cardbase.  Then I went over the snow lines, the snow on the fences, trees, and roof with a quickie glue pen and added glitter.  I put the sentiment inside as I didn't want to cover up any of the lovely image.

Next up for Addicted to CAS "Ornament":


A friend and I regularly go for tea at a little French bakery / coffee shop and the pastries are served on gold cardboard holders that I carefully clean and recycle to make large ornaments for cards. In this case, I dripped a couple of shades of red alcohol inks on the round part of the pastry holder and spritzed with rubbing alcohol to get it to run and cover the round part. When dry, I added a dove die cut from white glitter cs and a branch cut from green shimmer cs. I embellished with three little stick-on gold glitter circles and some matching gold glitter strips for the ornament's hanger. I let it all take centre stage on a plain white card base with just an added stamped and heat embossed sentiment. 

A male friend has a birthday coming up so I had my usual struggle to make a masculine card.  I'm linking it up with Sweet Stampin' "It's our Birthday" - they are celebrating the 15th year of their challenge.  And also Seize the Birthday "Masculine".

I found the stencilled piece in my unused background box - it was very intensely orange and I didn't like it, so I watered down some gesso and painted over it to lighten it up.  I stamped the Tim Holtz image in black and edged around it with Tea Dye Distress ink.  Then cut a rectangle out of the stencilled piece and layered it over the stamped image as a frame.  Added a birthday sentiment to the top of the frame.

  Please grab our logo 

  Sweet Stampin' Challenge Blog


Supplies for card 1:
Stamps - Northwoods
Ink - Versafine Onyx Black
Paper - watercolour paper, kraft cs
Size - A2
Accessories - watercolour paints, quickie glue pen, glitter

Supplies for card 2:
Stamps - A Muse sentiment
Ink - ColorBox Gold, red alcohol inks
Paper - white cs, white glitter cs, green shimmer cs
Size - 4.75" square
Accessories - Impression Obsession dove die, recycled pastry holder, gold embossing powder, Anita's Glitterations gold strips and dots

Supplies for card 3:
Stamps - Tim Holtz man, unknown sentiment
Ink - various orange Distress inks, Distress Tea Dye, Versfine Onyx Black
Paper - white cs
Size - A2
Accessories - Spellbinders rectangle die, clock stencil, gesso

Monday, 2 December 2024

Candy Canes, Candles, and Reindeer

I have this card for Jingle Belles:


They wanted a card in inspired by their banner:


I saw the image (on the left of the banner) of the candy canes tied up with Christmas greenery and gold ribbon, and immediately thought of a stamp I have.  And I kept lots of red in the card as the banner has a lot of red.

The image is stamped and coloured with coloured pencils, including a metallic gold pencil for the ribbon.  I trimmed it with a label die and went around the edge with a fine black marker to give the edge some definition.  I popped it up on fun foam on a border cut out of candy cane dp, using the next size up of the same label die.  I used a red cs for the base that has a tiny bit of gold shimmer in it (hard to see in the photo).

Next up:

Festive Friday is celebrating a Traditional Christmas - my card has quite a few of the elements from its list - I've got red, green, gold, candles, and a Christmas sentiment.  And the Colorful Options Challenge wants red, green, and gold so I'm linking it up there too.

Stamped and watercoloured, a bit of gold splatter added, a gold shimmer border and a gold sentiment cut out with a banner die. 

  Please Share Our Badge

And one more card today:

Shopping our Stash wants a masculine card and The Paper Players want a deer - the two go together really well.

Grab Our Badge! 

My card was inspired by a video I saw online a while back (that unfortunately I can't find again). The moon and the snowbanks are done with masking and sponging. Then the reindeer and the holly branches are stamped on top. I bordered with black cs, went along the snow lines with clear Stickles, painted the berries with a red Posca paint pen, splattered with a white Posca paint pen, and added a Tim Holtz sentiment sticker.  

I made a second version, adding a bit of text stamping to take the place of the sentiment sticker on the first version:


Supplies for card 1:
Stamps - either Serendipity or Creative Images candy canes, tiny joy sentiment
Ink - Versafine Onyx Black
Paper - red shimmer and white cs, candy cane dp
Size - A2
Accessories - coloured pencils, metallic gold pencil, Spellbinders label dies, black marker, fun foam

Supplies for card 2:
Stamps - unknown
Ink - Versafine Onyx Black
Paper - mixed media, off white and gold shimmer cs
Size - A2
Accessories - watercolour paints, small banner die

Supplies for card 3:
Stamps - Lavinia
Ink - various Distress inks, Versafine Clair Nocturne
Paper - white cs
Size - 5.25" square
Accessories - red and white Posca paint pens, clear Stickles, TH sentiment sticker,